
Your roof rack is making noise because of loose parts, improper assembly, wind, or worn-out components. Simple adjustments, tightening bolts, adding padding, or lubricating moving parts can usually silence it.
That annoying rattle, whistle, or hum from your car’s roof rack can really disrupt a quiet drive. It’s a common issue, and you’re not alone if you’re wondering, “Why is my roof rack making noise?” The good news is that most roof rack noises are surprisingly easy to fix, often with just a few basic tools and a bit of your time. You don’t need to be a car expert to solve this! We’ll walk you through the most common culprits and show you exactly how to get your roof rack quiet again. Let’s find out what’s causing that sound and how to fix it, so you can enjoy peaceful journeys once more.
Common Causes of Roof Rack Noise
Roof rack noises usually fall into a few main categories. Understanding these will help you pinpoint the problem quickly. Think of it like a doctor listening to your symptoms before offering a diagnosis.
1. Loose Components: The Wiggly Bits
This is by far the most common reason for a noisy roof rack. Over time, vibrations from driving can cause nuts, bolts, and clamps to loosen. When parts aren’t snug, they can move against each other or the vehicle’s roof, creating all sorts of sounds. It might be a squeak as rubber flexes against metal, a rattle as metal parts tap together, or even a clunk if something is really loose.
2. Improper Installation: Not Quite Right
If your roof rack wasn’t installed perfectly, or if you’ve recently reattached it, it might be making noise. This can happen if the bars aren’t aligned correctly, if the feet aren’t sitting flush on the roof, or if the towers aren’t tightened evenly. Even a slight misalignment can create stress points that lead to noise.
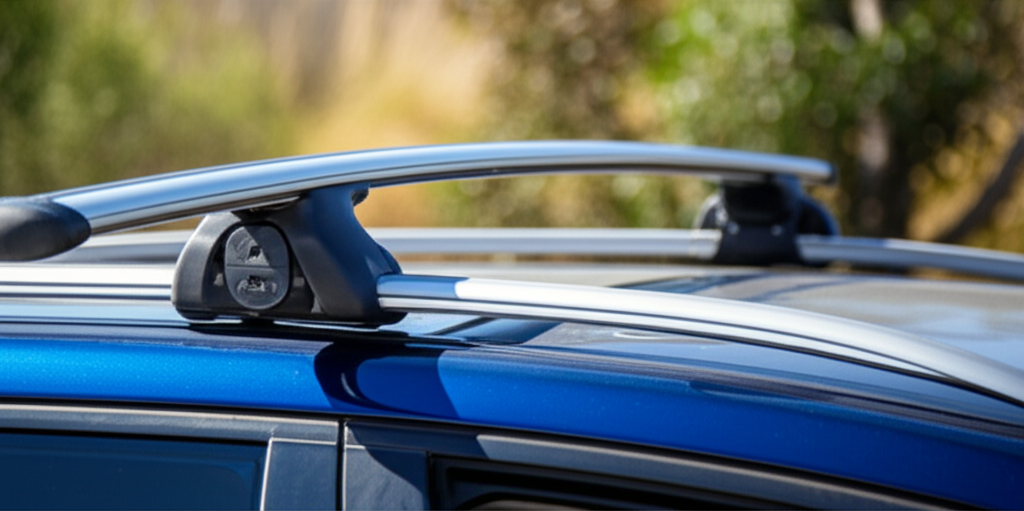
3. Wind Noise: The Aerodynamic Annoyance
Your roof rack is essentially an extra shape sitting on top of your car, and wind loves to interact with shapes. As air flows over and around the rack, it can create whistling, howling, or buffeting sounds. This is especially common at highway speeds and can change depending on the wind direction and speed. The design of the rack and how it fits your specific car model plays a big role here.
4. Worn-Out Parts: Time Takes Its Toll
Like any part of your car, roof rack components can wear down. Rubber seals can become brittle and crack, plastic pieces can degrade, and even metal parts can develop wear over time. If your rack is older or has seen a lot of use, this might be the cause of the noise.
5. Cargo Issues: What You’re Carrying Matters
Sometimes, the noise isn’t from the rack itself but from the gear you’ve loaded onto it. If your bikes, kayaks, or cargo box aren’t secured properly, they can shift and vibrate against the rack or each other, creating noise. Even empty crossbars can sometimes cause noise if they’re not designed with aerodynamics in mind.
Troubleshooting Steps: Finding the Source of the Sound
Before you can fix the noise, you need to find out exactly where it’s coming from. This detective work is crucial. A good way to start is by listening carefully while driving – try to notice when the noise occurs (e.g., only on bumpy roads, only at high speeds, when turning).
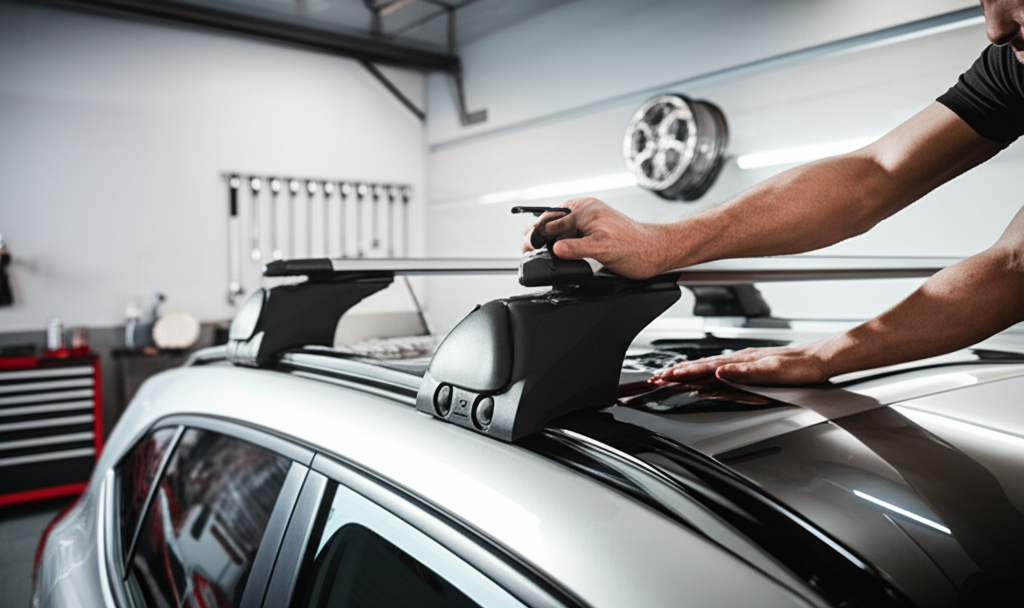
Step 1: The Visual Inspection
Park your car in a well-lit area. Walk around the vehicle and give your roof rack a good once-over. Look for anything that seems obviously loose, damaged, or out of place. Shake each part of the rack gently to see if anything moves more than it should.
- Check all bolts and screws. Are they tight?
- Inspect the rubber pads or feet. Are they worn, cracked, or missing?
- Look at the crossbars. Are they securely attached to the towers?
- Examine the towers (the parts that attach to your car’s roof). Do they seem firmly seated?
- If you have accessories attached (like bike mounts), check them too.
Step 2: The “Shake Test”
With the car parked and engine off, carefully try to wiggle each section of your roof rack. Push, pull, and twist gently. If you hear or feel significant movement in a specific area, that’s likely your problem spot. This is especially useful for identifying loose clamps or connections.
Step 3: Listen While Driving (Safely!)
If the noise is intermittent, you might need to do some listening while you drive. If possible, have a passenger help you by listening and pointing out the direction of the sound. Safety First: Never try to adjust your roof rack while driving. All adjustments should be made when the vehicle is safely parked.
- Drive on different types of roads (smooth, bumpy).
- Test at various speeds, especially highway speeds.
- Listen during turns and braking.
Step 4: Remove and Reinstall (If Necessary)
If you suspect the installation is the issue or you can’t find a loose part, sometimes the best approach is to remove the entire rack and then reinstall it carefully, following the manufacturer’s instructions meticulously. This ensures everything is seated correctly and tightened to the proper specifications.
Essential Fixes: Quieting the Noise
Once you’ve identified the source, here are the most effective ways to silence that noisy roof rack.
Fix 1: Tighten Everything Up!
This is the go-to solution for most loose-part noises. Grab your tools and get to work.
- Locate the Fasteners: Most roof racks have bolts, screws, or knobs to secure the crossbars to the towers, and the towers to the vehicle.
- Use the Right Tools: Your rack likely came with a specific Allen wrench or tool. If not, you might need a socket set or wrench. Check your rack’s manual for recommended tools.
- Tighten Firmly, But Don’t Overtighten: Snug is good. Overtightening can strip threads or damage the rack or your car. If it’s a bolt, tighten it until it feels secure and doesn’t move. For knobs, tighten them until they resist further turning.
- Work Systematically: Tighten bolts for one bar, then move to the next. Ensure even pressure.
Fix 2: Pad, Wrap, or Insulate
This is excellent for wind noise and squeaks caused by friction.
- Padding for Bars: If your crossbars are bare metal or plastic, wind can whistle around them. You can buy specific aerodynamic fairings for the front bar, or even wrap the bars with thick foam padding or rubber tape. Some people use pool noodles cut lengthwise!
- Padding Between Parts: If you hear squeaks where two parts of the rack meet, or where the rack meets your car, add a layer of thin rubber or foam. This could be weather stripping, old inner tubes, or even a bit of felt.
- Check Rubber Feet/Pads: If the rubber pads on the towers are worn, they might not be creating a good seal. Sometimes, adding a bit of dielectric grease (a silicone-based lubricant that doesn’t conduct electricity and is safe for rubber and plastic) can stop squeaking.
Fix 3: Adjust for Aerodynamics
Sometimes, a slight adjustment can reduce wind noise.
- Bar Position: If your crossbars are adjustable, try moving them slightly closer together or further apart. Sometimes a small change can break up the sound waves.
- Accessory Placement: If you have accessories mounted, ensure they aren’t catching the wind in a way that creates noise. Sometimes rotating or repositioning them can help.
- Fairings: A wind fairing is a curved piece of plastic or metal installed on the front crossbar. It’s designed to deflect wind up and over the rack, significantly reducing wind noise and drag. Organizations like NHTSA often have information on vehicle aerodynamics and safety related to external attachments.
Fix 4: Lubricate and Protect
For squeaks and creaks, a little lubrication can go a long way. However, be mindful of what you use.
- Silicone Spray: A silicone-based lubricant spray is usually safe for rubber and plastic and can stop squeaking where parts rub together. Apply it sparingly to the contact points.
- Dielectric Grease: As mentioned earlier, this is great for rubber seals and anywhere you have rubber meeting metal or plastic.
- Avoid Petroleum-Based Lubricants: Products like WD-40 (in its standard petroleum-based form) can degrade rubber and plastic over time, making the problem worse in the long run.
Fix 5: Secure Your Load
If the noise only happens when you have gear on your rack, the problem is likely with the cargo itself.
- Check Straps and Bungees: Ensure all straps are tight and not flapping in the wind. Bungee cords can be particularly noisy if they’re loose.
- Tighten Mounts: Make sure bike racks, kayak carriers, or cargo boxes are securely locked and tightened to the crossbars according to their specific instructions.
- Prevent Shifting: Use wheel chocks or foam blocks to prevent items from shifting and rattling if necessary.
- Consider a Cargo Box: For bulky items, a well-secured cargo box is often quieter than loose gear.
Tools You Might Need
Most roof rack fixes are simple and don’t require a full mechanic’s toolkit. Here’s what you’ll likely want to have on hand:
- Manufacturer’s Tool: Usually an Allen wrench (hex key) or specific socket that came with your rack.
- Screwdriver Set: Phillips head and flathead screwdrivers.
- Socket Wrench Set: For bolts.
- Adjustable Wrench: Handy for various bolt sizes.
- Measuring Tape: For checking bar spacing if needed.
- Flashlight or Headlamp: To see into dark corners.
- Rag or Shop Towels: For wiping surfaces or excess lubricant.
- Safety Gloves: To protect your hands and improve grip.
- Step Ladder or Stool: To safely reach the roof of your vehicle.
When to Consider Professional Help
While most roof rack noises are DIY fixes, there are times when it’s best to seek expert advice:
- Damage to Your Vehicle’s Roof: If you notice dents, scratches, or paint damage where the rack attaches, consult a body shop.
- Damaged Rack Components: If a part of the rack itself is cracked, bent, or otherwise structurally compromised, it’s safer to replace it.
- Uncertainty About Installation: If you’ve tried everything and the noise persists, or if you’re uncomfortable with the installation process, a professional installer or auto shop can help.
- Specific Vehicle Fitment Issues: Some vehicles have unique roof designs (like panoramic sunroofs or specific mounting points) that require specialized knowledge. For instance, ensuring proper contact with your car’s roof is vital to prevent leaks or damage, especially with systems that attach directly to the roof or in door frames – consult resources on vehicle body integrity.
Preventative Maintenance: Keeping the Peace
The best way to deal with roof rack noise is to prevent it from happening in the first place. A little regular attention goes a long way.
- Regular Tightening: Every few months, or before a long trip, give all the fasteners a quick check and tighten any that have loosened.
- Cleanliness: Keep the rack and the mounting points on your car clean. Dirt and debris can cause friction that leads to squeaks.
- Inspect Rubber Parts: Periodically check the rubber feet and seals for wear, cracks, or hardening. Replace them if they look compromised.
- Proper Storage: If you remove your rack for long periods, store it properly indoors to protect it from the elements.
Understanding Roof Rack Types and Noise Potential
Different types of roof racks can be more prone to certain noises. Knowing what you have can help you troubleshoot.
Factory-Installed Racks
These are integrated into your car’s design. While often sturdy, they can still develop loose parts or wind noise if the seals wear out or mounting points loosen over time.
Aftermarket Crossbars (Universal or Vehicle-Specific)
These attach to your car’s existing roof rails, fixed points, or door frames.
- Clip/Clamp Systems: These attach in the door jambs. If the rubber pads are worn or the clips aren’t perfectly seated, they can cause creaks or wind noise.
- Rail-Grip Systems: These clamp onto raised or flush factory roof rails. Loose clamps or worn rubber on the clamping feet are common noise sources.
Full Roof Racks (e.g., for Jeeps or SUVs)
These are more robust systems. While often more stable, the sheer number of components means more potential points for looseness or wind interaction.
Rack Accessories (Bike Mounts, Cargo Boxes)
These add-ons can introduce their own noises, either from rattling against the crossbars or from wind. Ensure they are properly secured and aligned.
A Quick Guide to Roof Rack Noises and Their Likely Fixes
Here’s a handy table to help you quickly identify the sound and its probable cause:
| Type of Noise | Likely Cause | Primary Fixes |
|---|---|---|
| Rattling/Clunking | Loose bolts, screws, or clamps; shifting cargo. | Tighten all fasteners; secure cargo properly. |
| Whistling/Howling | Wind passing over crossbars or gaps in the rack. | Install wind fairing; add bar padding; check aerodynamic alignment. |
| Squeaking/Creaking | Friction between rubber and metal/plastic; loose connections. | Lubricate contact points (silicone spray, dielectric grease); tighten loose parts; add padding. |
| Buzzing/Humming | Vibration, often at specific speeds, usually wind-related. | Tighten all parts; consider aerodynamic accessories or bar modifications. |
| Thumping/Popping | Loose towers, poor fit on roof, or significant flex. | Reinstall rack following instructions meticulously; ensure proper fit; tighten tower hardware. |
Remember, consistently identifying the specific sound and when it occurs is key to solving the problem. What might sound like a rattle to one person could be a whistle to another, so precise description helps!
Frequently Asked Questions (FAQ)
Q1: How often should I check my roof rack for noise?
It’s a good idea to give your roof rack a quick visual check and tug test every few months, and definitely before any long road trips. If you notice any new noises, investigate them right away.
Q2: Can a noisy roof rack damage my car?
Yes, if parts are very loose, they can potentially rub against your car’s paint, causing scratches. In extreme cases of severe looseness, there’s a risk of components coming detached, which is a serious safety hazard. So, it’s important to fix the noise!
Q3: My roof rack whistles at highway speeds. What’s the best fix?
This is classic wind noise. The most effective fixes are usually installing a wind fairing on the front crossbar, or adding some form of aerodynamic padding or cover to the crossbars themselves.
Q4: I can’t find any loose parts, but my rack still makes noise. What else could it be?
It could be micro-vibrations causing friction between parts that aren’t loose enough to wiggle but still rub. Try adding thin padding (like rubber sheeting or high-density foam tape) between any contact points. If it’s wind noise, aerodynamic modifications are your next step.
Q5: Is it safe to drive with a noisy roof rack?
While a slight whistle might just be annoying, a significant rattle, clunk, or thumping sound could indicate a safety issue. It’s best to fix any loud or concerning noises promptly to ensure the rack remains securely attached to your vehicle.
Q6: Do different roof rack brands make different noises?
Yes, design, materials, and
Recent Posts
Jumper Cables With Bag: Heavy Duty Booster Cables for Easy Storage
There’s nothing more frustrating than turning the key in your car and hearing silence. A dead battery can ruin your day in an instant.You might feel stuck, stressed, and unsure what to do next....
Strong Ram 1500 Heavy Duty License Plate Frame for Ultimate Durability
There’s nothing more frustrating than struggling with a flimsy license plate frame that bends, rusts, or just doesn’t fit right on your Ram 1500. You want something strong and reliable that...