
We promise a clear path. When the check engine light flags an issue, it often ties back to the oxygen sensor. We will explain what that means today and walk you step by step to a confident fix.
The oxygen sensor watches exhaust and helps the computer keep the air-fuel mixture on target. If the mix runs too rich or too lean, the engine light can come on and fuel use can rise.
We cover symptoms, common causes, safe driving tips, code reading, simple tests, repair options, and typical costs. We’ll also show how to protect the emissions system long term.
Small faults — like wiring or a worn part — often trigger the warning. Catching problems early can save fuel and prevent bigger repairs. We set clear expectations about tools and skill so you can choose DIY or professional help.
Key Takeaways
- Learn quick checks and when to stop driving.
- Follow a step-by-step diagnostic path from codes to wiring.
- Simple tests can confirm a bad oxygen sensor fast.
- Early fixes save fuel and protect emissions components.
- We present clear DIY vs. pro choices and expected costs.
Understanding the O2 Sensor’s Role in the Air-Fuel Mixture and Emissions System
A tiny probe in the exhaust sends live voltage signals that guide fuel delivery every second. Those pulses tell the computer whether combustion is rich or lean. The module then makes small trims to keep the air-fuel mixture correct and emissions low.
How the ECM uses feedback to adjust fuel
The probe’s voltage swings between low and high as oxygen levels change. Rapid switching shows the system is healthy and the ECM adjust air-fuel quickly. In closed-loop operation the computer will continuously adjust to improve drivability and economy.
Upstream vs. downstream readings in exhaust
Upstream sensors sit before the catalytic converter and directly drive fuel trims. Downstream units sit after the converter and monitor its performance. If downstream readings mirror upstream, the catalytic converter may be weak.
- Heater circuits warm the probe fast so closed-loop starts sooner and emissions drop.
- Flat voltage often points to a bad probe or wiring fault.
- Age, contamination, or exhaust leaks can skew oxygen exhaust gases readings and make the computer chase the wrong mix.
Common Symptoms of a Bad or Failing Oxygen Sensor
You’ll usually spot a bad sensor in daily driving — unusual idle, rough runs, or poor mileage. These signs tell us when the air-fuel mix is drifting and the computer is chasing the problem.
Engine light on, rough idling, and engine misfires
Daily clues include an illuminated warning, rough idling at stops, and occasional engine misfires. Heat can make a failing unit act normal one moment and quit the next.
Poor fuel efficiency and run rich or lean conditions
A bad oxygen sensor often makes the system run rich. That wastes gas and can leave black soot at the tailpipe. You may notice poor fuel efficiency and sluggish throttle response.
Failed emissions or smog check and sulfur smell
Unburned fuel can reach the catalytic converter and cause a rotten-egg odor. Ignore it and the converter may overheat or fail, leading to a failed smog check.
“Early diagnosis saves fuel and protects the catalytic converter.”
- Note when symptoms happen — cold start, hot restart, or climbs.
- Some issues mimic ignition or fuel faults; tests confirm the cause engine.
Why Is My Check Engine Light for O2 Sensor
A single trouble code can mean a slow-reacting probe, a broken heater circuit, or a wiring issue. We start by splitting likely causes into two groups: performance problems and circuit faults.
Typical trouble codes pointing to sensor or circuit
Performance codes suggest slow or biased readings. That maps to rough idle, surging, or poor fuel economy — classic sensor symptoms.
Circuit codes point at wiring, heater power, or a bad ground. These usually show delayed closed-loop and poor cold drivability.
- Exhaust or vacuum leaks can mimic a faulty oxygen sensor and set the same trouble codes.
- Freeze-frame data — RPM, load, temp — helps narrow cause quickly.
- Intermittent codes often mean loose connectors or heat-related opens in the harness.
Don’t clear codes until you record them. A photo or note keeps crucial clues. We’ll next use voltage traces, continuity checks, and heater resistance to separate a tired part from a wiring fault — a plan you can follow with basic tools.
Top Causes: Faulty Sensor, Wiring Damage, or Exhaust Leaks
Wiring damage, heat, and contamination are the top culprits when the system shows odd readings. We’ll outline common faults and quick checks you can do.
Sensor aging, contamination, and heater element failure
Probes wear out after about 80–120k miles. Oil, coolant, or silicone can coat the tip and slow reactions.
Heater element failure delays closed-loop and hurts economy on cold starts. That often sets a failing oxygen sensor code.
Electrical connector corrosion and harness damage
Inspect the electrical connector for green corrosion, bent pins, or water intrusion. A loose tab or broken clip can make the signal jump or drop.
Routing matters—melted insulation near the manifold or chafed loom at brackets can short circuits. Replace or protect damaged sections to stop repeat faults.
Oxygen exhaust leaks upstream of the sensor
An exhaust leak before the probe pulls in fresh air. That dilutes exhaust gases and oxygen exhaust gases, which tricks the computer into adding fuel.
Look for black soot at gaskets and flanges. Small leaks often show visually when you inspect the joint.
Quick comparison
| Cause | Typical sign | Fast check |
|---|---|---|
| Bad oxygen sensor | Slow switching, poor mpg | Live voltage trace or replace after testing |
| Wiring / electrical connector | Intermittent codes, no heater power | Continuity, pin corrosion, harness heat damage |
| Exhaust leak | Rich trims, soot at flange | Smoke test or visual gasket check |
Takeaway: Similar codes can mean a faulty oxygen sensor or a bad oxygen signal from wiring or leaks. We recommend testing before part swaps. Address root causes—heat shields, new connectors, fixed leaks—to prevent repeat failures.
Safety and Driveability: Can You Drive With a Faulty Oxygen Sensor?
We level with you—you can often drive a short distance with a faulty oxygen sensor, but risks rise the longer you wait.
Short-term vs. long-term: Running a stuck-rich command will waste fuel and can wash oil from cylinder walls. That extra fuel can overheat and damage catalytic converter substrates over time.
When to stop driving. Smelling raw fuel, seeing a glowing converter, persistent engine misfires, or severe rough idling means park and diagnose now. Those signs warn of imminent damage.
A failed heater delays closed-loop on cold starts. Expect poor fuel efficiency and stumbling until the unit warms. Downstream faults rarely strand you. Upstream faults that run rich can foul plugs and cut power.
- Avoid heavy throttle, towing, or hard accelerations.
- Fix before a state inspection so you don’t waste fees if the check engine light blocks a pass.
- Short trips in cold weather plus a weak heater extend rich operation—plan a prompt repair.
Action plan: Do a quick scan and visual connector check today. A loose plug often saves the catalytic converter tomorrow. With this guide ahead, we help you decide whether to drive briefly or schedule an immediate fix.
Step-by-Step: Pulling Trouble Codes to Isolate Sensor Issues

Begin with a scanner to pull trouble codes and snapshot the car’s condition at the fault moment. Save stored and pending codes before clearing. That gives a reliable before-and-after record.
Using an OBD-II scanner to read and interpret codes
Read codes, then capture freeze-frame data. Note coolant temp, RPM, load, and vehicle speed. Those values tell us the exact conditions when the warning set.
Freeze-frame data and live O2 voltage or fuel trim clues
Watch live data next. An upstream oxygen sensor should toggle rapidly at idle when sensor functioning properly. Slow waves or flat lines point to a tired probe or wiring issue.
“Record before you erase — a saved snapshot shortens diagnosis and avoids wasted parts.”
| Data | What to watch | Quick action |
|---|---|---|
| Trouble codes | Stored vs. pending | Save, then clear |
| Fuel trims | Short/long term | Positive = lean; negative = run rich |
| Bank compare | Bank 1 vs 2 | One bank off = local issue |
Tip: Check readiness monitors before smog tests and plan a short test drive. If trims normalize and codes stay away, the repair path is likely correct.
Visual Inspection: Wiring, Electrical Connectors, and Exhaust
Start with a careful visual pass under the car — many faults hide in plain sight along the harness and exhaust.
We put the vehicle on stable stands and follow the harness from the probe to the main loom. Look for melted insulation near the manifold and sharp edges that chafe wires.
Unplug the electrical connector and inspect pins. Clean corrosion, dry moisture, and repair spread terminals before condemning parts.
Checking for frayed wires, loose plugs, and exhaust soot
Gently tug wires near strain reliefs. Hidden breaks open when the engine moves and cause intermittent dropouts.
Follow the exhaust path. Black soot at flanges, cracked welds, or a missing gasket point to oxygen exhaust leaks. These marks are common signs bad oxygen gives false readings.
Verify the probe is tight and not cross-threaded. A loose unit can draw fresh air and skew exhaust gases results.
| Item | What to look for | Quick fix |
|---|---|---|
| Wiring | Chafed insulation, melted spots | Repair or reroute, add heat wrap |
| Connector | Corrosion, bent pins, moisture | Clean, replace clip or plug |
| Exhaust joints | Soot, cracked welds, missing gasket | Replace gasket, weld crack, tighten flange |
“Many parts blamed as bad oxygen turn out to be loose plugs or leaks.”
We photograph suspect areas and only move to electrical or probe testing after basics look right. Simple fixes stop most symptoms bad oxygen and avoid needless parts swaps.
Testing the Sensor: Voltage, Heater Circuits, and Sensor Functioning Properly
Start diagnostics by watching the probe signal under simple throttle changes. This gives a quick pass/fail on whether the upstream unit reacts fast enough.
Upstream switching and response time
Back-probe the signal wire and watch live voltage. Healthy switching rises and falls quickly at idle and with light throttle.
Snap the throttle and expect a fast spike. A failing sensor lags or stays flat.
Heater circuit and resistance checks
Confirm battery power at the heater feed, a solid ground, and resistance within the vehicle spec. If heater power is missing, the probe won’t warm and the unit won’t reach full function.
- Do a propane or carb cleaner enrichment test outside—voltage should jump. No change suggests a faulty oxygen sensor or wiring fault.
- Wiggle the harness while watching data—intermittent drops point to broken conductors or loose terminals.
- Compare bank-to-bank response times. One lazy bank hints at a local issue; both slow suggests fuel or broader trouble.
“Record pre- and post-test values so you can measure improvement after repairs.”
| Test | Good result | What fails means |
|---|---|---|
| Back-probe switching | Rapid oscillation 0.1–0.9V | Slow or flat trace — replace probe or inspect wiring |
| Heater check | Battery feed, ground, correct ohms | No power or open circuit — repair harness |
| Enrichment test | Immediate voltage spike | No spike — unit or wiring fault likely |
Next step: If results are borderline on a high-mileage car, fitting a new sensor makes sense — but only after confirming the circuit and ignition aren’t causing engine misfires. Stay safe—let exhaust cool, use gloves, and keep hands clear when probing.
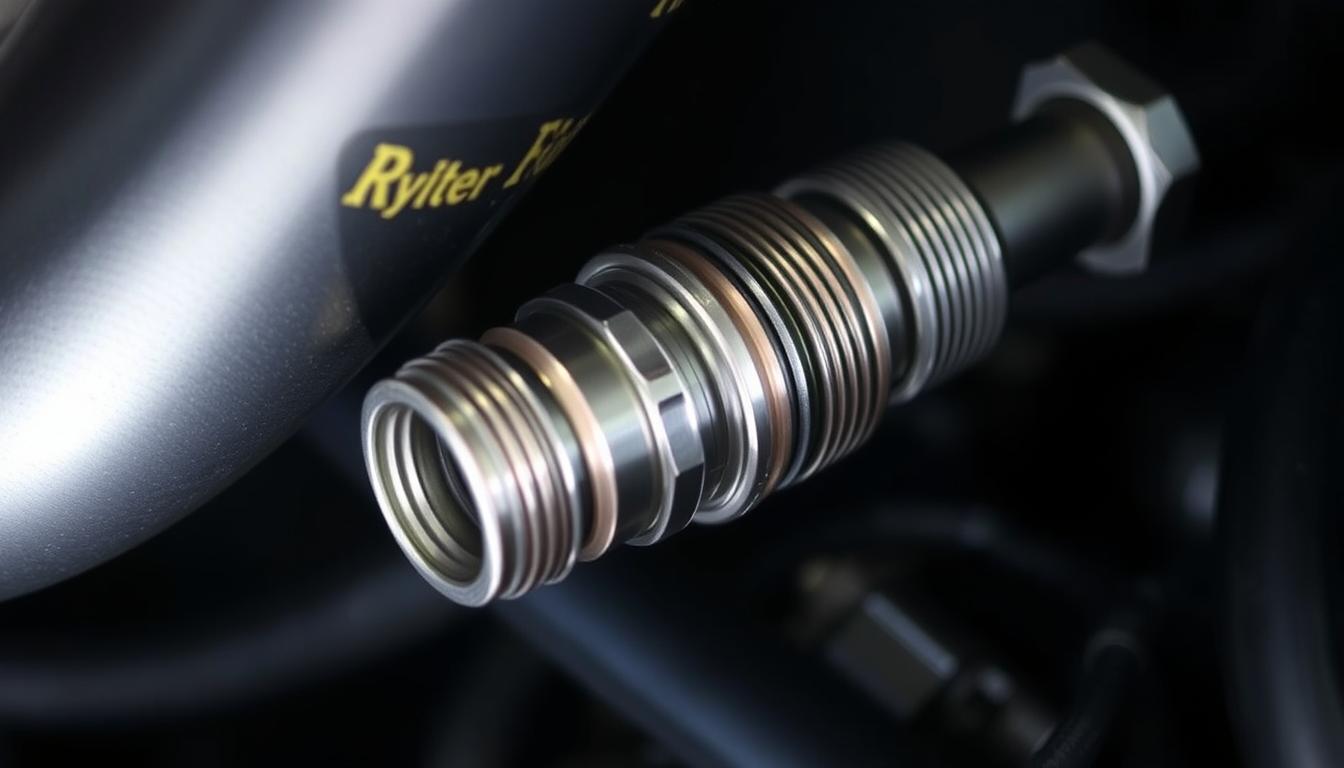
Upstream Versus Downstream O2 Sensors: Symptoms, Sensor Cause Engine Issues, and Diagnosis
 sensor setup, showcased against a muted industrial backdrop. The sensors are shown in a clean, well-lit environment, their metallic casings and electrical connectors rendered with precision. The foreground features the upstream sensor, its wiring and mounting clearly visible, while the downstream sensor occupies the middle ground. The overall scene conveys a sense of technical expertise and attention to the diagnosis and repair of oxygen sensor-related engine issues.")
Upfront probes steer fuel delivery quickly, while rear probes monitor converter health.
Upstream units control the air-fuel mixture directly. A failing oxygen sensor upstream can cause surging, stumbles, and engine misfires. Those faults make the ECM adjust air-fuel in the wrong direction and can feel like poor drivability.
Downstream units verify catalytic performance. They often set efficiency codes without hurting driveability. If downstream traces mimic upstream, the converter may be weak or a misfire is flooding exhaust gases.
Start diagnosis by confirming upstream switching and short/long-term trims. Then compare downstream steadiness to assess converter health. Also inspect wiring and grounds on each bank—mixing connectors on V6/V8 swaps causes repeat faults.
“If the car runs rough, focus upstream; if it runs fine but fails emissions, evaluate downstream and the converter.”
| Position | Main role | Common symptom |
|---|---|---|
| Upstream | Controls trims, fast feedback | Surges, misfires, poor throttle response |
| Downstream | Monitors converter, long-term trims | Efficiency codes, flat readings |
| Both | Signal integrity | Wiring faults mimic bad parts |
Tip: Use OEM or trusted-brand upstream parts to keep fast response and protect the converter long term.
DIY Fixes: From Cleaning Connectors to Oxygen Sensor Replacement
Small steps — safe stands, penetrating oil, and a correct socket — make the job simple. We walk through a compact, safe repair you can finish in a garage.
Tools you need
- oxygen sensor socket, ratchet, and extensions
- O2-safe penetrating oil, torque wrench, safety glasses, gloves
- Dielectric grease, contact cleaner, and anti-seize if the part maker allows
Remove old unit and install new one
Soak threads on a cool exhaust. Support the car with jack stands. If the electrical connector sits near moving fans, disconnect the battery.
Unplug the electrical connector, inspect pins, and clean with contact cleaner. Secure a firm lock on reassembly to avoid intermittent faults.
Use the oxygen sensor socket and steady pressure to break the unit loose. A breaker bar helps stubborn bungs. Thread the new sensor by hand to avoid cross-threading.
Gaskets, anti-seize, routing, and final checks
Use only the supplied anti-seize. Replace any sooted gasket or crush ring. Torque to spec, route the harness away from heat, and clip to factory points.
“A quality new unit restores crisp feedback — smoother idle and better economy.”
Clear codes, take a short drive, and watch live data to confirm proper switching. Recheck after a few heat cycles and tighten if needed.
Avoiding Confusion: Turn Signal, Signal Switch, and Unrelated Faults
Lighting circuits and engine management run on different wiring and modules. So a worn turn signal or a faulty signal switch rarely affects fuel control or exhaust feedback.
What replacing parts won’t fix
Replacing a turn signal or swapping the turn signal switch won’t clear emissions codes tied to the oxygen sensor. The ECM reads sensor data and heater status — not the blinker stalk.
Blinker problems — like failing to cancel or erratic flash — point to the turn signal switch, bulb, or flasher relay. Those are safety items. Fix them, but don’t expect an emissions code to vanish.
| Issue | Likely system | Fast test |
|---|---|---|
| Won’t cancel | Turn signal switch | Operate stalk while turning |
| Erratic flash | Relay, bulb, wiring | Swap bulb or test relay |
| Emissions code | ECM / exhaust | Scan live data, inspect exhaust |
Tip: Scan before and after any electrical work. That proves you didn’t disturb nearby connectors. Keep repair notes so future troubleshooting stays simple.
“Fix lighting issues separately. Focus on exhaust and sensor data when codes point to emissions.”
Costs, Time, and Aftercare: Resetting Codes, Replacing Car Battery, and Protecting the Catalytic Converter
Budgeting a repair means knowing part tiers, labor time, and follow-up checks. Parts run from $30 budget units to $200+ OEM pieces. Labor ranges widely—30–90 minutes for easy access, longer if rusted or hidden.
Parts and labor ranges
We recommend mid-tier or OEM for upstream locations where fast response matters most. Downstream parts can be more flexible if you are saving money.
- Parts: $30–$250.
- Labor: 0.5–2 hours typical; add time for seized threads or bung repairs.
Clearing codes and smog readiness
Clear trouble codes only after repair and a successful short drive. A full drive cycle may take 20–50 miles. An empty readiness slate after replacing car battery means a retest may fail as “not ready.”
Protecting the catalytic converter
A persistent bad oxygen sensor or a rich run can overheat and foul the catalytic converter. That damage catalytic converter scenario raises repair bills fast.
“Fix sensor faults promptly to avoid converter failure and failed emissions.”
Aftercare: Recheck trims at cruise, inspect harness routing, and scan for returning trouble codes over the next few days. Track fuel economy for two tanks to confirm restored performance.
Conclusion
To finish, we tie symptoms to testing steps so you can decide whether to repair or call a pro with confidence.
Spot the signs — match common symptoms like rough idling or poor fuel efficiency to tests. Don’t guess; confirm codes, inspect connectors, and watch live data until the signal shows the part functioning properly.
If tests point to a bad oxygen sensor, a new sensor is the right move. If wiring or a harness fault shows up first, repair that before you replace parts. Use basic tools — a scanner, multimeter, and an oxygen sensor socket — to save time and money.
Protect the catalytic converter. Avoid long drives with a faulty oxygen sensor or drive faulty oxygen conditions; prompt repair prevents failed emissions and damage catalytic converter. We’ve got your back — take it step by step and recheck after repairs.
FAQ
What does an illuminated engine fault tied to an oxygen sensor mean?
It signals the emissions system detected odd readings — the upstream sensor may be slow or stuck, the heater circuit could be dead, or wiring and exhaust leaks might be skewing oxygen exhaust gases. We start by pulling codes and freeze-frame data to see if the ECM adjust air-fuel feedback is outside expected limits before deciding on parts.
How does the oxygen unit help the engine run properly?
It measures oxygen in exhaust gases and sends voltage to the ECM so closed-loop control can trim fuel. Upstream sensors drive fuel control with fast switching. Downstream sensors check catalytic converter performance by showing steadier readings when the converter is working.
What common symptoms point to a failing oxygen device?
Typical signs include a persistent engine fault, rough idling, engine misfires, poor fuel efficiency, sulfur or rotten-egg smell, and failed emissions tests. Intermittent faults may come and go with heat, so note when symptoms happen to match them with live data.
Which trouble codes usually indicate sensor or circuit issues?
Codes fall into performance and circuit categories — performance codes show slow or biased voltage, while circuit codes point to heater, power, ground, or open/shorts in the harness. Freeze-frame info helps us reproduce the condition for accurate diagnosis.
Could wiring damage or an exhaust leak cause the same fault as a bad oxygen unit?
Yes. Frayed wires, corroded connectors, or upstream exhaust leaks that draw in fresh air can mimic a bad sensor. Visual inspection of the harness, connectors, and flanges is essential before replacing the part.
Is it safe to keep driving with a faulty oxygen device?
Short trips are usually OK, but prolonged driving can run the engine rich, foul spark plugs, and overheat or contaminate the catalytic converter. Stop sooner if you smell raw fuel, have severe misfires, or see a glowing converter.
What’s the best first step when the ECM flags an O2 problem?
Use an OBD-II scanner to record stored and pending codes, review freeze-frame data, then check live O2 voltages and fuel trims. Save the codes before clearing — that snapshot guides the rest of the testing path.
How do we visually check the sensor area and wiring?
Safely support the car, inspect the harness along the exhaust for melted insulation, unplug and examine connectors for corrosion or bent pins, and look for soot at flanges that shows exhaust leaks. Photograph issues before repairing.
How can I test sensor switching and the heater circuit?
Back-probe the upstream signal to watch fast voltage switching at idle, perform a throttle or enrichment test to confirm quick spikes, and use a multimeter to verify heater power, ground, and resistance. Wiggle the harness to catch intermittent opens.
How do upstream and downstream faults differ in symptoms and urgency?
Upstream faults directly affect drivability — stumbles, surges, and misfires. Downstream faults usually trigger emissions warnings without strong drivability loss. If downstream mirrors upstream, suspect a weak catalytic converter.
What tools and steps are needed for replacement at home?
Gather an oxygen sensor socket, penetrating oil safe for O2, ratchet and extensions, torque wrench, gloves, dielectric grease, and appropriate anti-seize only if the part maker specifies it. Soak threads, unplug the connector, break the sensor loose carefully, thread the new one by hand, torque to spec, and clear codes for a test drive.
Will replacing a turn signal or its switch clear an O2-related fault?
No — turn signal circuits are separate. Replacing a stalk or switch won’t affect fuel control codes. If both issues occur close together, scan for codes to avoid chasing unrelated repairs.
How much does sensor replacement usually cost and how long will it take?
Parts range from budget aftermarket to OEM — upstream sensors need precision and often cost more. Labor runs 30–90 minutes for accessible units; rusted bungs take longer. Plan a drive cycle after replacement to set readiness monitors before a smog test.
Can a weak sensor damage the catalytic converter?
Yes. A sensor that causes a persistent rich condition can overheat and contaminate the converter, shortening its life. Early diagnosis saves fuel and prevents expensive downstream repairs.
What should I do after replacing a sensor or disconnecting the battery?
Clear codes, then complete a full drive cycle so readiness monitors reset. If you disconnect the car battery, expect monitors to be “not ready” until the cycle finishes — verify with a quick OBD scan before any emissions test.

- 🔥🔥🔥【2026 NEWLY RELEASED BI-DIRECTIONAL CONTROL】As the 2026 upgraded version of Kingbolen S608, our Newest S6 Elite auto …
- 【15 MOST POPULAR RESET FOR 150 MAKES】Tired of costly mechanic trips for common resets? Kingbolen S6 Elite obd2 scanner d…
- 【ALL SYSTEM DIAGNOSTICS, LEAVE NO FAULT HIDDEN】The Kingbolen S6 ELite car scanner, effectively works all cars for all sy…

- CEL Doctor: The ANCEL AD310 is one of the best-selling OBD II scanners on the market and is recommended by Scotty Kilmer…
- Sturdy and Compact: Equipped with a 2.5 foot cable made of very thick, flexible insulation. It is important to have a st…
- Accurate Fast and Easy to Use: The AD310 scanner can help you or your mechanic understand if your car is in good conditi…

- 【2026 Professional Car OBD2 Scanner】Upgrade check engine code reader V850 featuring complete OBDII/EOBD functionality an…
- 【Quickly Read/Clear Fault Codes】This car diagnostic scanner quickly reads and clears emissions-related fault codes and p…
- 【One-click I/M Readiness for S-nn-0-g Check】 V850 vehicle code reader features One-click I/M readiness function, enablin…
- 【Comprehensive OBD2 Diagnostic Capabilities】:This OBD2 scanner offers professional OBD2 diagnostics, enabling rapid read…
- 【Multi-effect detection function integration】:Combining the functionality of a battery tester, it assesses battery healt…
- 【Professional OBD2 Scanner Diagnostic】:As professional car scanner,the OBD2 scanner diagnostic tool will help you,will h…
- 【ACCURATE DIAGNOSTICS】Quickly read and clear DTCs (engine fault codes). The device includes a built-in library of 98,963…
- 【COMPREHENSIVE & VERSATILE 】Offers complete OBD-II/EOBD diagnostic coverage for engine systems. Beyond reading/clearing …
- 【S.MOG CHECK ASSISTANT】Quickly evaluate your vehicle’s emissions compliance. With Mode 6 and I/M readiness monitoring, y…
- 【Multi-functional】: This practical, multi-functional OBD2 scanner can comprehensively diagnose vehicle data. It can help…
- 【Convenient and Portable】: The OBD2 diagnostic tool is extremely easy to use—simply plug it into the vehicle’s OBD port …
- 【Usage Instructions】: The car diagnostic scanner has 6 buttons: up/down scroll, enter/exit, and quick lookup for VIN and…
Recent Posts
10 Best License Plate Frames for Popular Cars: Stylish & Durable Picks
Have you ever struggled with a loose or rusty license plate frame that just won’t stay put? It’s frustrating when your car’s look feels unfinished or when a noisy frame distracts you on every...
Best Tesla Model 3 & Model Y License Plate Frames No Drill Options
Have you ever struggled with installing a front license plate on your Tesla Model 3 or Model Y? Drilling into your sleek car’s bumper can feel wrong and risky.It’s frustrating to think about...