
Surprising fact: studies show small chips and dents left untreated double repair costs within three years.
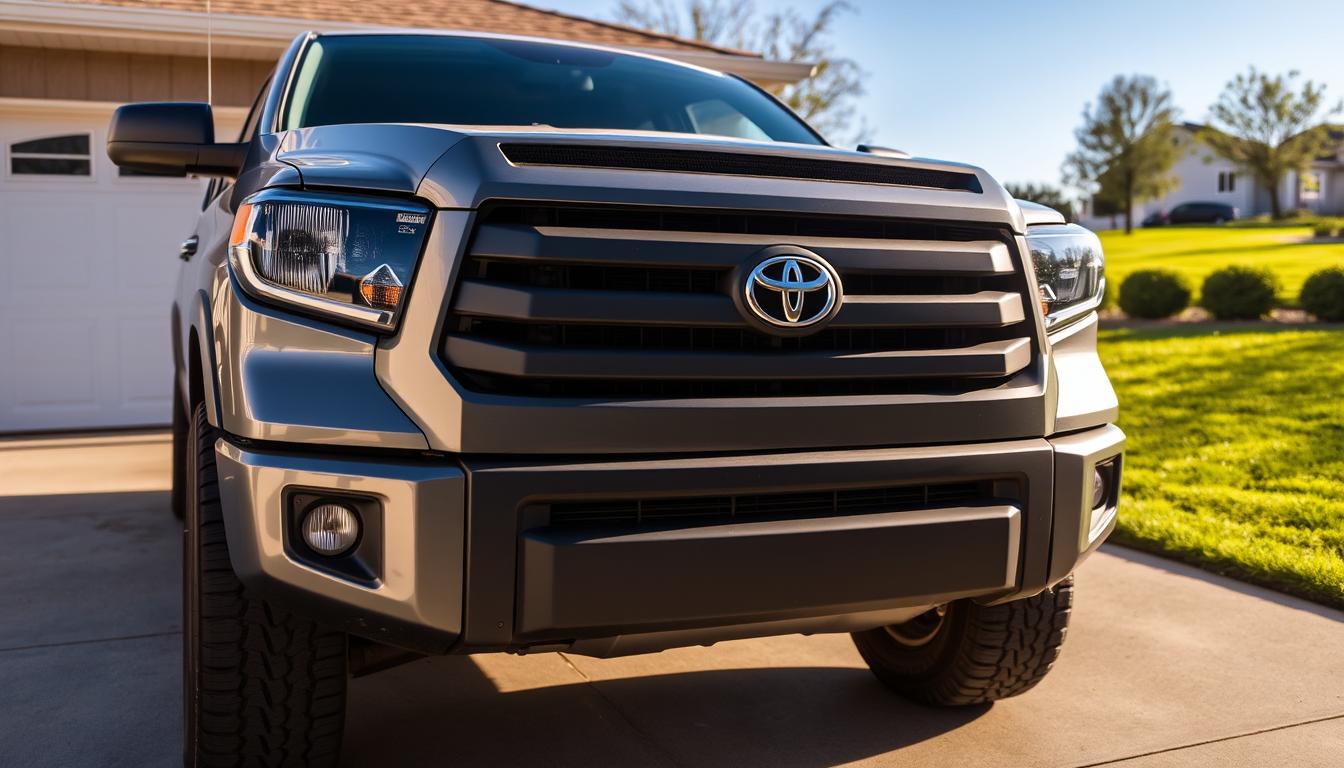
We help owners spot quick wins for a toyota tundra—small dents, paint chips, surface rust, loose trim, and basic lighting quirks. Our tone is hands-on and calm. We walk through gentle dent pulling, paint touch-ups, snugging clips, and bulb swaps that use common pcs and garage tools.
Why act fast? Rust creeps under paint. Loose door trim may rip at speed. Dim lights or a faulty brake or horn raise safety and ticket risks. Catching issues early saves time and money.
We show where DIY shines — exterior panels and led lights — and when to step back. We favor Toyota-friendly paint, body-safe clips, and adhesives that protect finishes.
Key Takeaways
- Quick exterior checks stop small issues from becoming costly repairs.
- Use matched materials for toyota vehicles to protect finishes.
- Basic tools handle dents, chips, trim, and most lights at home.
- Prioritize turn, brake, and backup lights for safety and legality.
- Know limits — leave drivetrain and deep electronics to pros.
Quick Assessment and Setup for DIY Toyota Tundra Body Repairs
Start with a ten-minute inspection. We walk the truck panel by panel to spot fresh dents, new scratches, bubbling paint that hints at rust, and trim that’s starting to lift.
Where rust shows first: check lower door edges, rear wheel arches, and bed sides. Mark spots so they don’t spread under paint.
Basic toolkit: plastic trim levers, a sensor socket and a socket/wrench combo, masking tape, and a microfiber pack. Keep a small paint touch-up pack—matching Toyota code, primer, fine sandpaper, alcohol wipes, and clear coat.
Handle bulbs and lenses with care. Use LED-safe gloves, avoid touching glass, and keep the holder and plug clean. Inspect the sensor and wiring harness near lights for loose fasteners.
- Fastener feel: snug but not stripped — a proper wrench or socket helps.
- Clips: replace weak pcs instead of forcing them.
- Power safety: disconnect the negative battery cable before any wiring harness or lighting work.
Prep a dry, shaded workspace. Lay parts in a labeled pack and keep towels handy. This keeps small fasteners organized and the job stress-free.
Don’t Let Your Tundra’s Body Damage Go Unchecked: Simple Fixes You Can Do

Short, steady work prevents small faults from growing. We focus on easy, gear-light methods that most car owners can manage in a driveway or garage.
Small dent remedies
- Start clean and warm: heat the panel with a hair dryer, then use a household plunger or a suction cup—pull steady, not sharp.
- Heat-and-pull: warm, pull, and stop if creases or paint softening appear. Protect clear coat—no open flame.
- Know when to stop: deep oil-canning or sharp creases need a shop pull or filler.
Scratches, rust, lighting and trim
For chips, clean with isopropyl, de-nib with 2000-grit, primer bare metal, then thin Toyota paint layers and clear coat from your touch-up pack.
Surface rust: sand to bright metal, use a rust converter on pitting—this helps 1st gen and newer tacoma tundra panels, especially 2000-2006 toyota bedsides.
- Lighting: swap turn signal and backup bulbs to led for life. Inspect each plug and holder, clean contacts, and test turn, hazard, and backup at night.
- Trim and emblems: remove old adhesive, clean with alcohol, reclip or use a body-grade adapter when needed.
- Bumpers and horn: align brackets, tighten even gaps, and secure the horn or air horn so the harness isn’t stressed.
Pro Tips, Common Mistakes, and When to Get Help

Simple upkeep—wash, decontaminate, and seal—makes a big difference over time. A touchless rinse, pH-neutral soap, an iron remover decon, and a quality sealant every few months keeps chips and rust from gaining a foothold.
Quarterly checks pay off. Look under wheel arches, inside door hems, and behind mud flaps. Small loose clips or bubbling paint are easy to fix early.
Know your limits
We avoid frame and crash-structure work at home. Tasks like frame pulls, airbag modules, or crushed crash bars belong in a collision shop.
Also steer clear of non-body electronics and driveline fixes. Oxygen sensor diagnostics, transmission faults, or rewiring a radio and harness for android auto or a double din car stereo often need programming and module work.
- Why this matters: modern Toyota Lexus platforms route many features through integrated modules. A miswired harness or a slipped sensor socket can trigger costly diagnostics.
- Infotainment retrofits on 2007 2008 2009 trucks often need bluetooth pairing, radio coding, or android auto wireless setup—pros handle that cleanly.
- Keep a neat parts pack. Label pcs and spare clips so panels go back together right.
If you feel stuck, stop and ask a tech. A short consult is cheaper than chasing a worsening problem.
Conclusion
Spend an hour now to avoid pricey shop time later—especially on 2000-2006 toyota models. We showed quick checks for tacoma tundra and other toyota vehicles that stop small issues from growing into costly repairs.
Quick wrap: confirm each turn signal and signal lamp flashes evenly. Verify both brake lamps and the reverse backup light. Clean each plug and holder, and match led bulbs for consistent color.
Recheck fasteners after a day—one gentle wrench pass and a final socket on trim keeps rattles away. Keep a small finish pack with spare clips, pcs, alcohol wipes, an adapter, and a sensor socket handy. For 1st gen trucks and 2005 2006 models, watch lower doors and arches for rust.
Seasonal checks—before winter and long trips—protect finish, horn and air horn brackets, and overall safety. A little care now saves time later, and we’re here to help when more guidance is needed.
FAQ
What quick checks should I do first on my Toyota Tundra to catch small body issues?
Start with a 10-minute walkaround—look for fresh dents, new scratches, bubbling paint that hints at rust, and trim that’s lifting. Check lower door edges, rear wheel arches, and bed sides where rust often starts. Open and close doors and the tailgate to hear rattles. Do this in a shaded, clean area so you can spot surface issues easily.
Which basic tools and supplies are worth having for DIY exterior fixes?
Keep a small kit: plastic trim levers, a sensor socket/wrench set, matching Toyota touch-up paint and primer, 2000-grit sandpaper, masking tape, LED-safe gloves, microfiber towels, and a parts pack for clips and fasteners. These let you handle dents, chips, bulbs, and loose trim without special shop gear.
How do I safely replace a turn signal or backup bulb on a Tundra?
Disconnect the negative battery cable before working near wiring. Use LED-safe gloves to avoid oils on bulbs, inspect the plug and holder for corrosion, clean contacts if needed, then install the new bulb and test turn, hazard, brake, and reverse functions. Make sure wiring has strain relief and plugs seat firmly.
What’s the easiest way to pull a small dent at home without damaging paint?
Work on a clean, warm panel. Try a household plunger or a suction cup—apply steady pulls, not jerks. If you use heat, warm the area with a hair dryer (no open flame) and pull gently. Stop immediately if the metal creases, the paint shows small oil-canning, or the coat softens or smells.
How should I touch up paint chips and scratches to avoid rust later?
Clean the area with isopropyl alcohol, de-nib edges with fine sandpaper, apply primer to bare metal, then add thin layers of Toyota-matched paint. Finish with clear coat and allow curing before a light polish. Mask wide around the chip to protect surrounding paint and use a tack cloth to remove dust.
How do I treat small surface rust spots on Tacoma and Tundra panels?
Sand to bright metal, use a rust converter on any remaining pitting, then prime and repaint. Pay attention to seam sealer at wheel lips and lower hems. For older 2000–2006 trucks, check bed sides and lower doors early—treating small spots fast prevents spread beneath the paint.
When should I replace clips and trim hardware instead of reusing them?
Replace any clip that won’t grip or cracks when pried. Cheap new clips save panels from forced fits. If a clip compresses and won’t spring back, swap it. Keep a small pack of common Toyota clips and fasteners so reassembly is secure and rattle-free.
What simple bumper checks and fixes can be done after a minor bump?
Inspect bumper brackets and fasteners, loosen slightly to realign gaps, then retighten evenly. Confirm lights sit square in housings and that brackets don’t contact body panels. A gentle wrench snug is usually enough—avoid over-tightening plastic mounts.
How should I handle a horn or air horn that sounds off or vibrates?
Check the horn bracket for tightness and ensure the horn isn’t rubbing bodywork. Confirm the harness has no excessive tension and clips are secure. For air horn mounts, make sure brackets and fittings don’t stress lines. Often a small repositioning restores a clear tone.
Which tasks are best left to pros rather than DIYers?
Avoid structural repairs, frame work, airbag modules, oxygen sensor diagnostics, transmission faults, or complex radio and wiring harness installs for Android Auto/double DIN retrofits. Late-model Toyota and Lexus systems often need programming and proper diagnostics—let a qualified technician handle those to prevent costly mistakes.
What preventative care keeps paint and trim healthy over time?
Use a touchless rinse, pH-neutral wash, occasional decontamination (iron remover), and a quality sealant every few months. Inspect behind mud flaps and inside door hems quarterly. Keeping surfaces clean and sealed reduces chips and slows rust development.
How can I tell if a bulb or socket needs replacing rather than just cleaning?
Bright, clean metal on the plug is fine—replace the socket if you see green or white crust, melted plastic, or intermittent contact. If cleaning contacts doesn’t restore consistent light output or the socket feels loose, replace it to avoid future failures.
Any tips for organizing parts and fasteners during a DIY repair?
Lay parts out in a labeled pack or tray, use small labeled bags for unique screws, and keep a parts bin with spare clips and tapes. Work on a clean towel and take photos as you disassemble. This prevents lost fasteners and makes reassembly quick and accurate.
What should I check the day after a repair?
Recheck fasteners and clips with one gentle wrench snug—panels settle and may need a final pass. Verify lights again at night, listen for new rattles, and ensure adhesive repairs are holding. A short follow-up saves troubleshooting later.
Recent Posts
Durable Jeep Wrangler American Flag License Plate Frame for Patriotic Drivers
Have you ever felt frustrated by a plain, worn-out license plate frame on your Jeep Wrangler? It’s a small detail, but it can really affect your vehicle’s look.Every time you see that dull...
Slim Design Audi Black License Plate Frame for Sleek Car Styling
Have you ever struggled with a bulky, noisy license plate frame that just doesn’t fit right? It can be so frustrating when your car’s style feels off or the frame rattles every time you...