
Roof rack designs offer clever and essential ways to expand your vehicle’s carrying capacity, turning everyday cars into adventure-ready haulers. From simple crossbars to elaborate systems, understanding the different types helps you choose the perfect solution for bikes, kayaks, luggage, and more, making every trip easier and more convenient.
Ever wish you had more space in your car? That feeling of a packed-to-the-gills vehicle, with gear piled high and not enough room for everyone’s legs, is a common travel headache. But what if I told you there’s a smart, stylish solution that can nearly double your storage potential? We’re talking about roof racks! These ingenious additions to your car’s roof can safely carry everything from your weekend adventure gear to extra luggage for that long-awaited vacation. Let’s break down the world of roof rack designs, so you can stop cramming and start exploring with ease. We’ll explore the different types, what makes them work, and how to pick the perfect one for your needs, making your car a true hauler!
Understanding Roof Rack Basics: What You Need to Know
Before we dive into the cool designs, let’s get a handle on the basic parts of a roof rack system. Think of it as the foundation for all your adventures. Most systems have a few key components that work together to securely attach gear to your car’s roof.
At its core, a roof rack system usually consists of:
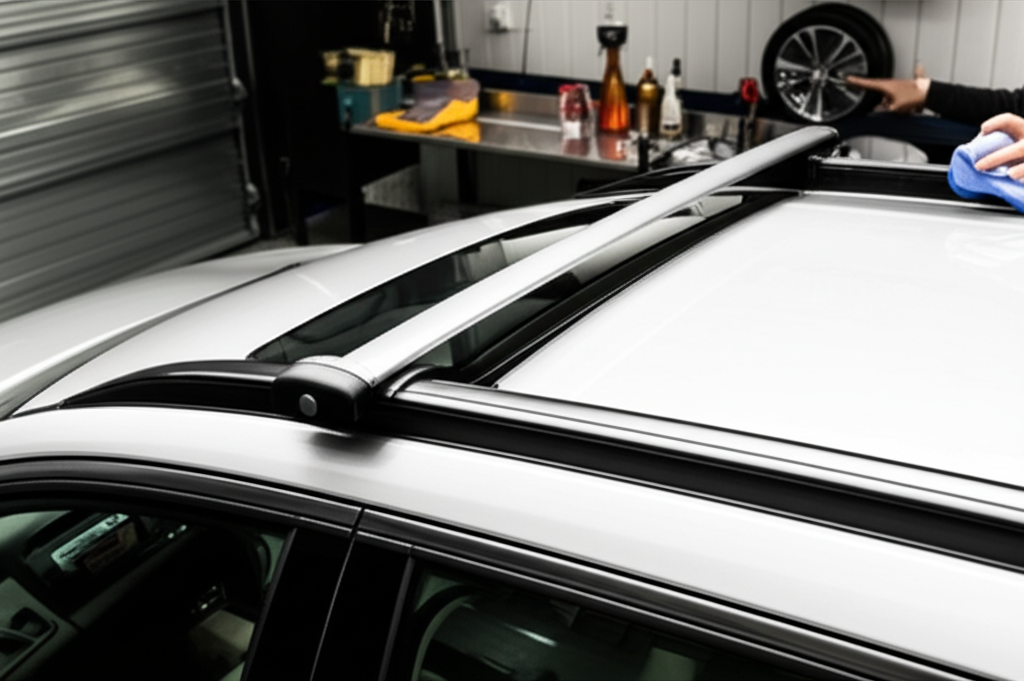
- Crossbars: These are the horizontal bars that run from side to side across your roof. They are the primary support for whatever you’ll be carrying.
- Fit Kit/Mounting System: This is the crucial part that actually attaches the crossbars to your car. Different cars have different roof designs (like fixed points, flush rails, or naked roofs), so the fit kit ensures a secure and custom connection.
- Accessories: These are the specialized attachments that hold your specific gear. Think bike carriers, kayak mounts, cargo boxes, or ski racks.
The beauty of modern roof rack systems is their modularity. You often start with the crossbars and fit kit, and then you can add different accessories as your needs change over time. This makes them a versatile investment for any car owner.
Types of Roof Rack Designs: Finding Your Perfect Match
The world of roof rack designs can seem a bit overwhelming at first, but it breaks down into a few main categories. Each type is engineered to work with specific vehicle roof styles and to carry particular kinds of gear. Choosing the right one is all about knowing your car and your typical cargo.
1. Factory-Mounted Racks
Many cars come with roof rack systems already installed from the factory. These are often integrated seamlessly into the car’s design. While convenient, they might not always offer the most flexibility or load capacity.
- Pros: Integrated look, often convenient.
- Cons: Can be less robust, fewer accessory options, sometimes fixed positions.
2. Bare Roof Racks (Clip-On/Clamp-On)
These systems are designed for cars that don’t have any existing rails or mounting points on the roof. They work by clamping onto the car’s door frames.
How they work: A sturdy rubber or plastic-coated foot pad sits on the roof, and a metal clamp or clip hooks into the inside of the door frame. This creates a secure anchor point. A specific “fit kit” is essential for each car model to ensure the clamps engage correctly and safely.
Best for: Sedans, coupes, and SUVs without factory rails. They are a great entry point for occasional hauling.
Key Features:
- Requires a specific vehicle fit kit.
- Clamps grip the edge of the door frame.
- Foot pads protect the vehicle’s paint.
3. Raised (Side) Rails
You’ll often see these on SUVs and wagons. They are rails that run the length of the roof on either side, with a gap between the rail and the car’s roof.
How they work: Most raised rail systems allow for specific feet to wrap around or attach securely to the rail. Crossbars are then mounted onto these feet, creating a sturdy platform above the rails.
Best for: SUVs, wagons, minivans. They offer a good balance of ease of installation and carrying capacity.
Key Features:
- Visible gap between the rail and the roof.
- Many aftermarket crossbar options available.
- Can accommodate various accessories.
4. Flush Rails
These are similar to raised rails, but they sit directly on the roof with no gap. They look sleek and are common on many modern vehicles.
How they work: Flush rails also have specific mounting points, often hidden under small covers at the ends of the rails. Special feet or towers are designed to attach directly to these points, providing a solid base for crossbars.
Best for: Modern SUVs and crossovers, offering a clean aesthetic. They provide a strong and stable mounting platform.
Key Features:
- No gap between the rail and the roof.
- Sleek, integrated look.
- Requires specific mounting hardware.
5. Fixed Points
Some vehicles have small, threaded mounting points hidden under covers on the roof. These are factory-designed locations specifically for attaching a roof rack.
How they work: Special towers or feet with bolts are used to screw directly into these fixed points, creating a very secure and robust connection. This type of mounting system often offers the highest load capacity.
Best for: Vehicles with these pre-drilled and threaded mounting locations. Often found on SUVs, vans, and even some sedans.
Key Features:
- Discrete mounting points on the roof.
- Extremely secure and high load capacity.
- Requires specific hardware designed for the vehicle’s fixed points.
6. Gutters
An older but still effective design found on classic vehicles, the rain gutter is a metal lip that runs along the edge of the roofline.
How they work: Racks for gutter mounts use feet that hook over the gutter and are then tightened down. This provides a strong, reliable anchor point.
Best for: Classic cars, some older SUVs and vans that still feature rain gutters.
Key Features:
- Hooks onto the existing rain gutter.
- Strong and proven mounting method.
- Less common on modern vehicles.
Essential Roof Rack Accessories: Carry What You Love
Once you have your base roof rack system (the crossbars), the real fun begins with accessories! These are like specialized tools designed to hold your gear safely and efficiently. The right accessory can make loading and unloading a breeze, and it protects your equipment.
Here are some of the most popular and essential roof rack accessories:
Cargo Boxes
These are enclosed, aerodynamic containers that attach to your crossbars. They are perfect for keeping luggage, sports equipment, or anything else you want protected from the elements.
- Pros: Excellent weather protection, keeps items out of sight, aerodynamic for reduced noise and better fuel economy.
- Cons: Can be bulky, take up the entire length of the crossbars.
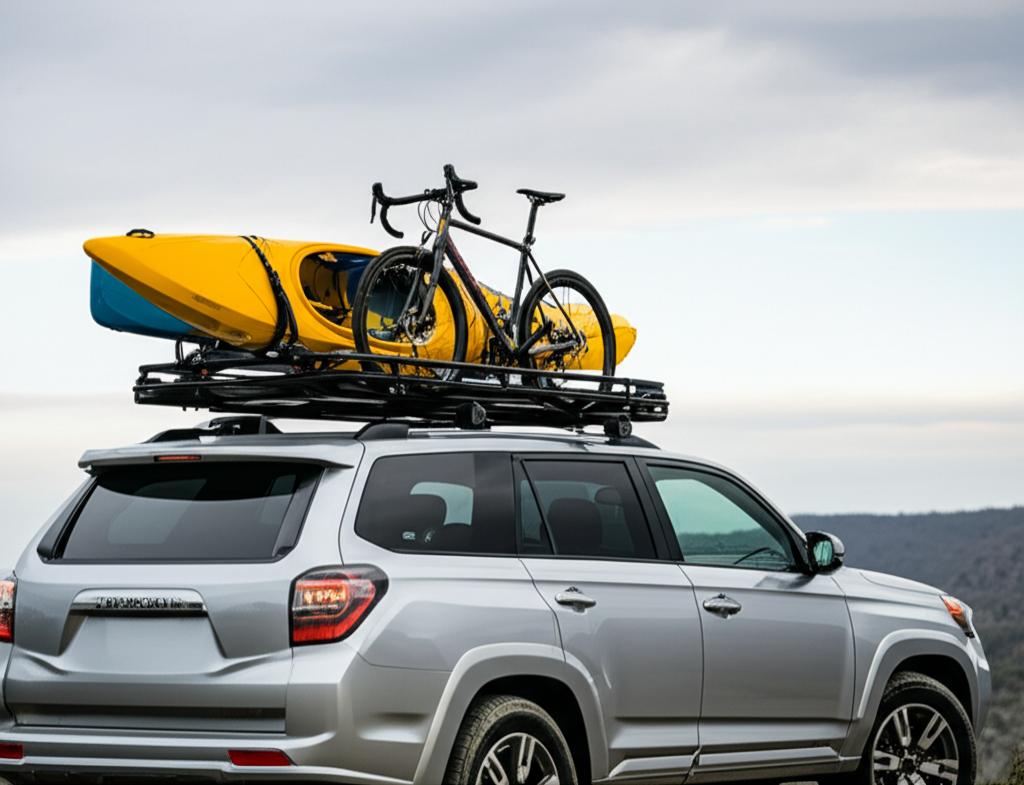
Bike Racks
There are several types of bike racks, each with its own advantages:
- Fork Mount: The bike’s front fork is detached and clamped into the rack. This is often the most stable and aerodynamic option.
- Frame Mount (Upright): The bike’s frame is clamped, and the wheels rest on the rack. This is often easier for loading as you don’t need to remove the front wheel.
- Wheel Mount: The bike’s wheels are placed into trays, and the frame is secured with straps. This is very user-friendly and requires no contact with the bike’s frame or fork.
Pros: Safely transports bikes, frees up interior space.
Cons: Can add wind noise, some types require lifting the bike.
Kayak/Canoe Carriers
Designed to cradle your watercraft securely.
- J-Cradles: These hold kayaks on their side, allowing you to fit more than one on a roof rack.
- Saddle/Roller Systems: These support the kayak hull and often include rollers to help with loading heavier boats.
Pros: Securely transports bulky water sports gear.
Cons: Can be tricky to load solo for heavier kayaks.
Ski and Snowboard Racks
These racks are built to hold skis and snowboards. They typically have a clamp mechanism to hold the gear firmly.
- Pros: Keeps snow and water out of your car’s interior, protects edges and bases.
- Cons: Primarily for winter use.
Load Baskets
Open-air baskets that attach to crossbars, offering a flexible way to carry irregularly shaped items, camping gear, or muddy equipment that you don’t want inside the car.
- Pros: Versatile for various gear shapes, keeps items contained.
- Cons: Items are exposed to the elements, can create wind noise.
Choosing the Right Rack: A Practical Guide
Selecting the ideal roof rack design involves a few key considerations. It’s not just about picking the one that looks coolest; it’s about finding a safe, reliable, and practical solution for your specific needs. Here’s a step-by-step approach:
Step 1: Identify Your Vehicle’s Roof Type
This is the most critical step. What kind of roof does your car have? Look closely:
- Bare Roof: No rails at all? You’ll likely need a clip-on/clamp-on system.
- Raised Side Rails: Rails with a gap? You’ll need feet that wrap around these.
- Flush Rails: Rails with no gap? Look for systems designed for flush rails.
- Fixed Points: Are there small covers on your roof that hide screw holes? This is ideal for high-load capacity racks.
- Gutters: Do you have a classic car with visible rain gutters?
Knowing your roof type will immediately narrow down your options and point you towards the correct mounting system (fit kit).
Step 2: Assess Your Carrying Needs
What will you typically be carrying?
- Occasional light gear (small luggage, sports equipment for a weekend): A basic crossbar system might suffice.
- Frequent sports gear (bikes, kayaks, skis): You’ll need specific accessories designed for these items.
- Bulkier items or extended travel (camping gear, multiple suitcases): Consider a cargo box or load basket.
The type and frequency of your hauling will dictate the accessories and even the strength required from your base rack.
Step 3: Consider Load Capacity and Durability
Manufacturer specifications will detail the dynamic load capacity of their roof rack systems. This is the maximum weight the rack can safely carry while the vehicle is in motion. It’s crucial to adhere to this limit!
Generally, rack systems that mount to fixed points or use substantial clamp systems will offer higher load capacities than those on bare roofs. For example, a robust mountain bike might weigh 30-40 lbs, while a large cargo box filled with gear can easily exceed 100 lbs. Ensure your chosen system can handle your anticipated loads.
For load capacities, always refer to the manufacturer’s recommendations. Reputable brands often have detailed guides on their websites.
Step 4: Factor in Aerodynamics and Noise
Crossbars can create wind noise, especially at highway speeds. Some designs are more aerodynamic than others. Aerodynamic crossbars are typically flatter and have shaped edges to reduce drag and noise. Cargo boxes are also designed with aerodynamics in mind.
If noise sensitivity is a concern, looking for “quiet” or aerodynamic bar designs can make a significant difference to your driving experience.
Step 5: Budget and Brand Reputation
Roof rack systems range in price. While cheaper options might be tempting, investing in a reputable brand often means better quality materials, more rigorous safety testing, and a more secure fit. Brands like Thule, Yakima, and Rhino-Rack are known for their durability and extensive accessory options.
A good resource for understanding vehicle-specific rack fitments is the Roof Rack Fit Guide Manual, which lists compatibility across many vehicles.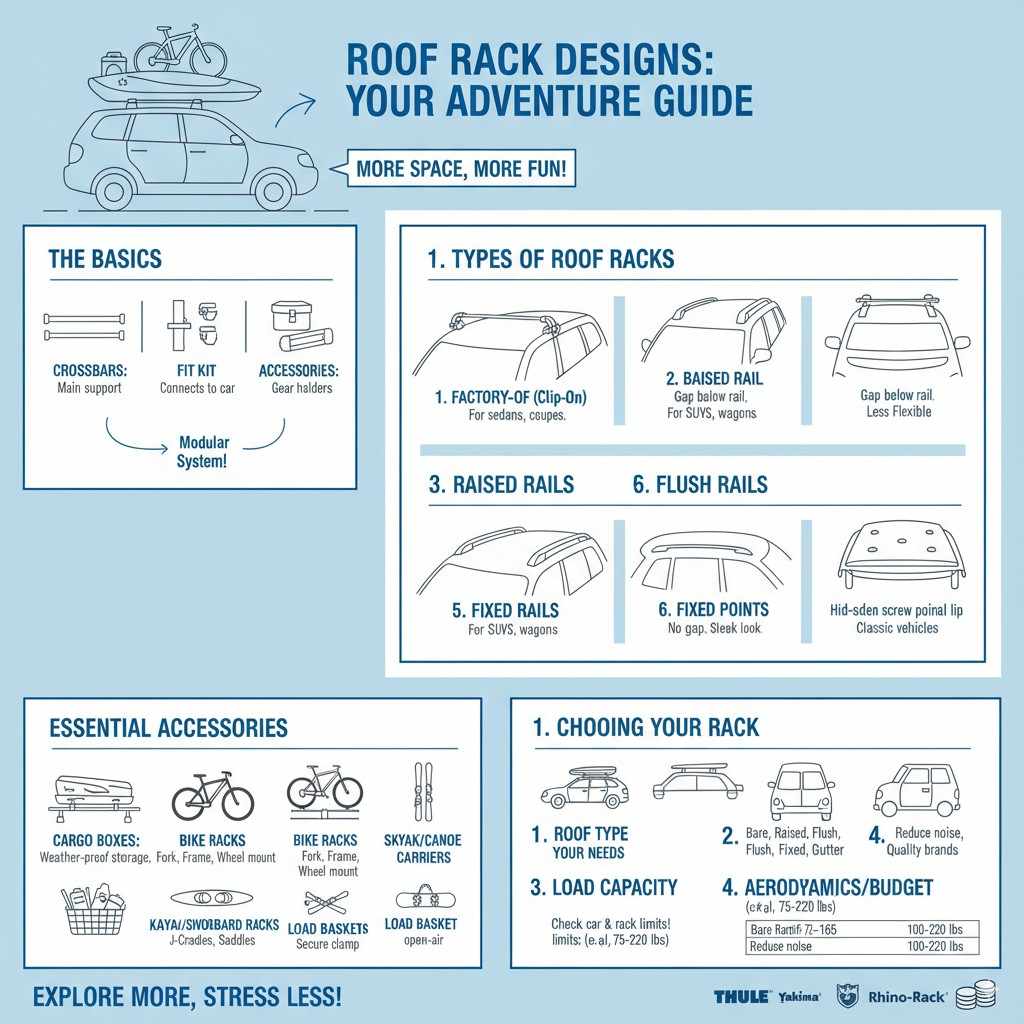
Installation Tips: Making it Easy and Safe
Installing a roof rack system might seem daunting, but with the right instructions and a little patience, it’s a manageable DIY project. Safety is paramount here, as a poorly installed rack can be dangerous.
General Installation Steps (May Vary by System)
Always refer to the manufacturer’s specific instructions for your exact rack and vehicle. These are general guidelines:
- Unpack and Identify Parts: Lay out all components and match them against the parts list.
- Assemble Crossbars (if needed): Some systems require attaching feet or towers to the crossbars.
- Attach Feet/Towers to Vehicle:
- Bare Roof: Carefully position the feet according to the fit kit instructions. Attach the clamps to the door frames, ensuring they are gripping the correct part of the frame. Do not over-tighten yet.
- Rails (Raised or Flush): Attach the dedicated towers or feet to the rails, following the specific system’s design.
- Fixed Points: Align the towers with the fixed points and insert the mounting bolts.
- Position Crossbars: Place the crossbars onto the towers. Ensure they are parallel and at the correct distance apart according to the instructions (this is crucial for stability and load distribution).
- Tighten Securely:
- Systematically tighten all bolts and clamps. Many systems have torque specifications or built-in click mechanisms to indicate when sufficient tightness is reached.
- Work in a criss-cross pattern to ensure even pressure, much like tightening lug nuts on a wheel.
- Final Checks:
- Give the rack a firm shake. It should feel solid and not loose.
- Double-check all bolts and clamps are tightened.
- If you have a bare roof system, ensure the rubber pads are fully seated on the roof and the clamps are securely engaged.
- If the rack came with locks, install them.
- Test Drive: Drive at low speeds initially and listen for any unusual noises. Gradually increase speed and check for vibration or looseness. Then, conduct another check of all connections.
Pro Tip: Many manufacturers offer excellent installation videos online. Searching for “[Your Rack Brand] [Your Vehicle Model] Installation” on YouTube can provide a visual guide that makes the process much clearer. For bare roof systems, using a measuring tape with the fit kit instructions is essential to ensure correct spacing and positioning of the bars relative to the doors.
Roof Rack Designs and Their Carrying Capacity
Understanding the typical load capacities for different roof rack designs is important for safety and usability. Always remember that the capacity of the entire system (rack + accessories + your gear) must not exceed the lowest capacity specified by any component, especially your vehicle’s roof limit.
Here’s a general overview, but always consult your vehicle owner’s manual and the roof rack manufacturer’s specifications for precise figures.
| Roof Rack Design Type | Typical Load Capacity (Dynamic) | Notes |
|---|---|---|
| Bare Roof (Clip-On) | 75 – 165 lbs (35 – 75 kg) | Highly dependent on the vehicle’s door frame strength and precise clamping. Can be lower for smaller cars. |
| Raised Side Rails | 100 – 220 lbs (45 – 100 kg) | Generally good capacity, as rails are designed to support weight. Varies by rail strength. |
Conclusion
Roof rack designs are more than just accessories—they transform your vehicle into a versatile adventure-ready machine. By understanding your car’s roof type and selecting the right system, you can safely and efficiently transport bikes, kayaks, skis, luggage, and more. From simple crossbars to advanced modular systems with specialized accessories, the options are endless. Choosing the correct rack ensures safety, stability, and convenience, while protecting both your gear and your vehicle. With the right setup, what once felt like a cramped car becomes a flexible, spacious solution for every road trip or outdoor adventure.
Investing in a quality roof rack system isn’t just about storage—it’s about freedom. Whether you’re planning weekend excursions, family vacations, or extreme sports adventures, a well-chosen roof rack expands your possibilities and makes every journey smoother and more enjoyable.
FAQ: Roof Rack Designs
1. What is the difference between raised and flush rails?
Raised rails have a visible gap between the rail and the roof, making it easier to attach different accessories. Flush rails sit directly on the roof, providing a sleeker look and typically requiring specialized mounting hardware.
2. Can I install a roof rack on a bare roof vehicle?
Yes! Bare roof vehicles need a clip-on or clamp-on system with a vehicle-specific fit kit to ensure a secure attachment without damaging your car.
3. How much weight can a roof rack carry?
Load capacity depends on the roof type and rack design. Bare roof racks generally support 75–165 lbs, raised side rails 100–220 lbs, and fixed-point systems can handle heavier loads. Always follow the manufacturer’s specifications.
4. Do roof racks affect fuel efficiency?
Roof racks can slightly reduce fuel efficiency due to increased wind resistance. Choosing aerodynamic bars or cargo boxes can help minimize this effect.
5. Are roof racks safe for all types of gear?
Yes, when paired with the correct accessories and within weight limits. Proper installation is crucial for safety.
6. Can I install a roof rack myself?
Most systems are DIY-friendly, but always follow the manufacturer’s instructions carefully. Double-check that all bolts, clamps, and fitments are secure before driving.
7. Which roof rack is best for my vehicle?
It depends on your roof type, the gear you plan to carry, and how often you’ll use the rack. Factory racks, clip-on systems, raised or flush rails, and fixed-point mounts each have advantages.
8. Do I need additional accessories for my roof rack?
Yes. Accessories like cargo boxes, bike racks, ski racks, and kayak carriers help secure your gear and protect it from the elements, making transport safer and easier.
Recent Posts
Jumper Cables With Bag: Heavy Duty Booster Cables for Easy Storage
There’s nothing more frustrating than turning the key in your car and hearing silence. A dead battery can ruin your day in an instant.You might feel stuck, stressed, and unsure what to do next....
Strong Ram 1500 Heavy Duty License Plate Frame for Ultimate Durability
There’s nothing more frustrating than struggling with a flimsy license plate frame that bends, rusts, or just doesn’t fit right on your Ram 1500. You want something strong and reliable that...