

It’s a familiar, frustrating sight for any driver: you get into your car, turn the key, and the dashboard clock is blinking defiantly at 12:00 AM. You reset it for the tenth time this month, only for the problem to return the next day. This persistent issue, known as car clock resetting, is more than just a minor annoyance. It’s often your vehicle’s way of signaling a deeper, underlying problem with its electrical system. While it might seem trivial, ignoring the cause can lead to more significant issues down the road, like a car that won’t start at all. Fortunately, you don’t need to be a master mechanic to diagnose and fix the most common causes. This guide will walk you through everything you need to know about car clock resetting, helping you find the ultimate, effortless fix and get your clock back on track for good.
Why Does My Car Clock Keep Resetting? Uncovering the Common Culprits
Your car’s clock, along with your radio presets and other memory-based settings, requires a small but constant stream of power from the battery to keep its memory, even when the engine is off. When that power supply is interrupted, even for a moment, the memory is wiped clean, and the clock reverts to its default setting. The key to solving the problem is finding the source of that power interruption. Here are the most common culprits.
The Most Likely Suspect: A Weak or Dying Battery
In the vast majority of cases, the root cause of a resetting clock is a failing car battery. A battery that is nearing the end of its life (typically 3-5 years) may still have enough power to start the engine, but it might not have the stable, residual voltage needed to maintain the clock’s memory overnight. As the battery weakens, its voltage drops below the minimum threshold required by the car’s electronic components. You might also notice other symptoms of a weak battery, such as slow engine cranking, dimming headlights when you start the car, or a battery warning light on your dashboard.
A Simple But Sneaky Problem: Loose or Corroded Battery Terminals
Sometimes the battery itself is perfectly healthy, but the connection to the car is compromised. The battery terminals are the metal posts where the main electrical cables connect. Over time, these connections can become loose due to vibrations or develop a layer of corrosion—a white, blue, or greenish powdery substance. This corrosion acts as an insulator, creating a poor connection that can intermittently interrupt the flow of electricity. Even a slightly loose terminal can cause a momentary power loss every time you start the car, which is just enough to trigger a full car clock resetting event.
The Overlooked Component: A Blown Fuse
Your car’s electrical system is protected by a series of fuses, and specific components like the radio, interior lights, and clock memory are often grouped together on a single circuit. If this particular fuse blows, these components will only receive power when the car is running. As soon as you turn the engine off, the power is cut, and the clock’s memory is erased. Finding a blown fuse is often a straightforward fix that only requires a few minutes and a new, inexpensive fuse.
Your Step-by-Step Guide to Fixing Car Clock Resetting Issues
Now that you know the potential causes, it’s time to troubleshoot. Follow these simple steps to diagnose and resolve the issue methodically.
Step 1: Visually Inspect the Battery and Terminals
Start with the easiest and most common fix. Open the hood and locate your car battery. First, check if the cable clamps are securely fastened to the battery terminals. Try to wiggle them; if there is any movement, they need to be tightened with a wrench. Next, look for any signs of corrosion. If you see that tell-tale powder, you’ll need to clean it off. For your safety, always disconnect the negative (black) cable first, followed by the positive (red) cable. You can use a dedicated battery terminal cleaning tool or a simple wire brush with a mixture of baking soda and water to scrub the corrosion off the posts and clamps. Once they are clean and dry, reconnect the positive cable first, then the negative, ensuring a tight fit.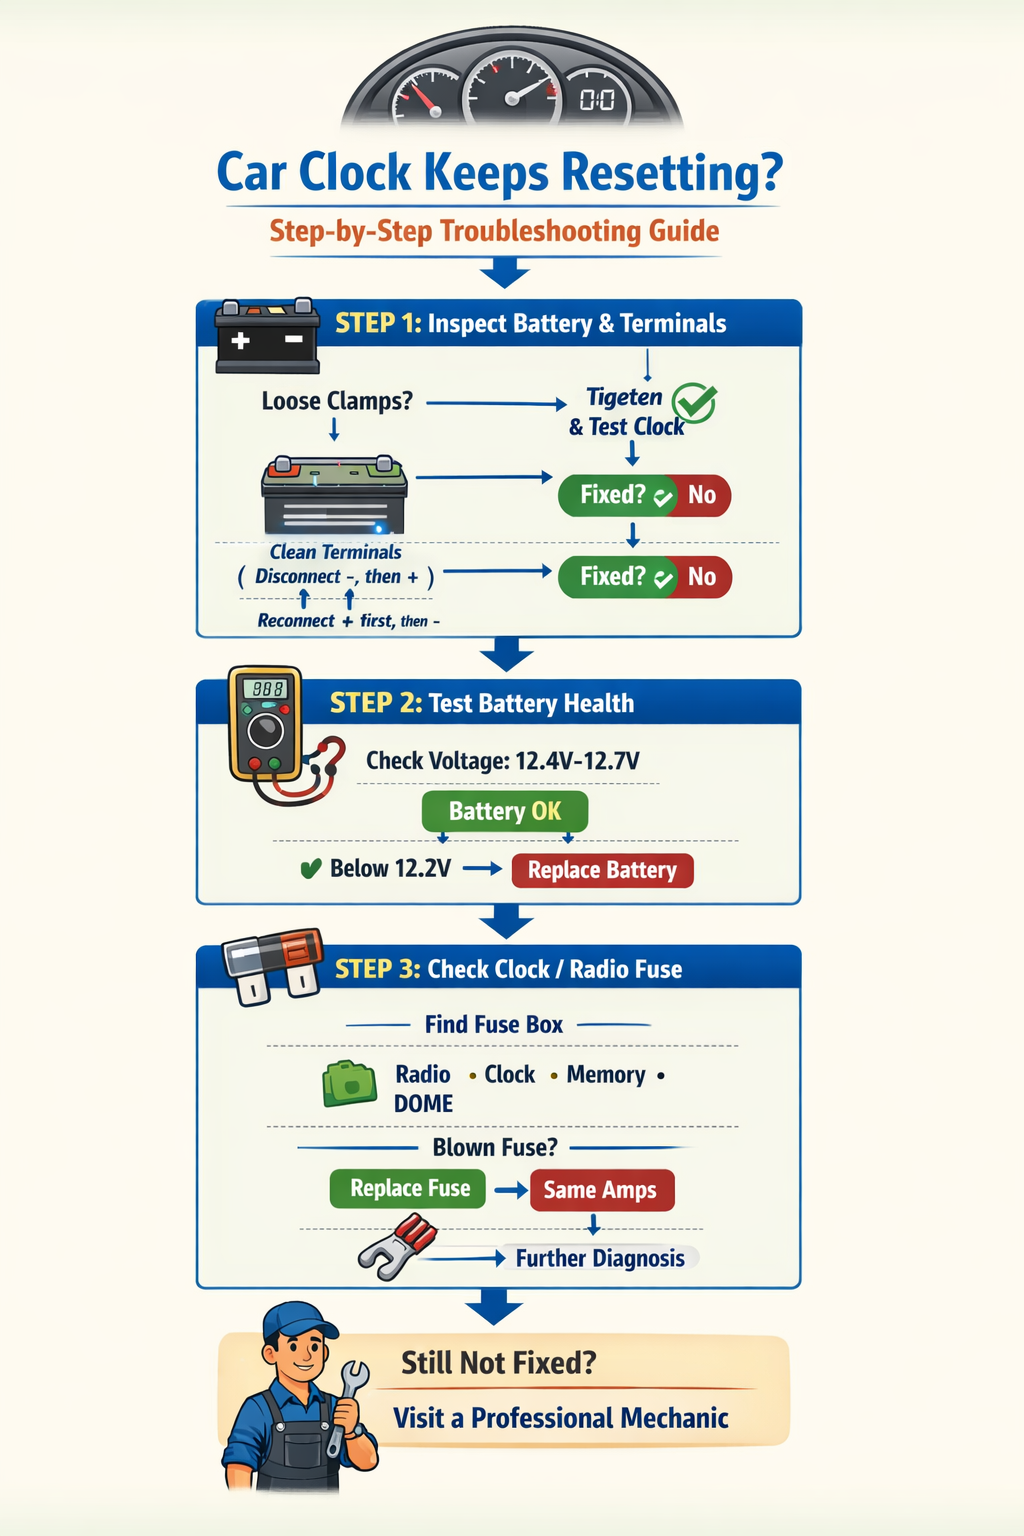
Step 2: Test the Health of Your Battery
If cleaning the terminals doesn’t solve the problem, the next step is to check the battery’s health. The most accurate way to do this is with a digital multimeter. With the engine off, a healthy car battery should read between 12.4 and 12.7 volts. A reading below 12.2 volts suggests the battery is weak and may need to be replaced. If you don’t own a multimeter, don’t worry. Nearly all auto parts stores offer free battery testing services and can tell you definitively if your battery is the source of the problem.
Step 3: Check the Relevant Fuse
If the battery checks out, it’s time to inspect the fuses. Your owner’s manual is your best friend here—it will contain a diagram showing the location of your fuse boxes (there may be one in the engine bay and another inside the cabin) and what each fuse controls. Look for a fuse labeled Radio, Memory, Clock, or DOME. Once you locate the correct fuse, pull it out using a fuse puller or a pair of needle-nose pliers. Hold it up to the light and look for a broken or melted metal strip inside. If it’s blown, replace it with a new fuse of the exact same amperage rating. Using a fuse with the wrong amperage can cause severe damage to your car’s electrical system.
When to Call a Professional
If you’ve checked the battery, terminals, and fuses, and the issue persists, the problem may be more complex. A failing alternator, a parasitic electrical drain, or a wiring short could be to blame. These issues require specialized diagnostic tools and expertise to pinpoint. At this stage, it’s best to consult a trusted, certified mechanic. Attempting to diagnose advanced electrical problems yourself can lead to further damage and costly repairs.
By methodically working through these simple diagnostic steps, you can likely identify and solve the mystery of your car clock resetting. More often than not, it’s a simple sign that your battery needs attention. By addressing it early, you not only fix the annoying blinking clock but also ensure your car is ready to start reliably every time you need it.
Recent Posts
Durable Jeep Wrangler American Flag License Plate Frame for Patriotic Drivers
Have you ever felt frustrated by a plain, worn-out license plate frame on your Jeep Wrangler? It’s a small detail, but it can really affect your vehicle’s look.Every time you see that dull...
Slim Design Audi Black License Plate Frame for Sleek Car Styling
Have you ever struggled with a bulky, noisy license plate frame that just doesn’t fit right? It can be so frustrating when your car’s style feels off or the frame rattles every time you...