

Transform your car’s interior with LED ambient floor lighting! This guide makes installing an LED ambient floor lighting kit for your car’s interior easy. Learn what you need, how to do it safely, and how to get a professional look without the big cost. Get ready to enjoy a stylish and personalized driving experience!
Ever step into your car at night and wish it had a little more pizzazz? Maybe you’ve seen super cool cars with soft, colorful lights glowing from under the seats, and thought, “That looks amazing, but probably impossible to do myself.” Well, I’ve got great news! Adding LED ambient floor lighting to your car’s interior is a surprisingly achievable DIY project. It’s not just about looks; it can make finding things in the dark easier and create a really relaxing vibe. Let’s break down how you can give your ride that custom, high-end feel without needing to be a car mechanic.
Why Add LED Ambient Floor Lighting to Your Car Interior?
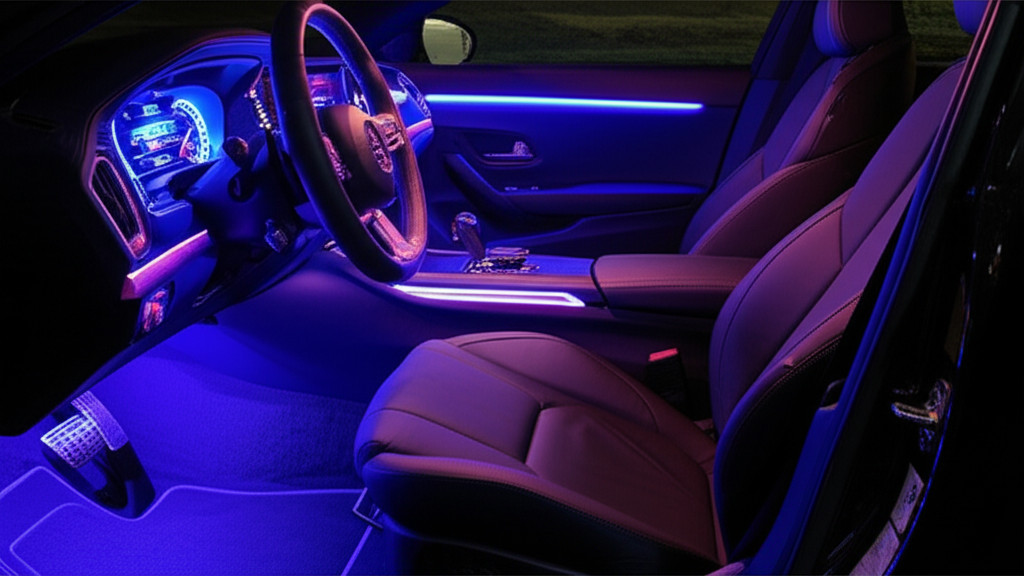
Adding LED ambient floor lighting to your car’s interior is more than just a trendy modification. It’s about enhancing your driving experience in practical and aesthetic ways. Think about those late-night drives or digging for a dropped item on the floor – a subtle glow can make all the difference.
Boost Your Car’s Aesthetics
Let’s be honest, a touch of ambient lighting instantly elevates your car’s interior. It adds a modern, sophisticated feel, turning a standard cabin into something that looks and feels custom-made. It’s a fantastic way to express your personal style and make your car stand out, whether you’re parked or cruising.
Improved Visibility and Safety
Beyond the cool factor, ambient lighting offers practical benefits. It provides a soft, diffused light that illuminates your footwells, making it easier to find dropped items like your phone or keys without straining your eyes or fumbling in the dark. This minor improvement can contribute to a safer driving environment by reducing distractions.
Create a Relaxing Atmosphere
The right ambient lighting can drastically change the mood inside your car. You can often choose colors and brightness levels to create a calming, cozy atmosphere for evening drives or a more energetic vibe when you need it. It’s like setting the perfect mood lighting for your personal space on wheels.
Personalization and Customization
With a good LED ambient floor lighting kit, the possibilities for customization are nearly endless. You can select colors that match your car’s exterior, your personal preferences, or even set them to change with your music. This level of personalization makes your car uniquely yours.
Understanding LED Ambient Floor Lighting Kits
Before we dive into installation, it’s important to know what you’re working with. LED ambient floor lighting kits are designed with the DIYer in mind, making them accessible even if you’ve never tackled an electrical project before.
What’s Inside a Typical Kit?
Most beginner-friendly LED ambient floor lighting kits for car interiors include:
- LED Strips or Pods: These are the light sources themselves. Strips are flexible and can be hidden easily, while pods are more compact and can be placed strategically.
- Control Box/Module: This is the brain of the operation. It manages power, allows you to change colors, adjust brightness, and often set patterns or modes.
- Wiring Harness: This includes all the necessary wires to connect the LED strips/pods to the control box and to your car’s power source.
- Remote Control or App: Many kits come with a small remote or can be controlled via a smartphone app, giving you easy access to all lighting features.
- Mounting Accessories: This can include adhesive tape, zip ties, or clips to help you secure the LED strips and wiring neatly.
- User Manual: A guide to help you through the installation and operation.
Types of LED Ambient Lighting
There are a few different styles of LED ambient lighting you might encounter:
- Single Color Strips: These offer one specific color and are great for a subtle, static glow.
- RGB (Red, Green, Blue) Strips: These are very popular because they can produce a wide spectrum of colors by mixing red, green, and blue LEDs.
- RGBW (RGB + White) Strips: Similar to RGB, but with an added dedicated white LED. This allows for brighter, cleaner white light and more nuanced color mixing.
- Sound-Activated Lights: Some kits can sync with your car’s audio system, making the lights pulse or change color to the beat of the music.
Essential Tools You’ll Need
While most kits are designed for easy installation, having a few basic tools on hand will make the job smoother and ensure a cleaner, more secure finish. Don’t worry, these are common tools that are easy to find and use.
- Trim Removal Tools: Plastic trim tools are essential for gently prying away interior panels without scratching or damaging them. Metal tools can leave marks, so plastic is your best friend here. You can find these online or at most auto parts stores.
- Wire Strippers/Crimpers: If your kit requires any wire connections, these tools are crucial for safely stripping insulation and making secure connections.
- Screwdriver Set: You might need a Phillips or flathead screwdriver for removing certain panels or mounting brackets.
- Zip Ties: Excellent for tidying up excess wiring and keeping it neatly secured behind panels.
- Electrical Tape or Heat Shrink Tubing: For insulating wire connections to ensure safety and longevity. Electrical tape is readily available; heat shrink tubing offers a more robust and professional finish.
- Test Light or Multimeter (Optional but Recommended): If you’re tapping into your car’s power, a test light helps you identify a live wire safely. A multimeter can give you precise voltage readings.
- Gloves: To keep your hands clean and protect surfaces.
- Cleaning Supplies: A clean cloth and some interior cleaner to ensure good adhesion if you’re using adhesive mounts.
Step-by-Step Installation Guide for LED Ambient Floor Lighting
Alright, let’s get down to business! Installing your LED ambient floor lighting kit is a straightforward process. We’ll focus on a common installation method that works for most vehicles. Remember, safety first!
Phase 1: Planning and Preparation
A little planning goes a long way. Before you start pulling things apart, take a moment to figure out where everything will go.
- Read Your Kit’s Manual: Every kit is a little different. Always start by thoroughly reading the specific instructions that came with your LED kit.
- Determine Light Placement: Decide where you want your LED strips or pods. Common spots include under the front and rear seats, along the edges of the floor mats, or even under the dashboard. Aim for placement where the light will be diffused and create a nice glow without being blinding.
- Identify a Power Source: You need to connect your kit to your car’s electrical system. The easiest and safest sources for beginners are usually:
- The 12V Cigarette Lighter Socket: Many kits come with an adapter that plugs directly into this. It’s simple, but the light will only be on when the car is on or in accessory mode, and sometimes it powers your accessories.
- The Fuse Box: This is a more permanent and cleaner solution. You’ll need to find an “always-on” or “ignition-switched” fuse to tap into. An ignition-switched fuse is ideal, as it means the lights will turn off when you turn off your car, preventing battery drain. Refer to your car’s owner’s manual for fuse box locations and diagrams. For more on safely tapping into your fuse box, resources like the AutoZone guide on fuses can be very helpful.
- Test Fit Everything: Lay out the LED strips and control box, run the wires roughly where they’ll go, and make sure you have enough length.
Phase 2: Wiring and Connection
This is where we connect the lights to power. We’ll focus on the fuse box method for a cleaner install, but mention the lighter socket alternative.
- Disconnect Battery (Safety First!): Before touching any wires, disconnect the negative terminal of your car battery. This prevents short circuits and protects you from electrical shock. Wait a few minutes for any residual power to dissipate.
- Access the Fuse Box: Locate your car’s fuse box. It’s often under the dashboard on the driver’s or passenger’s side, or sometimes under the hood. Consult your car’s manual for the exact location.
- Find the Right Fuse Tap: You’ll want to tap into a fuse that powers something you want to control. For ambient lights, an ignition-switched fuse (meaning it only gets power when the car is on) is best to avoid draining your battery. You can use a test light to find these. Many kits come with fuse taps that allow you to plug into an existing fuse slot without permanently altering your car’s wiring.
- Install the Fuse Tap:
- Remove the original fuse from the chosen slot.
- Insert the original fuse into the lower slot of the fuse tap (this protects the original circuit).
- Insert a new fuse (usually supplied with the kit or a low amperage one like 5A or 10A) into the upper slot of the fuse tap (this protects the new accessory circuit).
- Plug the fuse tap into the empty fuse slot.
- Connect Power Wire: Connect the positive (+) wire from your LED control box to the fuse tap. Ensure a secure connection using the provided connectors or by crimping.
- Connect Ground Wire: Find a clean, unpainted metal surface on your car’s chassis to act as a ground. This is usually a bolt or screw already attached to the car’s frame. Remove any paint or rust from the connection point for a solid ground. Connect the negative (-) wire from your LED control box to this ground point.
- Alternative (Cigarette Lighter): If your kit has a cigarette lighter adapter, simply plug it in. This is easier but the lights will be tied to the socket’s power source.
Phase 3: Installing the LED Strips/Pods
Now it’s time to get those lights in place!
- Route Necessary Wires: Carefully route the wires from the control box towards the areas where your LED strips/pods will be installed. Tuck them neatly under carpets, along existing wiring looms, or behind plastic trim to hide them.
- Mount the LED Strips/Pods:
- Clean the Surface: Before sticking any LED strips, thoroughly clean the mounting surface with alcohol or an interior cleaner and let it dry completely. This ensures the adhesive will stick well.
- Apply Adhesive: Most strips come with strong double-sided tape. Peel off the backing and press the strip firmly into place. For extra security, you can use a few small zip ties or clips.
- Hiding the Wires: Once the strip is mounted, gently tuck any visible wires out of sight. Use trim removal tools to carefully pry open small sections of plastic trim and hide the wires behind them.
- Connect LED Strips to Control Box: Plug the wires from your LED strips/pods into the corresponding ports on the control box.
Phase 4: Final Touches and Testing
Almost there! Let’s get everything put back together and test your new lighting.
- Secure the Control Box: Find a discreet and safe place to mount the control box. Under a seat, behind the dashboard, or tucked away in a console compartment are good options. Use zip ties or Velcro to keep it from rattling or moving.
- Tidy Up Wiring: Use zip ties to bundle any loose wires and secure them neatly. Make sure no wires can interfere with pedals, seat mechanisms, or door operation.
- Reconnect Battery: Reconnect the negative terminal of your car battery.
- Test Everything: Turn on your car and test the LED lights. Use the remote or app to cycle through colors, brightness settings, and any special modes. Check that everything works as expected.
- Reassemble Interior Panels: Carefully snap or screw back any interior panels you removed during the installation. Ensure they are flush and secure.
Maintaining Your LED Ambient Floor Lighting
Keeping your new ambient lighting looking great and working well is simple. Like any electronic accessory, a little care can go a long way.
- Keep Connections Dry: Avoid exposing the control box and wiring connections to excessive moisture. While most kits are somewhat protected, direct water exposure can cause damage.
- Periodic Checks: Every few months, or if you notice any flickering or issues, check that all connections are secure and no wires have become loose.
- Clean Gently: If you need to clean the LED strips themselves, use a soft, damp cloth. Avoid harsh chemicals.
- Battery Management: Ensure the lights turn off with your ignition if you wired them to an ignition-switched fuse. If you wired them to an always-on circuit and notice them staying on after the car is shut off, check your fuse tap or wiring. Leaving them on for extended periods without the engine running can drain your car battery. Your car battery is critical for starting, and a good guide on maintaining your car’s battery can help prevent issues.
Table: Pros and Cons of LED Ambient Floor Lighting
As with any car modification, there are benefits and potential drawbacks to consider. Here’s a quick look:
| Pros | Cons |
|---|---|
| Enhances interior aesthetics and customization. | Requires basic electrical knowledge and tools for installation. |
| Improves visibility in footwells for safety and convenience. | Potential for battery drain if not wired correctly to an ignition-switched source. |
| Creates a pleasant and relaxing driving atmosphere. | Can be distracting if the lights are too bright or flicker erratically. |
| Relatively inexpensive way to give a custom look. | Some cheaper kits may have limited color options or durability. |
| Most kits are plug-and-play or have simple wiring. | Improper installation can lead to short circuits or damage to car electronics. |
Frequently Asked Questions (FAQ)
Here are some common questions beginner car enthusiasts have about LED ambient floor lighting kits.
Q1: Is it difficult to install LED ambient floor lighting on my own?
A: For most people, installing a standard LED ambient floor lighting kit is a manageable DIY project. Kits are designed for ease of use, often with plug-and-play connectors or simple wiring diagrams. If you can follow instructions and use basic tools like trim removers and a screwdriver, you can likely do it. Taking your time and prioritizing safety are key.
Q2: Will LED ambient lighting drain my car battery?
A: Not if installed correctly! The best practice is to wire the lights to a fuse that is only powered when the ignition is on (an “ignition-switched” fuse). This ensures the lights turn off automatically when you turn off your car, preventing battery drain. If you wire them to an “always-on” fuse, they could drain your battery if left on.
Q3: Can I connect the lights to my car’s cigarette lighter?
A: Yes, many kits come with adapters that plug directly into the 12V cigarette lighter socket. This is the simplest wiring method. However, keep in mind that your lights will only be on when the car is in accessory mode or running, and it will tie up that power outlet.
Q4: How long do LED ambient lights last?
A: LEDs are known for their long lifespan. High-quality LED strips can last for tens of thousands of hours, meaning they can outlast your vehicle. The lifespan can be affected by the quality of the kit, installation, and operating conditions (like heat and moisture).
Q5: What is the difference between RGB and RGBW LED lights?
A: RGB (Red, Green, Blue) LEDs can create a wide range of colors by mixing these three primary colors. RGBW (RGB + White) LEDs add a dedicated white LED chip. This allows for a purer, brighter white light and more accurate color blending. If you want a brilliant white or need precise pastel shades, RGBW is a better choice.
Q6: Do I need any special tools for installation?
A: You’ll need a few basic tools. Essential items include plastic
Recent Posts
Say goodbye to digging for your phone or spilling your coffee. A center floor console is the must-have car organizer that will instantly declutter your drive and streamline your commute.
Tired of uncomfortable car seats ruining your journey? Discover how a quality car seat cushion pad can transform every drive into your most comfortable ride yet.