

Removing your roof racks is a straightforward DIY task that saves fuel and is essential for vehicle maintenance and appearance. This guide provides simple steps for safely detaching various rack types, ensuring you can do it with confidence and the right tools.
Have you ever found yourself looking at your car and thinking, “Those roof racks don’t need to be on there all the time”? You’re not alone! Whether you’re saving a bit on gas, want a sleeker look, or need to access your roof for other maintenance, knowing how to remove roof racks easily is a handy skill. It might seem a bit daunting at first, as those racks are built to be secure. But trust me, with a little guidance, it’s a task almost anyone can handle right in their driveway. This guide is designed to break down the process into simple, easy-to-follow steps, so you can feel confident tackling it yourself. We’ll cover everything you need to know, from the tools you’ll likely need to the specific methods for different rack styles. Let’s get those racks off and give your car a clean, efficient look!
Why Remove Your Roof Racks?
Roof racks are incredibly useful for hauling gear, but they aren’t always necessary. There are several good reasons why you might want to remove them temporarily or even permanently:
- Improved Fuel Efficiency: Even empty roof racks create aerodynamic drag. This drag forces your engine to work harder, leading to increased fuel consumption, especially at highway speeds. Removing them can offer a noticeable boost in miles per gallon.
- Reduced Wind Noise: Unloaded racks can generate significant wind noise, which can be annoying on longer drives. Taking them off means a quieter, more comfortable ride.
- Aesthetics: Some drivers prefer the clean, streamlined look of a car without roof racks. Removing them can give your vehicle a sharper appearance.
- Access to the Roof: If you need to clean your roof properly, access the sunroof, or perform other maintenance that requires clear roof access, removing the racks is often the easiest solution.
- Prevent Damage: In some situations, especially with aftermarket racks that aren’t perfectly fitted, they can rub against your car’s paintwork over time, causing minor damage. Removing them prevents this.
- Winter Storage: If you only use your roof racks for seasonal activities like skiing or biking, storing them off the vehicle can protect them from the elements and potential damage.
Understanding Your Roof Rack System
Before you start removing anything, it’s important to identify the type of roof rack system you have. Most systems consist of a few key components:
- Crossbars: These are the horizontal bars that run from side to side, over your vehicle’s roof.
- Racks/Bases/Foot Packs: These are the parts that attach to the vehicle’s roof or its existing rails, and they hold the crossbars.
- Mounting Hardware: This includes any clips, clamps, screws, or bolts that secure the racks to your car.
The way your racks are attached will depend on your vehicle and the rack manufacturer. Common attachment points include:
- Fixed Points: These are pre-drilled holes or threaded inserts in your car’s roof.
- Flush Side Rails: These are integrated rails that run front to back along the edges of your roof, with no gap underneath.
- Raised Side Rails: These are rails that run front to back but have a gap between the rail and the roof, like a handrail.
- Bare Roof: Some vehicles have no factory-installed rails and rely on clamps that grip the door frame.
Knowing your system helps you gather the correct tools and follow the right procedure. If you’re unsure, check your vehicle’s owner’s manual or the roof rack manufacturer’s website. For example, a quick search for “Thule FitGuide” can help you identify parts if you have Thule racks.
Tools You Might Need
Gathering the right tools beforehand makes the process much smoother. Here’s a list of common tools you might need, depending on your rack type:
- Allen Wrench Set (Hex Keys): Many roof rack bolts use Allen heads. You’ll likely need a set of various sizes.
- Socket Wrench Set: If your rack uses nuts and bolts, a socket wrench set with various socket sizes will be essential.
- Screwdriver Set: Sometimes, simple screws are used for minor adjustments or securing covers.
- Torque Wrench: Crucial for re-installing racks to ensure they are tightened to the manufacturer’s specifications. Overtightening or undertightening can be problematic.
- Soft Cloth or Towel: To protect your car’s paint from scratches when you remove parts or set them aside.
- Gloves: To protect your hands.
- Manufacturer’s Instructions: Always refer to the original installation manual for your specific roof rack system.
General Steps for Removing Most Roof Racks
While specific designs vary, most roof rack removal follows a similar pattern. The key is to reverse the installation process systematically.
Step 1: Gather Your Tools and Prepare the Area
As mentioned, have all your tools ready. Ensure your car is parked on a level surface, preferably in a shaded area or garage to protect the paint and keep yourself comfortable. Lay out a soft cloth or blanket near where you’ll be working to place removed parts safely.
Step 2: Loosen or Remove Crossbars
Crossbars are usually attached to the feet or towers. Look for fastening bolts or screws at the connection points. You’ll typically need an Allen wrench or a socket wrench here. Loosen these until the crossbar can be lifted or slid out of its mounts. If your crossbars are a single unit with the feet, you’ll skip this and move to detaching the feet from the roof.
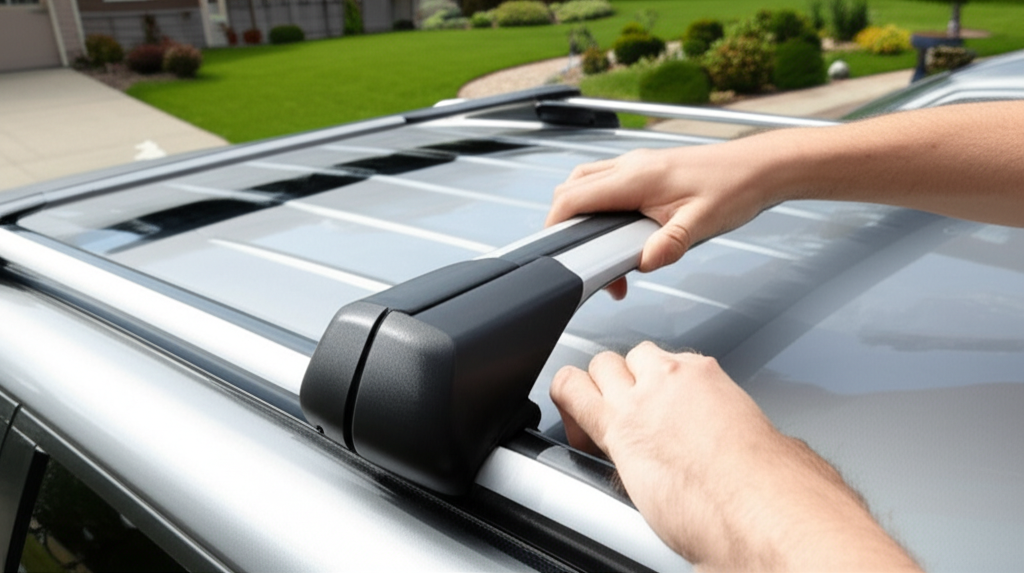
Step 3: Detach the Rack Feet/Towers from the Roof
This is the most critical step. The feet are what secure the entire rack system to your car. The method will vary greatly:
- For Racks with Bolts into Fixed Points: You’ll usually find bolts hidden under a cover or at the base of the foot pack. Remove these bolts, typically using an Allen wrench or socket wrench.
- For Racks on Raised Side Rails: These often have clamps that grip the underside of the rail. Look for adjustment screws or levers on the foot pack. Loosen these until the clamp releases the rail.
- For Racks on Flush Side Rails: These systems might use a different clamping mechanism, often requiring a specific tool or a sequence of loosening bolts. Some may have a strap that goes around the rail, tightened by a mechanism in the foot.
- For Clamped Systems (Bare Roof): These will have a clip that hooks into the door frame and a clamping mechanism at the tower. You’ll need to loosen the main tightening bolt for the clamp, and sometimes a separate screw that holds the clip in place.
Important Note: Many roof rack manufacturers use security bolts or require a specific tool to prevent theft. If you can’t find a standard bolt head, check if your rack kit came with a special key or driver. If not, you may need to contact the manufacturer for assistance or a replacement tool.
Step 4: Carefully Remove Each Rack Section
Once the hardware is detached, carefully lift the rack sections off your car. It’s often best to remove one side or one crossbar at a time. If you have a full rack system (like two crossbars and towers), they might be designed to be removed as a complete unit or in separate pieces.
Pro Tip: If a part feels stuck, don’t force it aggressively. Double-check if you’ve loosened all the necessary fasteners. Sometimes a bit of wiggling is needed, but brute force can damage your car or the rack.
Step 5: Clean and Protect Your Roof
After the racks are off, you’ll likely find dirt, debris, or even faint marks on your roof where the racks sat. This is the perfect opportunity to clean that area. Use a mild car wash soap and water, and a soft microfiber cloth. Dry the area thoroughly. If you notice any minor scratches, you might consider a rubbing compound or paint sealant, but for most, a good wash and wax will suffice.
Step 6: Store Rack Parts Safely
Store your disassembled roof rack system in a dry, safe place. Garage shelves, a storage bin, or even hanging them up can work. Keeping all the parts together, including any special tools or instructions, will make re-installation much easier when you need them again.
Specific Removal Guides for Common Rack Types
Let’s dive a bit deeper into some common rack types and their specific removal nuances.
1. Roof Racks on Raised Side Rails
These are very common on SUVs and wagons. The rails run along the sides of the roof with a gap underneath.
- Locate Mounts: The rack feet will clamp onto these rails.
- Loosen Clamps: On each foot, you’ll find a mechanism that tightens around the rail. This usually involves an Allen bolt or a cam lever. Turn the bolt counter-clockwise or open the lever to release the clamp.
- Remove Crossbars: If the crossbars are separate, detach them from the feet first by loosening their securing bolts.
- Lift Off: Once all clamps are released, lift the rack system off.
Consideration: Many raised rail clamp systems use a rubber strap that goes under the rail. Ensure this strap is freed before trying to lift the rack.
2. Roof Racks on Flush Side Rails
Flush side rails are integrated into the roofline and don’t have a gap. This makes attachment points less obvious.
- Find Attachment Points: These racks often have feet that sit directly on the rail. There might be covers that need to be opened or slid back to reveal the clamping mechanism.
- Release Fasteners: Inside the clamp mechanism, you’ll typically find a bolt or set of bolts that secure the rack to the rail. Loosen these with the appropriate tool.
- Remove Racks: Once all feet are loosened, the rack should lift away.
Tip: For flush rails, manufacturers often use specific adapters or under-rail clamps. Consult your rack manual; it’s crucial here.
3. Roof Racks on Fixed Mounting Points
Some vehicles have small, discrete mounting points (often covered by small flaps or panels) designed specifically for roof racks.
- Access Mounting Points: Open the covers or panels to reveal the mounting holes.
- Remove Bolts: The rack’s feet will be bolted directly into these points. Unscrew these bolts using your socket wrench or Allen key.
- Detach Racks: With the bolts out, the rack should lift off.
Note: These bolts might be specific to the vehicle manufacturer or the rack system. Keep them safe!
4. Clamped “Bare Roof” Systems
These are common on cars without factory rails and use clamps that grip the edge of the door frame.
- Loosen Main Clamp Bolt: On the inside of the foot pack, there’s a large bolt that tightens the clamp onto the door frame. Loosen this completely (counter-clockwise) until the clamp opens.
- Release Door Clip: There’s often a small clip or hook that engages with the door frame for stability. This might be a separate screw or simply released when the main clamp is undone.
- Remove Front and Rear Bars: Work on one bar at a time. You might need to slightly open the car door to get better access.
Safety First: When removing these, ensure the door is not fully open, as it could shift and snag the clamp. Also, be mindful of the paint around the door frame.
Table: Common Roof Rack Components and Removal Actions
Here’s a quick reference for common parts and what to look for when removing them:
| Component | Typical Attachment Method | Removal Action (Counter-Clockwise) | Notes |
|---|---|---|---|
| Crossbar | Bolted or clamped to rack feet/towers | Loosen bolts/screws securing bar to feet | May slide out after loosening |
| Rack Foot/Tower | Clamps onto rails, bolts into fixed points, or clamps door frame | Loosen adjustment bolts, release levers, or remove chassis bolts | This is the primary attachment to the car |
| Security Bolt | Replaces standard bolts on rack feet or crossbars | Use specific security key/tool to loosen | Often provided with the rack kit |
| Door Frame Clamp (Bare Roof) | Hook/clip into door frame, tightened by a clamp | Loosen main clamp bolt, release clip | Ensure door is slightly ajar for best access |
| Rail Clamp (Raised/Flush) | Grips over or under/around roof rails | Loosen adjustment bolt, slide clamp open | May involve a strap mechanism |
What If I Don’t Have the Original Instructions?
It’s a common situation! Many people buy used cars with racks already installed. Here are some ways to find out how to remove them:
- Identify the Brand: Look for logos or embossed names on the rack components (e.g., Thule, Yakima, Rhino-Rack, Whispbar).
- Search Online: Once you know the brand and the likely model (based on your car type), search for “[Brand Name] [Model Name/Number, if visible] removal instructions” or “[Brand Name] roof rack fitting guide”. Most major manufacturers have extensive online resources, including downloadable PDFs of manuals.
- YouTube is Your Friend: Often, you can find video tutorials of people removing or installing similar rack systems on YouTube, which can be incredibly helpful visually. Search for “remove [Brand Name] roof rack on [Your Car Model]”.
- Manufacturer’s Website: Visit the official brand website. Many have a “support” or “downloads” section where you can find manuals.
- Contact the Manufacturer: If all else fails, reach out to the customer service department of the roof rack manufacturer. They can often provide specific guidance or direct you to the right resources based on the parts you have.
For more general information on car maintenance and tips, resources like the U.S. Department of Energy’s Fuel Economy website (fueleconomy.gov) offer insights into how things like aerodynamics affect your vehicle.
Re-Installation Tips
When it’s time to put your roof racks back on, remember these tips for a secure and safe installation:
- Read the Instructions: Even if you’ve done it before, refer to the manual.
- Clean All Parts: Ensure no dirt or grit is present on the rack components or your car’s roof contact points.
- Follow Tightening Sequence: If there are multiple bolts, there’s usually a specific order to tighten them.
- Use a Torque Wrench: This is critical. Overtightening can damage your car or the rack; undertightening can lead to the rack coming loose, which is extremely dangerous. The manual should specify torque values. Many automotive shops can torque bolts for you if you don’t have a wrench.
- Double-Check Everything: After installation and before driving, give the racks a good shake. Ensure all clamps are secure and all bolts are tightened.
- Check Regularly: Periodically check the tightness of your roof rack fasteners, especially after long trips.
Frequently Asked Questions
Q1: How long does it typically take to remove roof racks?
For most standard systems, removing roof racks can take anywhere from 15 minutes to an hour. Simple systems on raised rails might only take 15-30 minutes, while more complex ones with many parts or security bolts could take longer.
Q2: Will removing my roof rack void my car’s warranty?
Generally, no. Removing accessories that you’ve added (or that came with the vehicle but you’re temporarily removing) will not void your car’s manufacturer warranty. However, any damage you cause during the removal process would not be covered.
Q3: Can I leave my roof racks on
Yes, you can leave roof racks on your vehicle, but there are trade-offs. Keeping them on all the time is convenient if you use them frequently. However, they can create wind noise, slightly reduce fuel efficiency, and expose the racks to more wear from weather. If you don’t plan to use them for an extended period, it’s a good idea to remove them to prolong their lifespan and improve gas mileage.
Recent Posts
Jumper Cables With Bag: Heavy Duty Booster Cables for Easy Storage
There’s nothing more frustrating than turning the key in your car and hearing silence. A dead battery can ruin your day in an instant.You might feel stuck, stressed, and unsure what to do next....
Strong Ram 1500 Heavy Duty License Plate Frame for Ultimate Durability
There’s nothing more frustrating than struggling with a flimsy license plate frame that bends, rusts, or just doesn’t fit right on your Ram 1500. You want something strong and reliable that...