
Bolded Quick Summary
Installing a roof rack is straightforward with the right tools and guidance. This guide breaks down the process, from choosing the right type for your car to securely mounting it, empowering you to add cargo-carrying capacity confidently and safely.
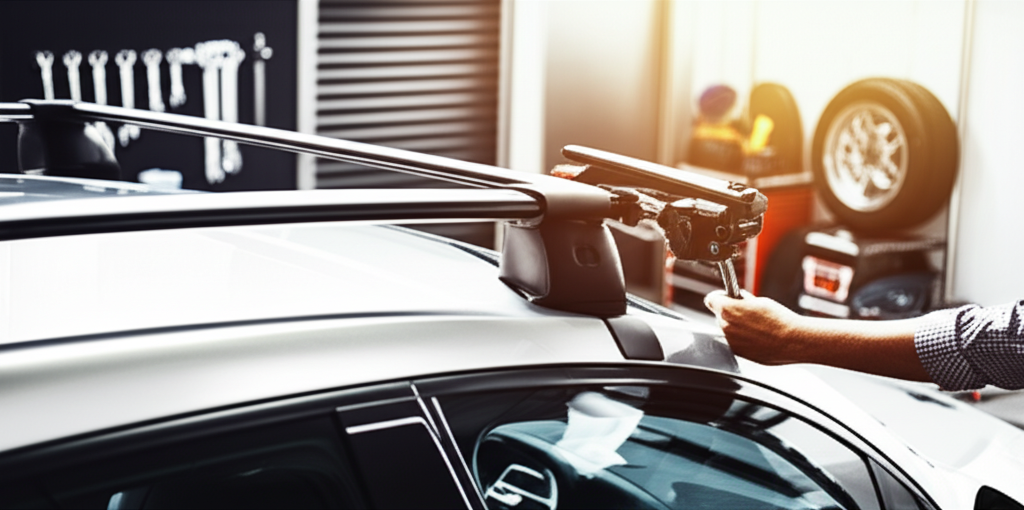
Ever looked at a car with a roof rack and thought, “How did they get that on there?” Maybe you need to haul bikes, skis, or that giant kayak, but feel a bit daunted by adding something to your car’s roof. You’re not alone! Many drivers find the idea of installing a roof rack a little puzzling. But what if I told you it’s more accessible than you think? With a little patience and this easy-to-follow guide, you’ll be ready to expand your vehicle’s carrying potential in no time. We’ll demystify the process, from understanding the different types to the actual nuts and bolts of installation. Let’s get started!
Understanding Roof Rack Anatomy: What Are You Working With?
Before we dive into installation, let’s get familiar with the parts. Most roof rack systems have a few key components that work together to create a secure and stable platform on your vehicle’s roof.
- Crossbars: These are the horizontal bars that run from side to side across your car’s roof. They’re what your gear will actually rest on or attach to. They come in various materials like steel, aluminum, or composite.
- Foot Packs (or Towers): These are the pieces that connect the crossbars to your car. They sit on the roof and grip it securely. The design of the foot pack depends heavily on your vehicle’s roof type.
- Fit Kit (or Clips/Pads): This is a highly vehicle-specific component. It contains custom-shaped clips or padded mounts that engage with your car’s door frames (for “clip-on” systems) or specific mounting points on the roof. This ensures a snug and safe fit.
- Locking Mechanisms: Many modern roof racks come with integrated locks to deter theft. These are usually key-operated.
Types of Roof Rack Mounts: Finding Your Vehicle’s Perfect Fit
The biggest factor in how a roof rack is installed is how it attaches to your car. Different vehicles have different roof designs, and roof rack manufacturers have developed specific systems to accommodate them. Knowing your vehicle’s roof type is the first and most crucial step.
1. Raised, Factory-Installed Side Rails
Many SUVs and wagons come with raised rails that run the length of the roof, with a gap between the rail and the car’s roof. These are very common and generally the easiest to work with.
- How they grip: Foot packs for these systems often wrap around the raised rail or clamp into the space beneath it.
- Installation ease: Usually very simple. You might only need to loosen a clamp, position the foot, tighten it, and then attach the crossbar. Some may require minimal tool use.
2. Flush Factory-Installed Side Rails
These rails run along the length of the roof but sit flush against it, without a visible gap. They often have small mounting points or channels integrated into them.
- How they grip: Foot packs typically slot into the specific channels or attach to designated mounting points designed into the rail.
- Installation ease: Moderately easy. You’ll usually need to locate these points, often covered by small flaps, and then fit the rack components according to the manufacturer’s instructions.
3. Fixed Mounting Points
Some vehicles have small, pre-drilled holes or threaded mounting points concealed under small covers, usually around the edges of the roof or near the door frames. These are designed specifically for roof racks.
- How they grip: Specific foot packs will have hardware that screws directly into these mounting points, creating a very secure connection.
- Installation ease: Can range from moderate to slightly more involved, as you’ll need to accurately locate and access these points.
4. Exposed Rain Gutters (Older Vehicles)
Older cars and some trucks might have a metal rain gutter running along the edge of the roof. While less common now, dedicated racks exist for them.
- How they grip: Special “gutter” style footings clamp directly onto this metal edge.
- Installation ease: Generally straightforward, involving clamping the feet onto the gutter and then attaching the crossbars.
5. Bare Roof (No Rails or Mounts)
This is for vehicles without any factory-installed rails or mounting points. This is where “clip-on” systems are used.
- How they grip: The foot packs have arms with rubber pads that press against the car’s roof and angled clips that hook under the edge of the door frame.
- Installation ease: This type requires the most care. Precise placement of the feet and proper door frame clipping are essential for safety and stability. It’s vital to use the correct fit kit for your specific car model and year.
Pro Tip: Check your car’s owner’s manual. It often provides details about your roof type and sometimes even recommends specific roof rack systems or mounting points.
Gathering Your Tools: What You’ll Need
Most modern roof rack installations are designed for DIY enthusiasts and don’t require specialized automotive tools. However, having the right set of basics will make the job much smoother and ensure a secure fit.
- The Roof Rack System: Make sure you have all the components: crossbars, foot packs, and the correct fit kit for your vehicle.
- Included Tools: Most rack manufacturers include the necessary Allen wrenches or hex keys.
- Measuring Tape: Essential for ensuring even spacing of crossbars.
- Soft Cloth or Towel: To protect your car’s paintwork where you’re placing components.
- A Friend (Optional but Recommended): Especially for bare roof installations or when handling longer crossbars, an extra pair of hands makes things much easier and safer.
- Safety Glasses: Always a good idea when working on your vehicle.
- Cleaning Supplies: A quick wash of the roof area can prevent grit from scratching paint.
Step-by-Step Installation Guide: Making it Happen
This guide covers the general process. Always refer to the manufacturer’s specific instructions for your chosen roof rack system, as details can vary significantly.
Step 1: Preparation is Key
Give your car’s roof and gutters (if applicable) a good wash. This removes any dirt, dust, or grit that could scratch your paint during installation. Ensure the area where the rack will sit is clean and dry.
Step 2: Understanding Your Fit Kit
This is arguably the most critical part for bare-roof or fixed-mount systems. Your fit kit contains components specifically engineered to interface with your vehicle’s door frames or mounting points. For raised or flush rails, the fit kit might just be specific adapters for the foot pack.
For Bare Roof Systems: Your fit kit will likely include rubber pads for the feet and precisely shaped metal clips that hook into your door frame. Familiarize yourself with how these pieces are meant to connect to the foot packs. The manufacturer’s instruction manual will show diagrams for your specific car model. A common resource for understanding vehicle-specific fitment is Thule’s Fit Guide, which helps identify compatible racks and their specific fit requirements.
For Rail Systems: The fit kit might involve specific mounting brackets or blocks that attach to your foot packs, designed to hug your particular style of rail. Again, consult your manual.
Step 3: Attaching the Foot Packs to the Crossbars (or vice versa)
Depending on the system, you might first attach the foot packs to the crossbars, or you might assemble the foot pack onto the vehicle and then attach the crossbars to that.
- If attaching feet to bars first: Follow the manufacturer’s instructions. This usually involves sliding the foot pack onto the end of the crossbar and securing it with bolts or clamps.
- If attaching feet to vehicle first: This is common for bare-roof systems. You’ll position the foot pack on the roof, ensure the rubber pad is correctly placed, and then attach the specific clip that hooks into the door frame.
Step 4: Positioning the First Crossbar
This is where the measuring tape comes in handy. The distance between your front and rear crossbars is crucial for stability and is specified in your roof rack manual. It’s often determined by the vehicle’s roof structure.
- Measure Carefully: Use your measuring tape to mark the desired position on your car’s roof or rails. Consistency is key.
- Attach the First Foot Pack: If using a bare-roof system, you might loosely attach one foot pack, then the other on the same side. Then, position the crossbar.
- Repeat on the Other Side: Ensure the crossbar is level and the foot packs are positioned symmetrically.
Step 5: Securing the Crossbars
This is the most critical step for safety and performance. All connections must be tight and secure.
- For Rail Systems: If your foot packs wrap around the rail, tighten the clamping mechanism until it holds firmly. For fixed points, use the provided hardware to bolt the foot pack into the mounting point.
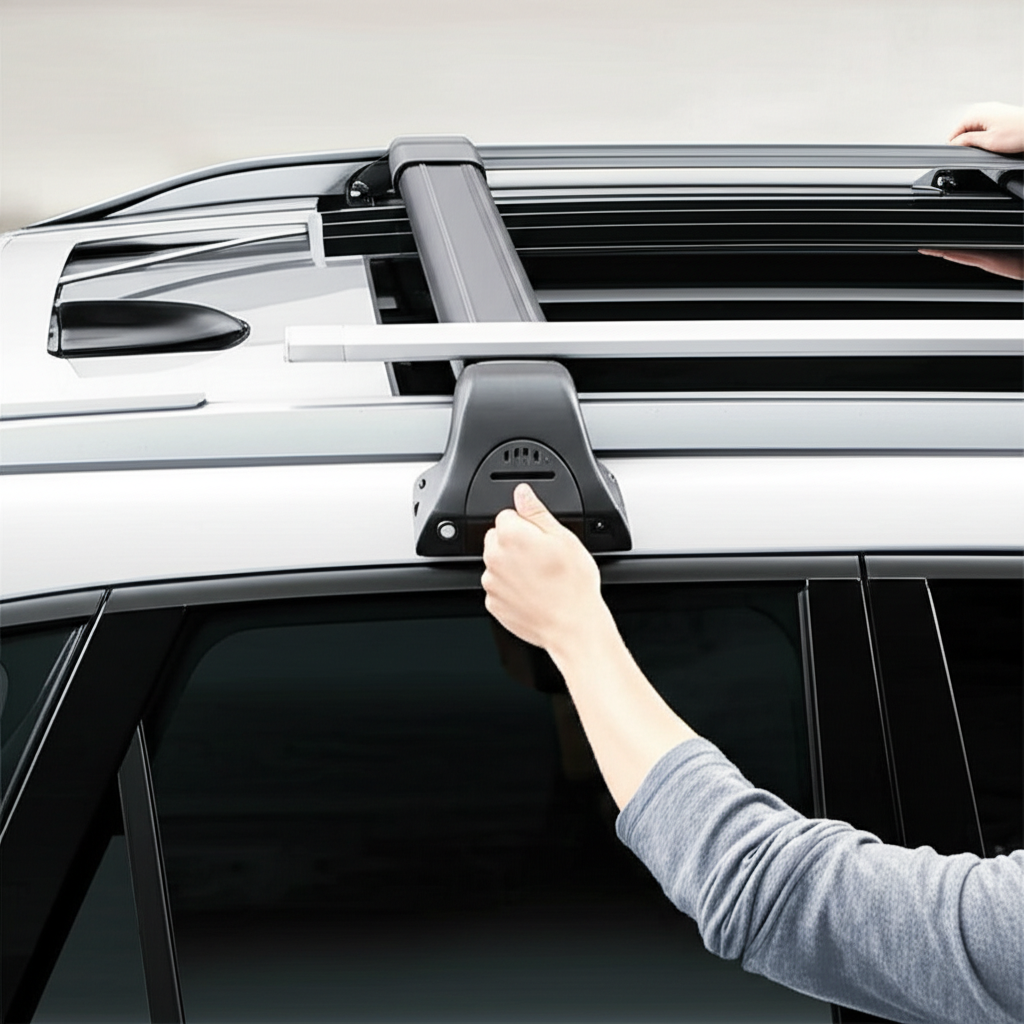
- For Bare Roof Systems: This is where proper door frame attachment is vital. The clips should be securely engaged under the door lip. Then, tighten the mechanism that holds the foot to the crossbar from above. You’ll typically tighten these from inside the car, often with the doors slightly ajar.
Torque Specifications: Many systems have specific torque settings (how tight to make the bolts) to prevent overtightening, which can damage your car, or undertightening, which is unsafe. Use a torque wrench if specified.
Step 6: Measuring and Installing the Second Crossbar
Repeat the process for the second crossbar, using your measurements to ensure it’s placed at the correct distance from the first. Proper spacing is essential for load distribution and preventing noise.
- Measure from the same point: For example, measure from the front of the driver’s door on one side, then the front of the passenger door on the other side, to place the second bar at the same distance.
- Check for Squareness: Once both bars are installed, ensure they are square to the vehicle’s midline.
Step 7: Tighten Everything Down
Go over every single bolt, clamp, and screw. Ensure all connections are snug. If your rack has locking mechanisms, install them now and secure them with the provided keys.
Step 8: The Wobble Test
Before you load anything, give the crossbars a good push and pull from various angles. They should feel solid with minimal movement. Try to rock the rack; if there’s significant play, revisit your tightening steps.
Step 9: Test Drive and Re-Check
Take a short, slow test drive (e.g., around your block). Listen for any unusual wind noise or rattling. Pull over in a safe spot and re-check all the bolts and clamps. This is your final safety check.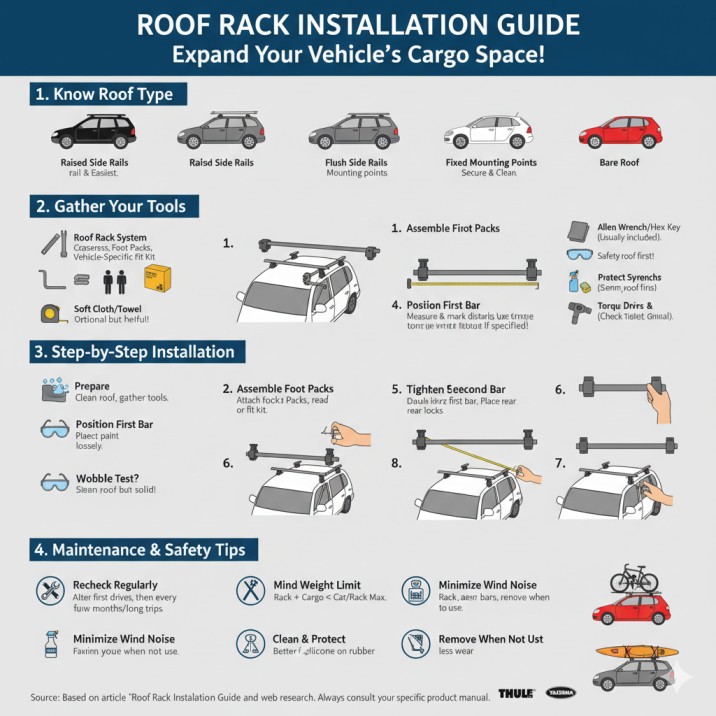
Specific Installation Scenarios: Quick Tips
While the general steps apply, here are some nuances for common scenarios.
A. Installing on Raised Roof Rails
This is one of the easiest types to install. The foot packs are designed to clamp around these rails.
- Loosen the clamps: Open up the foot pack’s clamp wide enough to fit around your rail.
- Position the feet: Slide the foot pack onto the rail at the desired location (use your measurement/manual).
- Tighten: Flip the clamp shut and tighten the bolts or knobs securely.
- Attach crossbar: If they aren’t pre-assembled, attach the crossbar to the foot pack.
- Repeat for other feet/rails.
B. Installing on Flush Rails
Flush rails often have specific mounting points or channels. You’ll typically need to locate these.
- Locate mounting points: Look for small covers or seams along the flush rail. These might need to be lifted or slid off.
- Assemble foot pack: Attach the specific bracket or adapter for your flush rail to the foot pack.
- Attach to rail: Slot the bracket into the rail channel or align it with the mounting point.
- Secure foot pack: Tighten the bolts that integrate the foot pack with the rail.
- Attach crossbar: Connect the crossbar to the foot pack.
- Repeat for all mounting points.
C. Installing on a Bare Roof (Clip-On System)
This requires the most precision. The clips hook under the door frame, and the pads rest on the roof. Incorrect installation can lead to leaks or damage.
- Assemble foot pack with correct clip: Attach the specific metal clip (found in your fit kit) to the foot pack. Ensure it’s oriented correctly for your car door.
- Position feet on roof: Place the foot pack(s) on the roof at the specified locations. The rubber pad should sit flat.
- Hook the clips: Carefully open the car door. Hook the metal clip under the edge of the door frame. The angle and position are critical and detailed in the manual.
- Close door (partially/fully): Close the door until it just touches the clip or the foot pack. Some systems require the door to be fully closed.
- Tighten: From inside the car or from above, tighten the mechanism that draws the foot pack down. This action pulls the clip tighter into the door frame and seats the rubber pad on the roof.
- Repeat for all four corners.
- Crucially, check the manufacturer’s specific instructions for applying outward pressure to the clip while tightening to ensure it seats correctly.
Factors Affecting Installation and Performance
Even with the best intentions, several factors can influence your roof rack installation and how well it performs over time. Being aware of these can save you headaches and ensure safety.
| Factor | Impact on Installation | Performance Impact (Post-Installation) | Tips & Solutions |
|---|---|---|---|
| Vehicle Type & Roof Design | Determines the required rack system (rails, flush, bare roof) and fit kit. Non-standard roofs may need specialized solutions. | A well-matched rack ensures stability and minimal noise. An ill-fitting one causes issues. | Always use a fit guide (like Yakima’s Fit My Vehicle) before purchasing. |
| Weather Conditions | Extreme heat can make rubber sticky; cold can make plastic brittle. Rain makes metal slippery. | Can affect aerodynamics and increase wind noise. | Install on a mild, dry day if possible. Clean and dry the vehicle thoroughly. |
| Roof Rack Brand & Quality | Ease of assembly, precision of fit kits, and durability of materials vary. | Higher quality racks are generally quieter, more secure, and last longer. | Invest in reputable brands known for engineering and safety. |
| Torque Settings | Overtightening can damage roof, paint, or rack components. Undertightening leads to instability. | Proper torque ensures the rack stays put. | Use a torque wrench if specified by the manufacturer. If not, tighten firmly but avoid excessive force. |
| Regular Maintenance | Components can loosen due to vibrations over time. | Loose racks are noisy, inefficient, and dangerous. | Re-check tightness of all bolts and clamps periodically (e.g., every few months, or before long trips). Inspect rubber pads for wear. |
Troubleshooting Common Installation Issues
Even with careful following of instructions, you might run into a snag. Here are some common problems and how to solve them:
- Wind Noise/Whistling: This is very common. It can be caused by the shape of the crossbars, their spacing, or how tightly they are mounted.
- Solution: Try adjusting the crossbar spacing slightly. Anti-whistle tape or a wind fairing (a deflector that mounts to the front crossbar) can also help.
Rack Feels Loose After Installation
If your rack wobbles or shifts after you’ve installed it, it usually means one or more feet aren’t seated correctly or the clamps need more tightening.
Solution:Double-check that all rubber pads sit flush against the roof and that the clips are properly hooked.
Ensure the crossbars are parallel and evenly spaced.
Re-torque all bolts or clamps following the manufacturer’s specifications.
If looseness persists, remove and reinstall one section at a time to identify the problem area.
Uneven Crossbars
Sometimes, one side of your rack might sit slightly higher than the other. This can cause uneven load distribution and excess wind drag.
Solution:
Use a measuring tape to confirm both crossbars are level and parallel to the roof. Adjust foot pack positions slightly until both sides align perfectly.Door Seal Interference
On bare-roof installations, door seals might not close properly after clipping the rack under the frame.
Solution:
Ensure clips are positioned exactly where the manufacturer specifies — even a few millimeters off can interfere with sealing. Most rubber door gaskets will compress around the clip once the rack is installed correctly.After Installation: Maintenance & Safety Tips
Installing your roof rack is only the beginning — maintaining it properly ensures long-term safety and performance.
1. Recheck Tightness Regularly
After your first few drives, especially after carrying a load, recheck all bolts and clamps. Vibrations can cause slight loosening over time. Make it a habit to inspect every few months or before long trips.
2. Mind the Weight Limit
Always respect the manufacturer’s maximum load capacity — both for the rack system and your vehicle’s roof. Overloading can cause damage or make your car unstable. Remember to factor in the weight of the rack itself when calculating the total.
3. Minimize Wind Noise
Wind fairings or aerodynamic crossbars can significantly reduce noise and drag. Positioning accessories symmetrically and removing unused attachments when not needed also helps.
4. Clean and Protect
Dirt and road salt can corrode metal parts over time. Clean your rack periodically, and apply a silicone protectant to rubber pads to keep them supple.
5. Remove When Not in Use
If you won’t be using your roof rack for an extended period, consider removing it. This reduces wear, improves fuel efficiency, and prevents UV-related degradation of rubber and plastic components.
Roof Rack Installation: Final Thoughts
Installing a roof rack might sound intimidating at first, but once you understand your vehicle’s roof type and follow the proper steps, it’s a straightforward DIY project. With the right tools, a compatible fit kit, and careful alignment, you can securely mount your rack and expand your vehicle’s cargo capacity in under an hour.
Whether your car has raised rails, fixed mounting points, or a bare roof, this roof rack installation guide gives you everything you need to ensure a stable, noise-free, and long-lasting setup. A properly installed rack not only increases functionality but also unlocks new adventures — from carrying bikes and kayaks to extra luggage for road trips.
Always double-check your torque settings, crossbar alignment, and overall load weight to keep your gear secure and your car safe. With consistent maintenance and periodic inspections, your rack will perform reliably for years to come.
Frequently Asked Questions (FAQ)
1. Can I install a roof rack myself?
Absolutely. Most roof rack systems are designed for DIY installation using basic hand tools. Just follow the manufacturer’s guide carefully and ensure you use the correct fit kit for your specific vehicle model.
2. Do I need to drill holes in my car?
No. Most modern roof racks attach using clamps, clips, or mounting points already integrated into the vehicle’s design. Drilling is almost never required unless your car’s manufacturer specifies it.
3. How long does installation take?
Typically between 30 minutes to 1 hour. Raised-rail systems are the fastest, while bare-roof clip-on systems take a bit more care and time to position properly.
4. How tight should I make the bolts?
Tighten them firmly but not excessively. Many roof rack brands, like Thule or Yakima, include torque specifications—use a torque wrench if available to ensure a secure but safe fit.
5. Why does my roof rack make noise while driving?
Wind noise is common, especially with square crossbars or uneven spacing. Adjust bar placement slightly or install a wind fairing to reduce noise.
6. Can I leave my roof rack on all the time?
You can, but removing it when not in use is better for fuel efficiency and longevity. Constant exposure to weather and UV rays can wear out rubber and plastic components over time.
7. How much weight can I safely carry?
Check your vehicle’s roof load capacity (found in the owner’s manual) and the rack’s rated limit. The total weight — rack plus cargo — must not exceed the lower of the two.
8. Do roof racks affect fuel efficiency?
Yes, slightly. The added drag can reduce mileage by 5–15%, depending on rack design and speed. Removing unused racks or using aerodynamic crossbars can minimize this.
9. How often should I check or retighten my roof rack?
Inspect all bolts and clamps after your first few drives, then periodically every few months or before long trips. Vibration from driving can cause slight loosening over time.
Recent Posts
Car Fridge Power Cable: Essential Guide to Reliable Cooling on the Go
Have you ever been on a long road trip, only to find your car fridge powerless because the cable didn’t fit or broke? It’s frustrating when your cold drinks or snacks spoil just because of a...
Best Tesla Model 3 License Plate Frame No Drill Install for Easy Setup
Have you ever tried to install a front license plate on your Tesla Model 3, only to realize you need to drill holes? It’s frustrating and nerve-wracking.You worry about damaging your car’s...