
Quick Summary: Most rooftop tents require a roof rack or crossbars for secure mounting. While some tents can attach directly to factory-installed roof rails, a dedicated rack system offers better support, weight distribution, and vehicle compatibility for a safe and stable setup.
Thinking about adventure with a rooftop tent (RTT) is exciting! But before you hit the road, a crucial question pops up: “Do you need a roof rack for a roof top tent?” It’s a common point of confusion for beginners, and getting it right ensures your tent is mounted safely and securely. You don’t want to worry about your cozy camping spot wobbling down the highway! This guide will break down exactly what you need to know, making the process clear and simple.
We’ll explore the different types of setups, explain why a proper rack is often essential, and help you make the best choice for your vehicle and your adventures. By the end, you’ll feel confident about securing your rooftop tent and ready for your next getaway.
Understanding Your Rooftop Tent’s Needs: What Does It Weigh?
Rooftop tents aren’t small. They are sturdy structures designed to withstand wind, rain, and the weight of people sleeping inside. Because of this, they also have a significant weight of their own. This weight is the first thing to consider when thinking about how to mount it. You can’t just strap it to the bare roof of your car; it needs strong support.
The weight of a rooftop tent can range significantly, typically anywhere from 50 pounds for smaller, lighter soft-shell models to well over 200 pounds for larger, hard-shell tents with more features. This means the mounting system needs to be robust enough to handle both the tent’s weight and the dynamic loads it will experience while you’re driving, braking, and cornering.
Key Considerations for Tent Weight:

- Static Weight: The actual weight of the tent itself.
- Dynamic Weight: The added stress on the mounting system from movement while driving. This is often much higher than the static weight.
- Occupant Weight: The weight of people and gear inside the tent when in use.
Always check the specific weight of the rooftop tent model you’re interested in. Manufacturers provide this information, and it’s a vital starting point for determining the right mounting solution.
Do You Need a Roof Rack for a Roof Top Tent? The Short Answer
For the vast majority of rooftop tents, the answer is yes, you absolutely need a roof rack. This typically means a system of crossbars and/or a robust platform that attaches securely to your vehicle’s roof. Think of it as the foundation for your adventure home.
While some very specific vehicle setups with exceptionally strong factory-installed rails might offer direct mounting options for certain tents, this is rare. Most tent manufacturers design their products with the assumption that they will be mounted onto a dedicated aftermarket roof rack system. These systems are engineered to safely support the weight and stress involved.
Trying to mount a rooftop tent directly onto a car’s bare roof, flimsy factory side rails, or a weak aftermarket system is not only unsafe but can also damage your vehicle and your tent. It’s a recipe for potential disaster on the road or at your campsite.
Why a Roof Rack is Essential for Rooftop Tents
A roof rack isn’t just an accessory; it’s a critical component for safely and reliably transporting your rooftop tent. Here’s why it’s so important:
1. Weight Distribution and Support
Rooftop tents are heavy. A proper roof rack system, especially one with sturdy crossbars or a full platform, distributes this weight evenly across the mounting points on your vehicle. This prevents undue stress on any single part of your car’s roof or frame. A well-designed rack ensures the tent sits flush and stable, reducing the risk of it shifting or causing damage.
2. Secure Mounting Points
Roof racks are designed to provide strong, dedicated anchor points. Rooftop tents usually have mounting brackets that slide into the load bars of crossbars or attach to the rails of a platform rack. These specialized brackets ensure the tent is cinched down tightly and won’t budge, even on rough terrain or at highway speeds.
3. Vehicle Compatibility and Safety Ratings
Aftermarket roof rack systems are engineered with specific weight capacities. These capacities take into account both the static weight of what you’re carrying (your tent) and the dynamic forces it experiences while driving. Exceeding your vehicle’s roof load capacity can lead to:
- Damage to your vehicle’s chassis, roof, and suspension.
- Compromised handling and braking due to an unstable load.
- Increased tire wear and fuel consumption.
Reputable rack manufacturers test their systems thoroughly and provide clear weight ratings. For example, companies like Thule and Yakima meticulously engineer their systems to meet safety standards verified by organizations like TÜV, a global leader in testing and certification.
4. Aerodynamics and Noise Reduction
While any load on your roof will affect aerodynamics, a properly designed and installed roof rack can help minimize wind noise and drag compared to a poorly secured tent or a makeshift mounting solution. Some racks are sleeker than others, and the way you mount the tent can also influence noise.
5. Protection for Your Vehicle
A good roof rack acts as a buffer between your vehicle’s roof and the heavy, often metal, base of the rooftop tent. This prevents scratches, dents, and warping of your car’s roof panel, preserving its value and appearance.
Types of Roof Racks for Rooftop Tents
Not all roof racks are created equal, and the best choice depends on your vehicle, the tent you choose, and your budget. Here are the most common types:
1. Factory-Attached Roof Rails
Some vehicles come with factory-installed roof rails that run along the length of the roof. These can be raised or flush. While some lightweight tents might attach to certain strong factory rails, it’s often not the ideal solution for heavier RTTs. The weight capacity of factory rails can be surprisingly low. Always check your vehicle’s manual for the exact load rating. If your rails are rated high enough and the tent brackets are compatible, this could be a simple option, but it’s less common for serious RTT use.
2. Aftermarket Crossbars (Load Bars)
This is the most common and versatile setup for rooftop tents. Crossbars are independent bars that mount across your vehicle’s roof, typically attaching to door frames (using a specific fit kit for your car model) or directly to existing factory rails or fixed mounting points. You’ll need to ensure the crossbars have sufficient weight capacity for your tent.
Key Features of Crossbar Systems:
- Mounting Styles:
- Fit Kits: These are vehicle-specific clips and pads that attach to your door jambs, providing a secure attachment point for the crossbars. Crucial for cars without factory rails.
- Rail-Mount: These attach directly to factory-raised or flush side rails.
- Fixed-Point Mount: These use hidden mounting points on your vehicle’s roof, often covered by small panels.
- Load Capacity: This is paramount. Look for systems rated for at least 165 lbs (75 kg) static load and preferably much higher for dynamic loads. Many heavy-duty systems can handle 200+ lbs dynamically.
- Material: Typically made of aluminum or steel. Aluminum is lighter and more corrosion-resistant, while steel is often stronger and less expensive.
Examples of reputable crossbar brands: Thule, Yakima, Rhino-Rack, Front Runner.
External Link: Learn more about roof rack basics and load ratings from a reputable source on vehicle accessories like REI’s guide to choosing a roof rack.
REI’s Guide to Choosing a Roof Rack
3. Roof Platforms (Racks)
A roof platform is a flat, grid-like or solid surface that covers a significant portion of your vehicle’s roof. These are the most robust and secure option for carrying a rooftop tent. They distribute weight over a very large area and offer numerous mounting points, making them ideal for heavier tents and for carrying other gear alongside the tent.
Key Features of Roof Platforms:
- Full Coverage: Provides maximum surface area for support and mounting.
- High Load Capacity: Typically have the highest weight ratings, often exceeding 200 lbs dynamic load.
- Versatile Mounting: Many slots and tie-down points allow for flexible tent placement and attachment.
- Accessories: Can easily accommodate awnings, lights, and other adventure gear.
Platforms are generally more expensive and can add significant weight and wind noise to your vehicle, but they offer the ultimate in security and utility for rooftop tent users.
Examples of reputable platform brands: Front Runner Outfitters, Rhino-Rack, Yakima (Off-Grid series).
Can You Mount a Rooftop Tent Directly Without a Rack?
As a general rule for most vehicles and rooftop tents, no, you cannot safely mount a rooftop tent directly without a proper roof rack system. Attaching a tent directly to a car’s body, bare roof, or very low-capacity factory side rails poses several risks:
- Insufficient Strength: Most car roofs are not designed to support the static weight of an RTT (100+ lbs) plus the dynamic forces of driving (which can be 5-10 times the static weight).
- Damage to Vehicle: The concentrated pressure points from the tent’s mounting hardware can dent, scratch, or even crack your car’s roof.
- Instability and Safety Hazards: An improperly mounted tent can shift, leading to precarious handling, potential detachment, and accidents.
- Voided Warranties: Attempting to mount heavy equipment like an RTT without the manufacturer’s recommended support can void your vehicle’s warranty.
The only exceptions might be extremely specific factory-integrated mounting systems designed for this exact purpose, or perhaps certain ultra-lightweight, single-person tents on vehicles known for exceptional roof strength, coupled with very precise DIY mounting solutions. However, for the average user with a standard vehicle and RTT, investing in a quality roof rack is non-negotiable.
Table: Comparing Roof Tent Mounting Options
Here’s a quick comparison to help you see the differences:
| Mounting Method | Best For | Pros | Cons | Typical Cost Range |
|---|---|---|---|---|
| Factory Side Rails (Direct Mount) | Very lightweight RTTs on vehicles with high-rated rails. | Potentially simplest and cheapest if compatible. | Low weight capacity often unsuitable for RTTs, limited compatibility, risk of damage. | N/A (Utilizes existing parts) |
| Aftermarket Crossbars | Most RTT users, versatile for various vehicles. | Good weight capacity, adaptable to many vehicles, allows for other accessories. | Requires careful selection of crossbar strength and fit kit, can add noise/drag. | $300 – $800+ |
| Roof Platform | Heavy RTTs, frequent off-roading, carrying multiple accessories. | Highest load capacity, superior stability, maximum support, versatile for gear. | Most expensive, heaviest option, can significantly increase wind noise and fuel consumption. | $800 – $2000+ |
Note: Costs are estimates and can vary greatly by brand, vehicle, and installation complexity.
How to Choose the Right Roof Rack System
Selecting the best rack system involves a few key decisions:
1. Know Your Vehicle
Start by identifying what type of roof your vehicle has:
- Bare Roof: No factory rails or mounting points. You’ll need crossbars with fit kits that clamp into the door frames.
- Factory Side Rails: Raised or flush rails running front to back. You can often use rail-mount crossbars or attach a platform directly.
- Fixed Mounting Points: Hidden points under trim pieces. These are excellent for robust rack systems.
Check your vehicle’s owner’s manual for its dynamic roof load capacity. This is crucial information!
2. Consider Your Rooftop Tent
Refer to your RTT’s specifications. Most RTTs will state the minimum crossbar spread required for mounting and ideally the recommended rack type (e.g., “mounts to crossbars” or “mounts to platform”).
- Softshell vs. Hardshell: Hardshell tents are generally heavier and bulkier, often benefiting more from a platform.
- Mounting Hardware: Understand how the tent attaches to the rack. Most use brackets that slide onto or bolt to crossbars.
3. Determine Your Budget
Roof rack systems vary in price. Crossbars are generally the most affordable, while full platforms are the most expensive. Factor in the cost of the rack, any necessary vehicle-specific fit kits, and potentially professional installation if you’re not comfortable doing it yourself.
4. Prioritize Weight Capacity
This cannot be stressed enough. Ensure the entire system (crossbars or platform, plus any mounting hardware) has a dynamic weight rating that safely exceeds the combined weight of your fully-equipped rooftop tent. Remember, your car’s roof load rating is the ultimate limit. Vehicle roof load capacity varies significantly by make and model.
5. Think About Aerodynamics and Noise
If long highway drives are common, consider lower-profile racks or more aerodynamic crossbar shapes to reduce wind noise and improve fuel efficiency. Platforms tend to be noisier and create more drag than crossbars alone.
Step-by-Step: Installing a Roof Rack for Your RTT (General Guide)
This is a general overview. Always refer to the specific instructions provided by your rack manufacturer and your vehicle’s owner’s manual.
Tools You Might Need:
- The roof rack system (crossbars, feet, fit kit, or platform)
- Specific tools mentioned in your rack’s instructions (often Allen wrenches, torque wrenches, measuring tape)
- A helper (recommended for safety and ease)
- A soft cloth or towel to protect your car’s paint
- Possibly a small step ladder

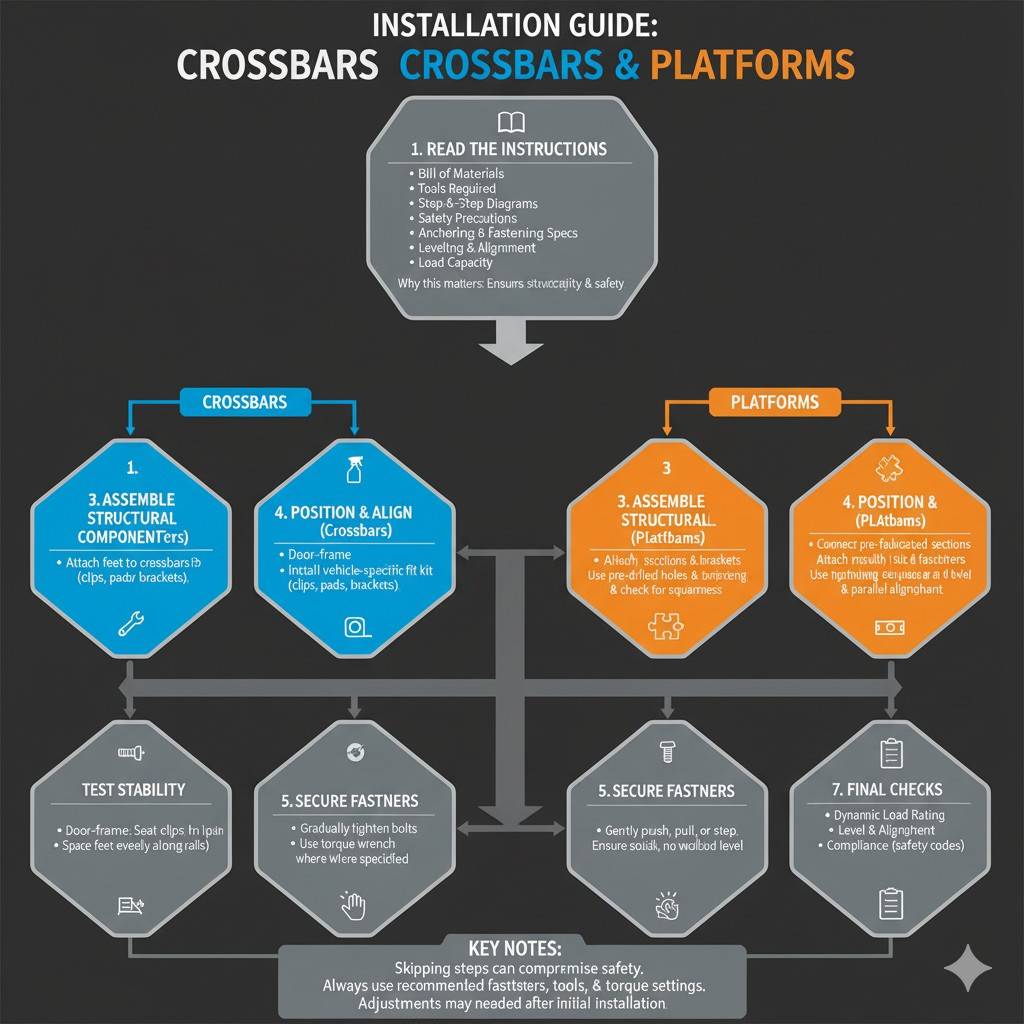
Installation Guide: Crossbars & Platforms
Installing a crossbar system or platform correctly is essential for safety, stability, and long-term performance. Whether you’re mounting roof crossbars for a roof top tent (RTT) or assembling a modular platform, following precise steps ensures reliable results.
1. Read the Instructions
Before handling any components, carefully review the manufacturer’s instructions. Each system has unique requirements depending on the design, vehicle, or intended platform:
- Bill of Materials: Verify all parts are included.
- Tools Required: Prepare necessary tools such as wrenches, torque wrench, drill, level, and measuring tape.
- Step-by-Step Diagrams: Use visual aids for proper assembly.
- Safety Precautions: Follow warnings for lifting, heights, electrical hazards, and handling heavy components.
- Anchoring & Fastening Specs: Use the specified bolts, screws, or anchors with proper spacing.
- Leveling & Alignment: Ensure crossbars or platform sections are square, level, and aligned.
- Load Capacity: Confirm the system can safely support the intended weight (e.g., RTT, cargo, or people).
Why this matters: Properly understanding the instructions ensures structural integrity, correct load distribution, environmental compatibility, and compliance with safety regulations.
2. Prepare the Installation Surface
- Vehicles (Crossbars): Clean the roof area where crossbars or feet will attach to prevent scratches and ensure a secure fit.
- Platforms: Ensure the floor, ground, or support structure is clean, stable, and level before assembly.
3. Assemble Structural Components
For Crossbars:
- Attach the feet to the crossbars according to instructions.
- Install vehicle-specific fit kit components (clips, pads, brackets) into the feet.
For Platforms:
- Connect pre-fabricated sections such as floor panels, support frames, or beams.
- Attach mounting brackets to distribute load, maintain alignment, and aid leveling.
- Use pre-drilled holes and manufacturer-specified fasteners.
- Follow the tightening sequence to avoid warping and continually check for squareness and level.
4. Position and Align
- Crossbars:
- Door-frame systems: Ensure clips seat correctly in door jambs.
- Rail-mounted systems: Space the feet evenly along rails.
- Platforms:
- Align sections according to instructions and ensure brackets interface properly with rails, mounting points, or support structures.
Tip: Use a measuring tape and level to ensure correct spacing and parallel alignment.
5. Secure Fasteners
- Gradually tighten bolts, screws, or anchors.
- Use a torque wrench where specified to avoid under- or over-tightening.
- Follow alternating tightening patterns for multi-point connections to maintain even pressure.
6. Test Stability
- Gently push, pull, or step on the crossbars or platform.
- Ensure all sections are solid, do not wobble, and remain level.
7. Final Checks
- Dynamic Load Rating: Confirm crossbars or platforms can handle the intended load safely.
- Level & Alignment: Recheck squareness and spacing.
- Compliance: Verify adherence to safety codes and manufacturer guidelines.
Key Notes:
- Skipping steps can compromise safety and structural integrity.
- Always use recommended fasteners, tools, and torque settings.
- Adjustments may be needed after initial installation, especially for modular platforms.
FAQ: Rooftop Tents and Roof Racks
Q1: Do all rooftop tents require a roof rack?
A: Yes, most rooftop tents need a dedicated roof rack or crossbars for safe mounting. Only very specific factory-integrated mounting systems may allow direct attachment.
Q2: Can I use factory roof rails for my rooftop tent?
A: Sometimes, if the rails are strong and rated for the tent’s weight. However, most heavy or hardshell tents perform best on aftermarket crossbars or platforms designed for high load capacity.
Q3: What’s the difference between crossbars and roof platforms?
A: Crossbars are simpler, lighter, and easier to install; platforms provide maximum support, distribute weight over a larger area, and offer more mounting flexibility for heavier tents or additional gear.
Q4: How do I know my rack can handle my rooftop tent?
A: Check the dynamic weight rating of your rack and compare it to the total weight of your tent plus occupants. Never exceed your vehicle’s roof load limit.
Q5: Will a roof rack affect fuel efficiency or noise?
A: Any roof load changes aerodynamics. Well-designed racks and properly mounted tents minimize wind noise and drag, but platforms generally produce more resistance than crossbars alone.
Quick Summary: Most rooftop tents need a roof rack for secure mounting. Crossbars or platforms distribute weight, provide stable anchor points, and ensure your tent is safe for highway and off-road use. Choosing the right system protects your vehicle, reduces stress on your tent, and gives you peace of mind on every adventure.
Recent Posts
Jumper Cables With Bag: Heavy Duty Booster Cables for Easy Storage
There’s nothing more frustrating than turning the key in your car and hearing silence. A dead battery can ruin your day in an instant.You might feel stuck, stressed, and unsure what to do next....
Strong Ram 1500 Heavy Duty License Plate Frame for Ultimate Durability
There’s nothing more frustrating than struggling with a flimsy license plate frame that bends, rusts, or just doesn’t fit right on your Ram 1500. You want something strong and reliable that...