
Are you struggling to find the right drive belt size for your vehicle or machine? Picking the correct belt can be confusing, but it’s crucial for smooth performance and avoiding costly repairs.
In this guide, you’ll learn exactly how to measure your drive belt and choose the perfect fit with ease. By the end, you’ll feel confident making the right choice every time—saving you time, money, and frustration. Keep reading, and let’s simplify the process together!
Types Of Drive Belts
Drive belts are essential parts of many machines and vehicles. They transfer power from one part to another. Different types of drive belts suit different needs. Knowing their types helps you choose the right one for your machine.
V-belts
V-belts are common in many engines. They have a trapezoidal shape. This shape helps the belt grip the pulleys tightly. V-belts are strong and can handle high power. They are easy to replace and cost-effective.
Timing Belts
Timing belts have teeth on their inner side. These teeth fit into matching grooves on the pulley. This design keeps the belt from slipping. Timing belts keep engine parts in sync. They are critical for engine timing and performance.
Serpentine Belts
Serpentine belts are flat and wide. They wrap around several pulleys at once. This belt drives many parts like the alternator and air conditioner. Serpentine belts are durable and save space. They need less maintenance compared to other belts.
Flat Belts
Flat belts are smooth and thin. They run on flat pulleys. These belts are used in light machines and older equipment. Flat belts move quietly and smoothly. They work best at low speeds and light loads.
Credit: www.mtdparts.com
Key Drive Belt Dimensions
Understanding the key dimensions of a drive belt is essential for choosing the right size. These dimensions ensure the belt fits perfectly and works efficiently. Measuring the length, width, thickness, pitch, and profile helps match the belt with your machine’s needs. Each dimension plays a specific role in the belt’s performance and durability.
Length Measurement
Length is the total distance around the belt. It includes the belt’s outer edge and inner circumference. Use a flexible tape measure or a string to find the exact length. Measure the old belt or the pulleys to get a correct size. Accurate length ensures the belt fits tightly without slipping.
Width And Thickness
Width is the belt’s flat side from edge to edge. Thickness is how deep the belt is from top to bottom. Both dimensions affect the belt’s strength and grip. Use a ruler or caliper to measure width and thickness precisely. Proper width and thickness prevent wear and improve belt life.
Pitch And Profile
Pitch is the distance between belt teeth or grooves. Profile is the shape and design of those teeth or grooves. These dimensions matter for timing belts and ribbed belts. They ensure the belt meshes well with the pulley. Measuring pitch and profile helps avoid slipping or damage.
Tools For Measuring Drive Belts
Measuring drive belts needs the right tools to get accurate results. Using proper tools helps in choosing the correct belt size. This ensures the belt fits well and lasts longer. Here are some common tools used to measure drive belts.
Measuring Tape
A measuring tape is simple and easy to use. It helps measure the belt length around pulleys or flat surfaces. Flexible tapes work best for curved paths. Measure twice to avoid mistakes. This tool is affordable and widely available.
Calipers
Calipers measure the belt width and thickness precisely. They have two jaws to hold the belt edges firmly. Digital calipers show measurements on a screen. Use calipers to check if the belt matches required specs. Small size makes them handy for tight spots.
Belt Tension Gauges
Belt tension gauges check the tightness of the drive belt. Proper tension prevents slipping and wear. These gauges apply force and show tension in units like pounds or newtons. Adjust belt tension based on gauge readings for best performance. They protect the belt and machine parts.
Step-by-step Measurement Guide
Knowing the exact size of your drive belt is key to choosing the right replacement. This guide will help you measure your belt correctly. Follow each step to avoid mistakes and ensure a perfect fit. Accurate measurements save time and money.
Measuring Belt Length
Start by removing the belt from the machine. Lay it flat on a clean surface. Use a flexible tape measure for best results. Measure the total length by wrapping the tape around the belt’s outer edge. Note the number in inches or millimeters. This is the belt’s outer circumference.
Checking Belt Width
Next, measure the belt width. Use a ruler or caliper for accuracy. Place the tool across the belt’s widest part. Write down the width in millimeters or inches. This helps match the belt to the pulley grooves. Avoid guessing the width to prevent slipping issues.
Assessing Belt Condition
Look closely at the belt’s surface. Check for cracks, fraying, or signs of wear. A worn belt can break or slip easily. Inspect both sides of the belt carefully. Replace the belt if it shows any damage. A healthy belt ensures smooth machine operation.
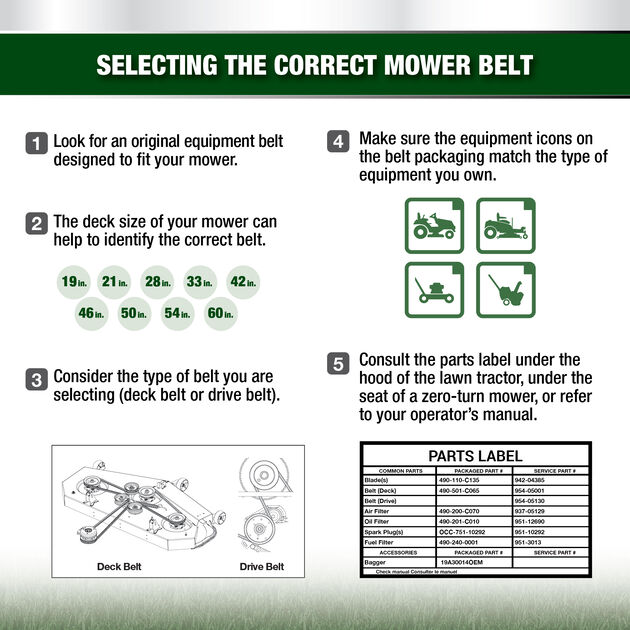
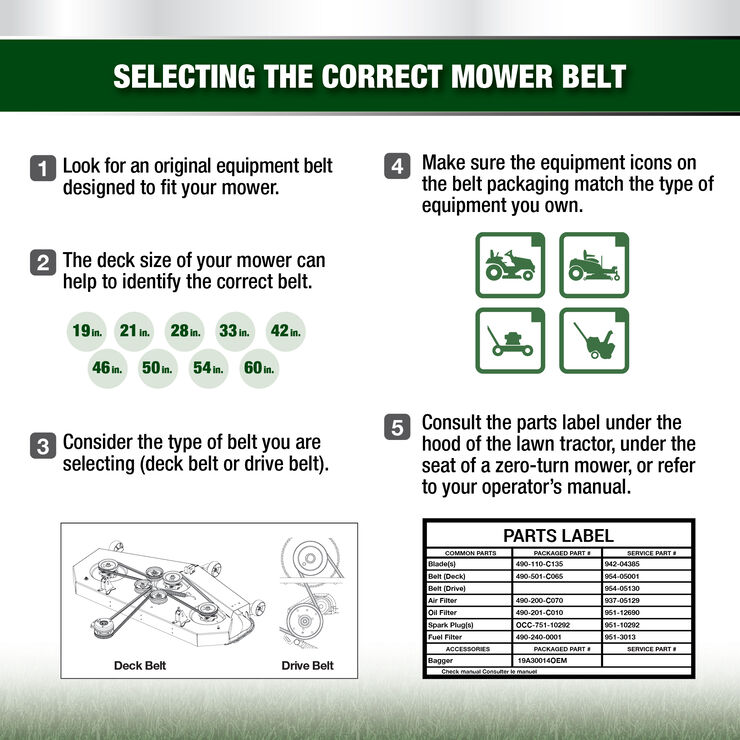
Choosing The Right Belt Size
Choosing the right belt size is essential for the smooth operation of machines. The correct belt size ensures proper fit and efficient power transmission. A wrong size can cause slippage, wear, or even damage to the equipment.
Understanding how to match the belt to the pulley, select the right material, and consider the load and speed helps in making the right choice. Each factor affects the belt’s performance and durability.
Matching Belt To Pulley
The belt must fit the pulley grooves perfectly. Check the pulley type and size before choosing the belt. Measure the pulley diameter and groove width carefully. A tight or loose fit reduces efficiency and may damage the belt or pulley. Select a belt that matches the pulley profile for best results.
Considering Belt Material
Belt materials vary based on strength and flexibility. Common materials include rubber, leather, and synthetic fibers. Choose a material that suits the machine’s environment and temperature. For heavy-duty work, stronger materials last longer. For light tasks, flexible materials provide better grip.
Accounting For Load And Speed
Heavy loads require belts with higher tensile strength. Speed affects belt tension and heat buildup. Higher speeds need belts that resist slipping and wear. Calculate the load and speed to find the belt that handles these conditions well. Proper selection prevents early belt failure and keeps machines running smoothly.

Credit: www.youtube.com
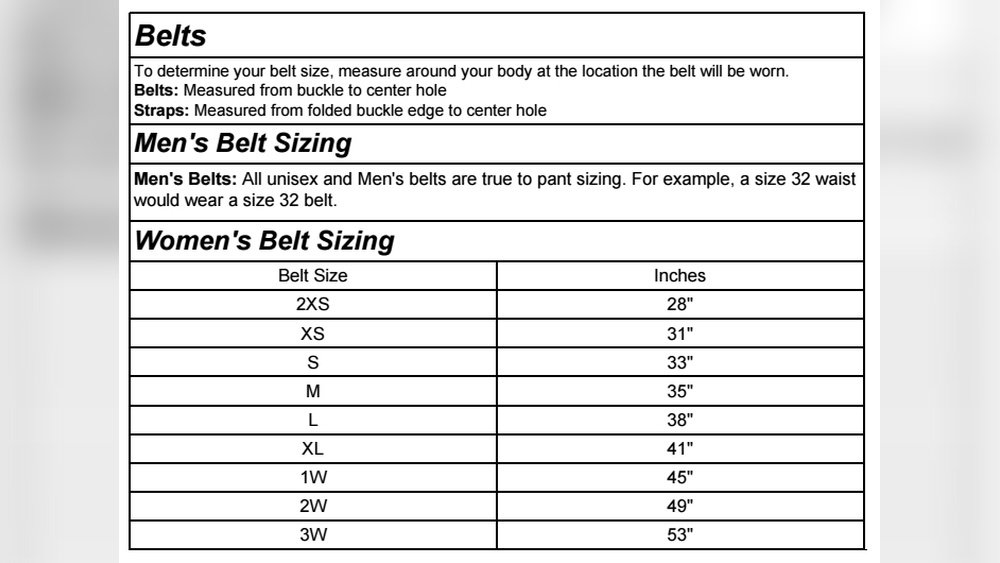
Common Belt Size Standards
Understanding common belt size standards helps you pick the right drive belt. Different systems use different units and codes. Knowing these standards makes measuring and choosing easier. This section explains the main size standards used worldwide.
Imperial Vs Metric Sizes
Drive belts come in two main measurement types: imperial and metric. Imperial sizes use inches, common in the US. Metric sizes use millimeters, popular in Europe and Asia. Each system measures belt length and width differently. Knowing which system applies saves time and errors.
Industry Size Codes
Manufacturers assign size codes to belts for easy identification. These codes include letters and numbers. They represent belt width, length, and profile type. Codes vary by belt type, such as V-belts or timing belts. Learning these codes helps match belts to machines quickly.
Cross-reference Charts
Cross-reference charts compare different belt standards side by side. They list imperial and metric sizes with industry codes. These charts help find equivalent belts from various brands. Use charts to ensure a perfect fit without guessing. They are essential for repairs and replacements.
Tips For Belt Maintenance
Maintaining your drive belt properly extends its life and keeps machines running smoothly. Simple care helps avoid breakdowns and costly repairs. Follow these easy tips to keep your belt in good shape.
Proper Tensioning
Check the belt tension regularly. A belt too tight can wear out bearings and cause damage. A loose belt slips and reduces power. Use a tension gauge or follow the machine’s manual for the right tightness. Adjust tension carefully to avoid problems.
Regular Inspections
Look at your belt often for cracks, frays, or glazing. Any signs of wear mean the belt might fail soon. Clean the belt and pulleys to remove dust and oil. Dirty belts slip more and wear faster. Early detection helps prevent sudden breakdowns.
Replacing Worn Belts
Replace belts that show deep cracks, missing chunks, or severe wear. Old belts lose elasticity and can break without warning. Always use the correct size and type for your machine. Installing a fresh belt keeps your equipment running safely and efficiently.
Credit: www.cubcadet.com
Frequently Asked Questions
What Is The Best Way To Measure A Drive Belt Size?
Use a flexible tape measure to find the belt’s length and width. Measure the outer circumference for length and the cross-section for width. Accurate measurement ensures proper fit and performance.
How Do I Choose The Right Drive Belt Size?
Match the belt size with your machine’s specifications. Check the length, width, and type recommended by the manufacturer. Selecting the correct size prevents slippage and extends belt life.
Can I Use A Worn Belt As A Reference Size?
No, a worn belt may have stretched or shrunk. Always measure a new or unworn belt for accuracy. Using a damaged belt size can cause improper fit and machine issues.
Why Is Drive Belt Size Important For Performance?
Correct belt size ensures efficient power transmission and reduces wear. A wrong size causes slipping, noise, and damage. Proper sizing improves machine reliability and lifespan.
Conclusion
Choosing the right drive belt size is key for smooth machine work. Measure your belt carefully using the guide above. Check the length, width, and type to match your needs. Using the wrong size can cause damage or poor performance.
Keep your measurements handy when buying a new belt. This helps you avoid mistakes and saves time. A good fit means better power and longer belt life. Take a moment to measure well, and your machine will run better. Simple steps, big difference.

- Space-Efficient 5-Tier Design: This 5-tier indoor greenhouse (40.2″ L x 18.9″ W x 74.8″ H) maximizes growing space verti…
- Durable Tent with Enhanced Visibility & Ventilation: Crafted for indoor cultivation, this greenhouse PVC tent provides w…
- Energy-Efficient Full Spectrum Lighting: Equipped with 5 packs of 23.6-inch T8 grow lights for indoor plants, this LED g…

- Four-Tier Construction: Boasting an overall size of 60 “x 35″x 16”, the greenhouse covers roomy space for all your bloom…
- Tough & Durable: Possessed with elector-coating, the tubes are tough, sturdy and rustproof. Made of premium PE, the eco-…
- Roll-up Zippered Door: The Purlyu Mini Greenhouse is designed with a zippered roll-up door for easy access and optimum a…

- STURDY & STRONG – This is a really nice solid green houses for outside, no matter what weather conditions. We use high-q…
- QUALITY UV RESISTANT PANELS – The 580g PC panels of this mini greenhouse that are 4mm thick and twin-wall polycarbonate …
- OPTIMAL AIRFLOW – With adjustable ventilation windows and a lockable door, this small greenhouse kit can ensure both fre…

- 【Effortless Assembly】Create your beautiful gardening space quickly with our greenhouse kit. The package comes with a cle…
- 【Resilient Construction】Designed to endure challenging weather, our greenhouse features 720g/m² polycarbonate panels and…
- 【Efficient Water Management】Our greenhouse includes a cleverly designed water gutter system along the sides, aiding in e…

- 【Quick and Easy Assembly】AirWire 6×7 FT outdoor greenhouse offers a stress-free installation process. All components are…
- 【Durable Structure】AirWire’s greenhouses are constructed with high-quality 720g polycarbonate panels and reinforced alum…
- 【UV-Protected Growth Environment】 Features a 4mm thick 720g double-layer polycarbonate sheet with a special UV coating. …
Recent Posts
Durable Jeep Wrangler American Flag License Plate Frame for Patriotic Drivers
Have you ever felt frustrated by a plain, worn-out license plate frame on your Jeep Wrangler? It’s a small detail, but it can really affect your vehicle’s look.Every time you see that dull...
Slim Design Audi Black License Plate Frame for Sleek Car Styling
Have you ever struggled with a bulky, noisy license plate frame that just doesn’t fit right? It can be so frustrating when your car’s style feels off or the frame rattles every time you...