
Your car’s drive belt is a small part with a big job. When it wears out or breaks, your engine’s performance can drop, and repairs can get costly.
But what if you could replace it yourself? Imagine saving money and gaining confidence by handling this simple repair on your own. In this guide, you’ll find clear, step-by-step instructions and a breakdown of the costs involved. Keep reading to learn how to tackle your drive belt replacement easily and avoid unexpected expenses.
Signs Of A Worn Drive Belt
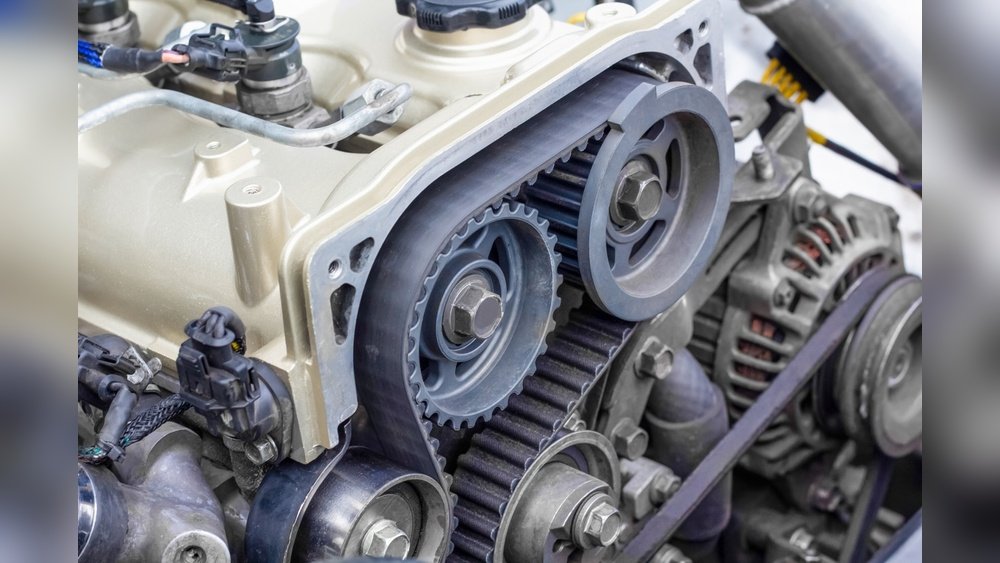
The drive belt plays a vital role in your vehicle’s engine. It powers important parts like the alternator, water pump, and air conditioner. Over time, the belt wears out and may cause problems. Knowing the signs of a worn drive belt helps avoid breakdowns and expensive repairs.
Early detection saves time and money. A worn belt can slip, crack, or break. This can lead to engine overheating or battery failure. Spotting these signs early means you can replace the belt before it causes more damage.
Common Symptoms
A worn drive belt often makes a squealing noise. This sound is loudest when you start the engine or turn on the air conditioner. Look for visible cracks, fraying, or missing pieces on the belt. The belt may also look shiny or glazed, which means it is slipping.
Other symptoms include engine overheating or dim headlights. These happen because the belt is not turning the water pump or alternator properly. If your power steering feels heavy or jerky, the belt may be slipping there too.
When To Inspect
Inspect your drive belt every 30,000 miles or as your vehicle’s manual suggests. Check it more often if you hear strange noises or experience engine problems. Always look at the belt during regular oil changes or tune-ups.
Cold weather can make belts wear faster. Check the belt more frequently in winter. Also, inspect it after long trips or rough driving conditions. Catching wear early helps keep your car running smoothly.
Tools And Materials Needed
Replacing a drive belt requires specific tools and materials. Having the right items makes the task easier and safer. This section lists everything needed to complete the job correctly. Prepare these tools before starting your DIY drive belt replacement.
Essential Tools
A socket set is vital for removing bolts and screws. A wrench set helps loosen and tighten components. Screwdrivers, both flathead and Phillips, are needed for smaller fasteners. Use a belt tension gauge to check the belt’s tightness. Pliers come in handy for gripping and pulling parts. A jack and stands ensure the vehicle is lifted safely. Gloves protect your hands from sharp edges and dirt. A flashlight or work light improves visibility in tight spaces.
Choosing The Right Replacement Belt
Selecting the correct belt is crucial for your vehicle’s performance. Check your car’s owner manual for belt specifications. Match the belt size, length, and type exactly. Consider OEM (Original Equipment Manufacturer) belts for better reliability. Some belts come with a warranty, which adds extra value. Avoid belts that look cheap or flimsy; they wear out fast. Keep the old belt as a reference when buying the new one. Proper fit prevents slipping and premature wear.
Step-by-step Replacement Process
Replacing a drive belt yourself saves money and helps you understand your vehicle better. This guide breaks down the process into easy steps. Follow each step carefully to ensure a smooth replacement. Keep safety in mind and take your time.
Preparing Your Vehicle
Park your car on a flat surface. Turn off the engine and remove the keys. Open the hood and locate the drive belt. Check your car manual if unsure. Gather tools like a wrench, socket set, and the new belt. Wear gloves to protect your hands.
Removing The Old Belt
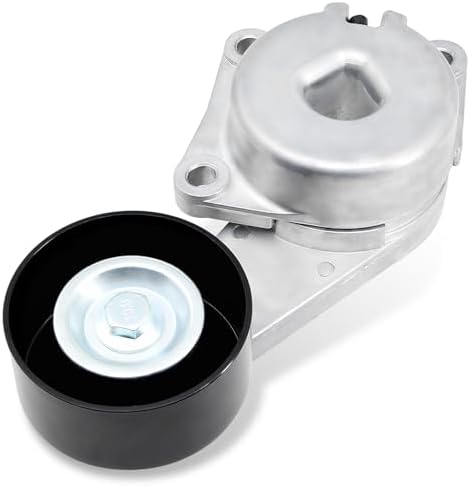
Find the belt tensioner pulley. Use a wrench to release tension on the belt. Slide the old belt off the pulleys slowly. Note the belt path to help with installation. Inspect the pulleys for damage or dirt. Clean pulleys before installing the new belt.
Installing The New Belt
Place the new belt on the pulleys following the correct path. Start with the smallest pulley first. Keep the belt tight on the pulleys as you go. Use the wrench to move the tensioner again. Slip the belt over the tensioner pulley last. Double-check the belt sits properly in grooves.
Checking Belt Tension
Release the tensioner slowly to apply pressure to the belt. Press down on the belt midway between pulleys. The belt should move about half an inch. Adjust if the belt feels too loose or too tight. Start the engine briefly to test the belt. Listen for noises and watch the belt’s movement.

Credit: en.wikipedia.org
Cost Breakdown
Understanding the cost breakdown of a drive belt replacement helps plan your budget well. Knowing each expense clearly avoids surprises. This guide explains the main cost parts for a DIY drive belt replacement. It covers parts pricing, tool expenses, and potential savings.
Parts Pricing
The drive belt itself is the main part cost. Prices vary by car model and belt type. Expect to pay between $20 and $50 for a quality belt. Some cars need extra parts like tensioners or pulleys. These parts can add $10 to $40 more. Buying genuine parts may cost more but ensures better fit and durability.
Tool Expenses
Special tools might be needed to remove and install the belt. Basic hand tools like wrenches or sockets often work. A belt tensioner tool can cost about $10 to $30. Many tools are reusable for other car repairs. If you have no tools, consider borrowing or renting to save money.
Potential Savings
Doing the replacement yourself cuts out labor fees. A mechanic can charge $80 to $150 for this job. Saving on labor reduces total expenses a lot. Learning the process also helps with future car maintenance. Saving money and gaining skills makes DIY worth trying.
Tips For Efficiency And Safety
Replacing a drive belt yourself saves money and gives a sense of achievement. Efficiency and safety are key to a smooth, trouble-free process. Simple steps can protect you and speed up your work.
Workplace Safety
Clear your workspace before starting. Remove tools and items that cause clutter. Keep the area well-lit to see every detail. Wear safety gloves to protect your hands. Use safety glasses to guard your eyes from dust and debris. Avoid loose clothing or jewelry that can catch on parts. Always disconnect the car battery to stop accidental engine starts. Follow the car manual’s safety instructions carefully.
Time-saving Tricks
Gather all tools and parts before you begin. Use a belt tensioner tool for quick removal and fitting. Label bolts and parts to avoid confusion. Work in steps, and don’t rush. Check the old belt’s path and match it with the new one. Clean the pulleys to improve belt grip. Test the belt tension before finishing the job. A well-organized plan cuts down repair time.

Credit: site-craft.net
When To Seek Professional Help
Replacing a drive belt on your own saves money and feels rewarding. Sometimes, the task becomes tricky or risky. Knowing when to call a professional keeps your vehicle safe and avoids costly errors. This guide helps you spot signs that need expert help.
Complex Issues
Some drive belt problems go beyond simple replacement. Issues with the tensioner or pulleys need special tools and skills. Misalignment or damage to related parts can cause bigger engine problems. Mechanics have experience to handle these complex repairs safely.
Warranty Considerations
Many cars have warranties that cover certain repairs. DIY repairs might void these warranties if done incorrectly. Professionals ensure the work meets warranty rules and keeps coverage valid. Check your vehicle’s warranty before starting a DIY drive belt replacement.

Credit: www.wikihow.com
- Compatibility: Compatible with 2003-2011 Ford E-150, 2003-2012 Ford E-250, 2003-2005 Ford E-150 Club Wagon, 2003-2005 Fo…
- Compatibility: Compatible with 2002 Ford E-150 Econoline, 2002 Ford E-250 Econoline, 2008 Ford E-350 Econoline, 2002 For…
- Compatibility: Compatible with 2007-2009 Ford F53, 2011-2011 Ford F53, 2005-2006 Ford GT, 2002-2005 Ford Excursion, 2002…
Frequently Asked Questions
How Often Should I Replace My Drive Belt?
Drive belts typically last 60,000 to 100,000 miles. Check your vehicle’s manual for specific intervals. Inspect belts regularly for cracks or wear to avoid breakdowns.
What Tools Do I Need For Diy Drive Belt Replacement?
Basic tools include a wrench set, socket set, and a belt tensioner tool. A flashlight and gloves are helpful. Ensure you have the correct replacement belt before starting.
How Much Does A Drive Belt Replacement Cost?
DIY replacement costs range from $20 to $50 for the belt. Professional service can cost $100 to $200, including labor. Prices vary by vehicle model and location.
Can I Replace A Drive Belt Without Removing Other Parts?
In most vehicles, you can replace the drive belt without removing major components. However, some models may require removing accessories for access. Consult your vehicle’s repair manual for guidance.
Conclusion
Replacing a drive belt can save you money and time. You only need a few tools and clear steps. Costs vary, but doing it yourself is often cheaper. Regular checks help avoid engine problems later. Take your time and follow safety tips carefully.
This guide gives you what you need to start. Keep your car running smoothly with simple maintenance. Try it once, and you may feel more confident next time.

- KEEP YOUR UNFINISHED WINE FRESH: Howdy bottle plugs, with their Wild West vibe, are the ultimate wine stoppers. They kee…
- LEAKPROOF AND SAFE: Our silicone bottle stoppers are as reliable as the old west stagecoach — leakproof & airtight, and …
- FOR MORE THAN WINE BOTTLES!: These versatile wine corks aren’t just for wine bottles. Use them for plugging tequila, mez…

- Unique Laser-cut design in heavy-duty stainless steel
- Hard maple handles with durable brass rivets and team imprint
- Convenient integrated bottle openers
- SAN FRANCISCO 49ERS STORAGE BIN: This collapsible fabric storage container is the perfect addition to any fan’s office, …
- DURABLE CONSTRUCTION: These non-woven polyester fabric bins are built to last, easy to wipe down, and fold flat when not…
- FUNCTIONAL DECOR: Bins include a reinforced chrome handle that is both stylish and functional making it easy to carry an…

- BLUFFING CARD GAME: Test who’s bluffing skills beat the rest as players race to play cards quickest and earn points.
- DON”T GET CAUGHT: Bluff your best, or get handed a penalty.
- Engaging Card Game for All Ages: Easy to learn and endlessly entertaining,.Plays 2-6 players and play lasts 20-30 minute…
Recent Posts
Durable Jeep Wrangler American Flag License Plate Frame for Patriotic Drivers
Have you ever felt frustrated by a plain, worn-out license plate frame on your Jeep Wrangler? It’s a small detail, but it can really affect your vehicle’s look.Every time you see that dull...
Slim Design Audi Black License Plate Frame for Sleek Car Styling
Have you ever struggled with a bulky, noisy license plate frame that just doesn’t fit right? It can be so frustrating when your car’s style feels off or the frame rattles every time you...