
Discover the Unexpected Secrets of Car Maintenance: Essential tips to save money, ensure safety, and boost your car’s lifespan. Learn simple DIY checks and understand vital components without jargon.
Is the thought of car maintenance making you break out in a sweat? You’re not alone! Many car owners feel intimidated by what goes on under the hood. It often seems like a mysterious world filled with jargon only mechanics understand. But what if I told you that taking care of your car doesn’t have to be complicated or expensive? With a few straightforward secrets, you can keep your vehicle running smoothly, stay safe on the road, and even save a good chunk of money on repairs. We’ll break down the essentials in a way that’s easy for anyone to grasp, letting you tackle common tasks with confidence. Ready to unlock these secrets and become a more informed car owner?
Unlocking the Power of Prevention: Why Basic Maintenance Matters
Think of your car like your health. Regular check-ups and healthy habits, like eating right and exercising, prevent serious problems down the line. For your car, these “healthy habits” are the essential maintenance tasks that prevent breakdowns and costly repairs. Skipping these simple steps is like ignoring a small cough that could turn into pneumonia. By understanding and performing basic checks, you’re not just fixing potential issues; you’re extending the life of your vehicle, improving its performance, and most importantly, ensuring your safety and peace of mind.
The Essential Fluids Every Driver Should Know
Your car relies on several vital fluids to keep it running. Knowing what they are, where to find them, and how to check them is a game-changer. These aren’t just liquids; they’re the lifeblood of your vehicle.
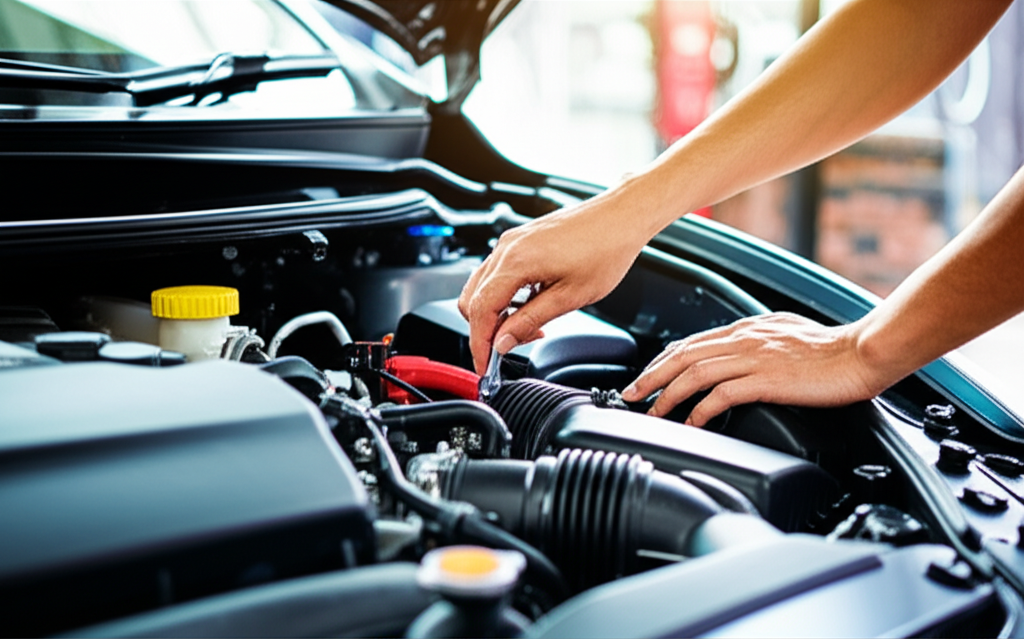
Engine Oil: The Guts and Glory
Engine oil is the absolute king of car fluids. It lubricates moving parts, reduces friction, cools the engine, and cleans away debris. Old, dirty oil can cause serious engine damage, leading to costly repairs. Regularly checking and changing your oil is arguably the most crucial maintenance task you can perform.
How to Check Your Engine Oil
- Ensure your car is parked on a level surface and the engine has been off for at least 10-15 minutes to allow oil to drain back into the pan.
- Locate the dipstick, usually with a brightly colored handle (often yellow or orange).
- Pull the dipstick out, wipe it clean with a rag or paper towel, and reinsert it fully.
- Pull the dipstick out again, and check the oil level. It should be between the “MIN” and “MAX” or “ADD” and “FULL” marks etched on the end of the dipstick.
- Observe the oil’s color and consistency. It should be amber/brown and fluid. If it looks black, thick, or sludgy, it’s time for a change.
When to Change Your Oil
Consult your car’s owner’s manual for the recommended oil change interval (typically every 5,000 to 7,500 miles for conventional oil, or longer for synthetic oil). However, driving conditions can affect this. If you frequently drive in stop-and-go traffic, extreme temperatures, or off-road, you might need to change it more often. Many newer cars also have an oil life monitoring system that will alert you.
Coolant (Antifreeze): Keeping Your Cool
Coolant prevents your engine from overheating in the summer and freezing in the winter. It circulates through the engine to absorb heat and then dissipates it through the radiator. Low coolant levels or old coolant can cause your engine to overheat, leading to severe damage.
How to Check Your Coolant Level
- Never open the radiator cap when the engine is hot. The system is under pressure, and hot coolant can spray out, causing severe burns. Wait until the engine has completely cooled down.
- Locate the coolant reservoir, typically a translucent plastic tank connected to the radiator.
- The reservoir will have “MIN” and “MAX” or “COLD” and “HOT” markings. The coolant level should be between these marks when the engine is cold.
- If the level is low, check elsewhere for leaks (like hoses or the radiator itself) before adding the correct type of coolant (usually a 50/50 mix of antifreeze and distilled water, but check your manual!).
It’s also a good idea to replace coolant every 30,000 to 60,000 miles, depending on the type, as recommended in your owner’s manual. For more information on automotive cooling systems, the U.S. Department of Energy offers helpful insights.
Brake Fluid: Your Stopping Power
Brake fluid is crucial for your car’s braking system. It transmits the force from your foot on the brake pedal to the brakes themselves. If the fluid level is low, or if it has absorbed too much moisture over time, your brakes may become less effective, which is a serious safety hazard.
How to Check Your Brake Fluid
- Locate the brake fluid reservoir, usually near the back of the engine bay on the driver’s side. It’s typically a clear or translucent container.
- The reservoir has “MIN” and “MAX” lines. The fluid level should be between these marks.
- Note the color of the fluid. Ideally, it’s clear to light amber. If it’s dark brown or cloudy, it may need to be replaced by a professional.
- If the fluid level is consistently low, it could indicate a leak in the brake lines or a problem with the brake pads. This requires immediate attention from a mechanic.
Brake fluid should typically be replaced every 2 to 3 years, as it absorbs moisture from the air, reducing its effectiveness. Always use the type of brake fluid specified in your owner’s manual (DOT 3, DOT 4, etc.).
Power Steering Fluid: Effortless Steering
Power steering fluid helps you turn the steering wheel with ease. If the fluid is low or contaminated, you might notice the steering wheel becoming stiff or difficult to turn, and you might hear whining noises.
How to Check Your Power Steering Fluid
- Park your car on a level surface.
- Locate the power steering fluid reservoir (check your owner’s manual).
- Many reservoirs have a dipstick attached to the cap, or fill lines directly on the reservoir itself. Check the fluid level according to the markings when the engine is COLD.
- If the fluid is low, add the specific type of power steering fluid recommended in your owner’s manual. Do not overfill.
While less frequent than oil or coolant changes, power steering fluid should be checked periodically, and replaced as per your manual’s recommendations, typically every 40,000-60,000 miles.
Transmission Fluid: Smooth Gear Changes
Transmission fluid lubricates and cools your transmission, also enabling it to shift gears smoothly. Different transmissions (automatic vs. manual) have different fluid requirements and checking procedures.
How to Check Your Transmission Fluid (Automatic)
- Park your car on a level surface and start the engine. Keep it running.
- With your foot firmly on the brake pedal, shift the selector through all the gears (P, R, N, D, etc.), pausing for a few seconds in each.
- Return the selector to PARK (P).
- Locate the transmission fluid dipstick (it’s often red and might be labeled “ATF” or similar, but check your manual as some cars don’t have easy-to-access dipsticks and require a mechanic).
- Pull out the dipstick, wipe it clean, reinsert it fully, and pull it out again to check the level. It should be between the “HOT” marks.
- Observe the fluid color. It should be reddish and clear. If it looks brown, smells burnt, or has particles in it, it’s a sign of potential transmission problems and needs professional inspection.
Transmission fluid generally doesn’t need frequent changing, but it’s vital to check it regularly and replace it according to your owner’s manual, often between 60,000-100,000 miles. Some modern cars require specialized tools to check and change transmission fluid, so consult your manual or a professional.
The Tire Truths: More Than Meets the Eye
Your tires are your car’s only contact with the road. Proper tire maintenance is critical for safety, fuel efficiency, and a smooth ride. Most people just look at the tread, but there’s more to it!
Tread Depth: Your Grip on Safety
Tread is what provides traction. Worn-out treads can significantly increase your stopping distance, especially in wet conditions. A common way to check tread depth is using a tread depth gauge or the “=[penny test]=”:
- Take a penny and place it into the deepest groove of your tire’s tread, with Abraham Lincoln’s head facing down.
- If you can see the top of Lincoln’s head, your tread depth is dangerously low (less than 2/32 of an inch), and it’s time for new tires.
For optimal safety, aim to replace tires when the tread reaches 4/32 of an inch. You can find more detailed information on tire safety from the National Highway Traffic Safety Administration (NHTSA).
Tire Pressure: The Unsung Hero of Performance
Proper tire inflation is essential. Underinflated tires can lead to poor handling, reduced fuel economy, and premature wear. Overinflated tires can cause a harsh ride and reduce traction.
How to Check Tire Pressure
- Buy a reliable digital tire pressure gauge.
- Locate the recommended tire pressure for your vehicle. This is usually found on a sticker inside the driver’s side door jamb or in your owner’s manual. Do NOT use the maximum pressure listed on the tire sidewall itself.
- Remove the valve stem caps from your tires.
- Press the tire pressure gauge firmly onto the valve stem.
- Read the pressure and compare it to the recommended PSI (pounds per square inch).
- Add air if needed, or release air if overinflated, by pressing the small pin in the center of the valve stem with the gauge or a small tool.
- Replace the valve stem caps.
- Check all four tires, plus the spare if your car has one.
Check tire pressure at least once a month and before long trips. Remember that tire pressure can change with temperature; for every 10°F drop in temperature, tire pressure can decrease by 1 PSI. The U.S. Environmental Protection Agency (EPA) provides tips on maintaining proper tire pressure for better fuel economy.
Tire Rotation: Even Wear for Longer Life
Rotating your tires ensures they wear evenly, which extends their lifespan and improves overall vehicle handling. Different tire positions wear at different rates due to weight distribution and steering forces.
When and How to Rotate Tires
Most manufacturers recommend rotating tires every 5,000 to 7,500 miles, or with every oil change. The rotation pattern depends on whether your car is front-wheel drive, rear-wheel drive, or all-wheel drive, and whether your tires are directional or have different sizes front to back. Always refer to your owner’s manual for the recommended rotation pattern for your specific vehicle. Common patterns include front-to-back (for directional tires) or cross-rotation.
Beyond the Fluids: Other Essential Checks
Your car is a complex machine, and a few other simple checks can make a big difference.
Brakes: Your First Line of Defense
Brakes are paramount to safety. While a full brake inspection should be left to professionals, there are things you can listen and feel for.
- Listen for noises: Squealing or grinding sounds when you brake can indicate worn brake pads.
- Feel for vibrations: If you feel vibrations in the steering wheel or brake pedal when braking, it might mean warped brake rotors.
- Check the brake pedal: If the brake pedal feels spongy or sinks to the floor when you press it, this signifies a serious issue that needs immediate professional attention.
Brake pads and rotors typically need replacement between 30,000 to 70,000 miles, depending on driving habits and the quality of the parts. For a deeper dive into brake maintenance, check out these resources on brake system safety.
Lights: Being Seen and Seeing
Ensuring all your lights are functional is critical for visibility and safety, both for you and other drivers.
How to Check Your Lights
- Turn on your headlights and check both low and high beams.
- Engage your turn signals (left and right) and hazard lights.
- Step on the brake pedal and have someone check if your brake lights are working.
- Turn on your reverse lights.
Replacing a headlight or taillight bulb is usually a straightforward DIY task. Consult your owner’s manual for specific instructions on how to access and replace bulbs for your vehicle.
Wiper Blades: Clear Vision in Any Weather
Wiper blades are essential for clearing your windshield of rain, snow, and debris. Streaky or skipping wipers can impair your vision, especially during crucial moments.
When to Replace Wiper Blades
Wiper blades typically need replacing every 6 to 12 months, or sooner if you notice:
- Streaking or smearing of water.
- Skipping or chattering across the windshield.
- Cracked or torn rubber edges.
- Reduced effectiveness in clearing the windshield.
Replacing wiper blades is one of the easiest DIY tasks. You can typically find replacement blades at any auto parts store. Ensure you buy the correct length and type for your vehicle.
Battery: The Power Source
Your car’s battery provides the electrical power to start the engine and run all the accessories. A dying battery can leave you stranded.
Signs of a Weak Battery
- Slow engine crank when starting.
- Dim headlights or interior lights.
- Clicking sound when trying to start the engine.
- Corrosion on the battery terminals (a white or bluish powdery substance).
Most auto parts stores can test your battery for free. If you see corrosion, you can clean it yourself with a wire brush and a mixture of baking soda and water. However, battery replacement itself is a task best suited for those comfortable working with car batteries due to the risk of electrical shock and the need for proper disposal. Reputable resources like those from AAA can offer detailed battery maintenance advice.
Fuel Efficiency Secrets: Save More at the Pump
Beyond just keeping your car running, smart maintenance can also significantly improve your fuel economy.
- Proper tire inflation: Underinflated tires increase rolling resistance, making your engine work harder and consume more fuel.
- Regular engine tune-ups: Spark plugs, air filters, and fuel injectors all play a role in how efficiently your engine burns fuel. Keeping these components in good shape ensures optimal performance and economy.
- Clean air filter: A dirty air filter restricts airflow to the engine, reducing performance and fuel efficiency. Check and replace it as recommended in your owner’s manual – it’s a very easy DIY task!
- Smooth driving: Avoid rapid acceleration and hard braking. Gradual inputs are much more fuel-efficient.
A table summarizing key maintenance items and recommended intervals:
| Maintenance Item | Recommended Interval | DIY Friendly? | Why it Matters |
|---|---|---|---|
| Engine Oil Change | Every 5,000 – 7,500 Miles (or per manual) | Yes | Lubrication, cooling, cleaning engine |
| Tire Rotation | Every 5,000 – 7,500 Miles | Yes (with proper knowledge of pattern) | Even tire wear, extended tire life |
| Tire Pressure Check | Monthly | Yes | Safety, fuel efficiency, tire wear |
| Coolant Check/Flush | Check monthly, Flush every 30,000-60,000 Miles | Check: Yes. Flush: Moderate | Prevents overheating/freezing |
| Brake Fluid Check/Change | Check monthly, Change every 2-3 Years | Check: Yes. Change: Professional recommended | Braking system efficiency and safety |
| Wiper Blades | Every 6-12 Months | Yes | Windshield visibility, safety |
| Air Filter | Every 15,000 – 3 Recent PostsDurable Jeep Wrangler American Flag License Plate Frame for Patriotic Drivers Have you ever felt frustrated by a plain, worn-out license plate frame on your Jeep Wrangler? It’s a small detail, but it can really affect your vehicle’s look.Every time you see that dull... Slim Design Audi Black License Plate Frame for Sleek Car Styling Have you ever struggled with a bulky, noisy license plate frame that just doesn’t fit right? It can be so frustrating when your car’s style feels off or the frame rattles every time you... |