
Did you know that repeated hits from potholes and rough roads can speed wear and cause the vast majority of rattles and clunks in vehicles?
We’ll walk you through fast, safe checks that cut down on that annoying sound and restore a quieter, more controlled ride.
Start smart: check Technical Service Bulletins by VIN or model before you replace parts — manufacturers often publish no-cost fixes.
Our plan is simple — listen, localize, load the suspension correctly, then tighten or swap obvious parts. Common wins are re‑torquing a backing‑out strut gland nut (use anaerobic thread locker) and replacing aged sway bar or shock bushings.
We stress safety from the first minute. Support the vehicle so weight stays on components. Use basic tools this weekend: a good light, torque wrench, breaker bar, pry bar, and penetrating oil.
We’ll also show quick diagnostics — the bounce test, a broomstick-as-stethoscope, and a dry‑park steering check — so you trace the source without guesswork.
Key Takeaways
- Start with TSBs for your vehicle to avoid chasing solved faults.
- Short checks often reveal loose nuts or dried bushings — easy to fix.
- Use proper support so weight stays on components during tests.
- Bring basic tools and thread locker for quick, lasting results.
- Confirm fixes with a short road test to save time and money.
Why Your Car’s Suspension Starts Making Noise on today’s roads
Mileage, weather swings, and repeated impacts are the usual suspects behind a suddenly chatty ride. Over time, rubber hardens, fasteners loosen, and clearance grows at worn joints.
Real-world causes: clunks over bumps often come from excessive clearance, loose strut hardware, or shrunken bushings. Older rear-wheel-drive vehicles may clunk at the rear when panhard rod bushings fail.
Rough-road hits and temperature cycles squeeze lubricants out of mounts. That speeds wear and moves a problem from a tiny rattle to a steady thump after long trips or many miles.
- Noise travels through the body, so a sound that seems forward can start elsewhere.
- Small parts—stabilizer links and mounts—make big racket when rubber hardens.
- Salt and winter corrosion can free up pickup points on unibody frames, creating a safety risk at the year’s end.
We recommend controlling load levels during checks to repeat the fault. Next, we’ll show how to load the system safely and find the loose parts that vanish when a vehicle sits lifted by the frame.
Recognize the Sounds: What clunks, rattles, and groans say about your suspension
A clunk, a groan, or a fast rattle — each points at different worn parts. We help you match sound to cause so you fix the right area on your vehicle instead of guessing.
Clunk over bumps
Deep thumps on bigger bumps often mean worn struts or a loose strut nut. Loose hardware lets the mount move and makes a heavy hit.
Where to look first: strut top nuts, sway bar links, and any dried bushings on your model. Start at the corner that sounds loudest.
Groan when turning
A slow grinding sound during turns usually maps to steering supports — idler or pitman arm joints. Dry bearings broadcast a steady groan as loads change.
Rear-end thumps on rough roads
Rear thumps on live-axle RWD vehicles often point to panhard rod bushings, tired shocks, or worn stabilizer links. Those parts let the axle move uncontrolled and hit the end of travel.
| Sound | Likely parts | Test | Quick check |
|---|---|---|---|
| Heavy clunk | Struts, strut nut, control arm bushings | Bounce test; inspect top mount | Check torque, look for loose nuts |
| Groan on turn | Idler arm, pitman arm, steering box | Dry-park steering check | Lubricate or inspect play |
| Rear thump | Panhard rod, shocks, sway links | Drive over rough patch; note load | Inspect bushings and link ends |
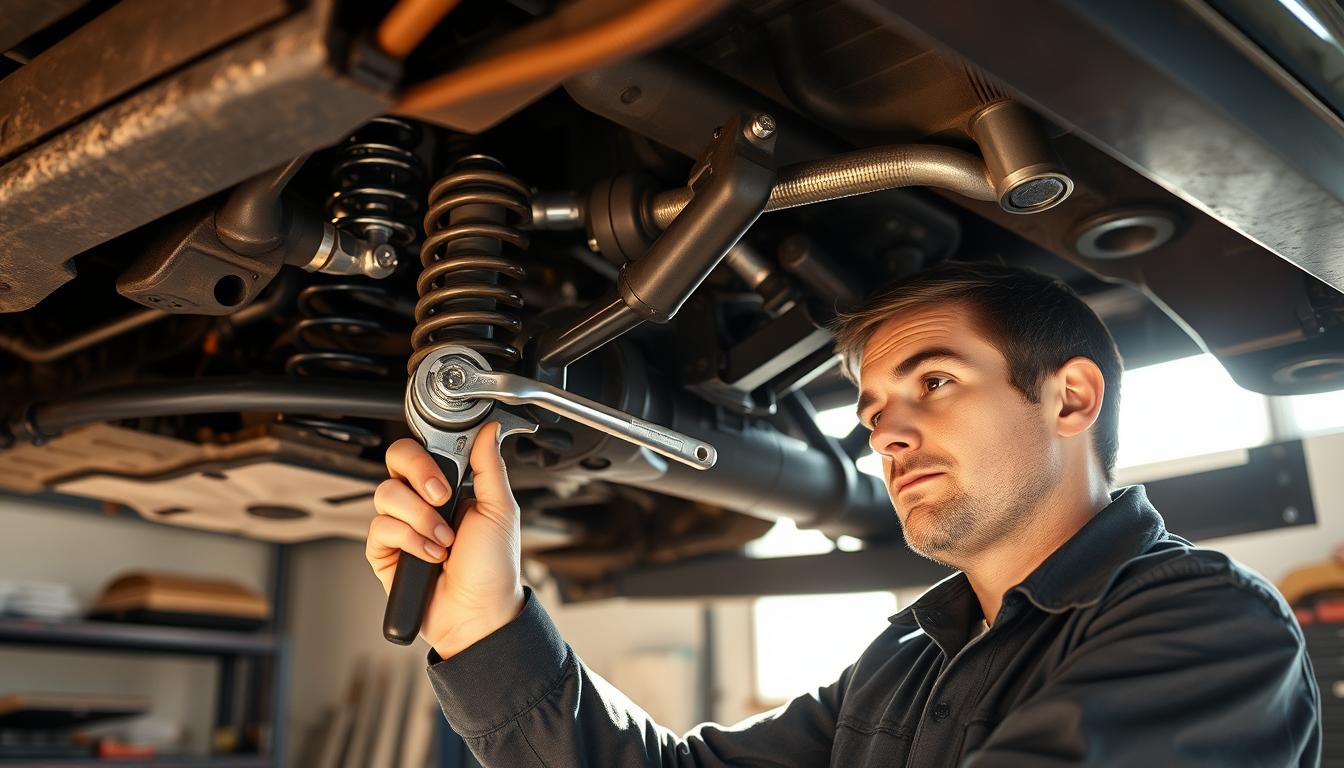
Safety First and Tools You’ll Need for a quiet, controlled DIY weekend
We begin every job by securing the vehicle and collecting the right kit. Safety is our first check — it protects us and makes the work faster.
Essential tools
Bring a bright inspection light so you can see cracks and movement at upper mounts and joints. A torque wrench gives accurate reassembly; a breaker bar frees stuck fasteners.
Other must-haves:
- Stout pry bar for bushing play checks.
- Quality penetrating oil to free corroded hardware.
- Chocks and a reliable jack — labeled for your car’s weight.
Safe support and lifting
Raise by the control arms or rear axle so the suspension stays at ride height. Lifting by the frame lets parts hang and can hide looseness.
Set the parking brake, chock opposite wheels, and work on level ground. That keeps brake and suspension systems stable while we inspect parts.
- Pre-soak stubborn bolts to save time, and organize hardware by corner.
- Know torque basics — avoid over-tightening bushings or under-tightening mounts.
- Use a pro tool or see a pro when press work is needed — ball joint presses and bushing tools are specialized.
Final tip: verify torque after a short test drive. Parts settle — a quick recheck prevents a return visit and saves time.
Conquer Car Suspension Noise with These Simple DIY Fixes
Start by checking known manufacturer bulletins — they often solve a mystery clunk before you touch a wrench. Search TSBs by VIN, model, or brand so you don’t waste time chasing a covered fault.
Start with TSBs
Look up service bulletins for your model. Some vehicles have documented redesigns that stop a repeat rattle at the source.
The bounce test
One person bounces the corner while another watches upper strut mounts and control arm joints on the vehicle. Watch for play at ride height — that often points to the loose part.
Dry-park steering check
Wheels on the ground, engine idling, column unlocked. Have a helper rock the wheel slowly. Any visible free play in the linkage shows a control issue that needs attention.
Stethoscope trick and loaded-height inspections
Use a broomstick or long screwdriver as a sound conductor to localize a creak or clunk at ride height. Inspect at loaded levels — lifting by the frame can hide looseness that appears under normal load.
- Log conditions—speed, bumps, steering angle, cargo, and time—to repeat the fault on short trips.
- Methodically tighten mounts and link parts to published torque. Recheck after a short road test and again at the end of the day.
Component-by-Component: Common culprits and quick remedies
We take a corner-by-corner approach — inspect, tighten, test, then replace only if needed. This saves time and money while restoring ride performance.
Struts and shocks
Worn hydraulics hit the end of travel and make a heavy knock. Check the upper mount and gland nut; a drop of anaerobic thread locker on a backed-out gland nut often stops the clunk.
Control arm and A-frame bushings
Look for shrunken or cracked rubber. Use a pry bar at ride level — easy movement means clearance that becomes a loud thump.
Sway bar links and bushings
Small links punch above their weight in sound. Replacing tired D-bushings or link ends restores crisp roll control and reduces chassis chatter.
Panhard rod on live-axle RWD
On older rear axles, fore-aft or lateral play in panhard bushings makes diagonal knocks. Replace the bushings when play appears; don’t ignore repeated movement under load or towing.
Steering linkages and pickup points
Tie rods, idler and pitman arms creak during slow steering inputs. Check for free play and confirm proper torque on fasteners. Rusted unibody pickup points are a structural risk — that needs a frame shop, not a weekend job.
“Start at the least-invasive fix: tighten, mark torque paint, then replace bushings if the sound returns.”
| Component | Typical action | Torque ref |
|---|---|---|
| Strut gland nut | Tighten, thread locker | Factory spec (use torque wrench) |
| Sway links | Replace ends or bushings | 20–50 ft-lb (varies by model) |
| Panhard rod | Inspect/replace bushings | 30–80 ft-lb (check manual) |
Tip: mark critical fasteners with torque paint. If the mark moves after a test drive, you found the loosened part.
Alternate Sources That Mimic Suspension Noise

Sometimes the thump you hear is not under a wheel at all — it’s coming from a part that moves with the motor or the exhaust.
We help you remove the mystery that isn’t suspension at all, so the car becomes quieter by fixing the true source.
Exhaust system contact
Loose or broken exhaust hangers let pipes or the muffler tap the chassis or driveshaft. Check the system when it’s cool.
Push the tailpipe side-to-side. If the system hits the body, that push will duplicate the clunk.
Look for shiny contact patches on pipes and crossmembers — they are clear signatures of intermittent knocks.
Motor mounts and engine movement
Motor mount thumps follow throttle changes, not bumps. If the sound appears when you accelerate or drop the throttle, suspect mounts.
Oil-soaked or delaminated mounts let the powertrain shift and hit its stops. Visually inspect mounts for oil, cracks, or separated layers.
- Replace broken hangers or worn mounts — low-cost parts that restore quiet and protect other components.
- Match brand and shape when ordering mounts or hangers so fit and performance meet factory intent.
- After a short drive, recheck mount fastener torque — fresh rubber can settle and hardware may loosen.
Confirm the fix: take a smooth loop. Accelerate, coast, and brake to see if the clunk disappears at the end of the test.
“We recommend eliminating alternate sources before deep suspension work — save time and reach a quieter result faster.”
Simple DIY Wins: Low-cost steps to make your suspension quieter now
Small, targeted efforts can cut most rattles in a single afternoon. We list the fastest, lowest-cost ways to reduce noise and bring peace back to your ride. Follow a short plan and you’ll get big value for little spend.
Tighten a backing-out strut gland nut and apply thread locker
Start with the zero-dollar check. Inspect the strut gland nut, torque it to spec, then add a drop of anaerobic thread locker. That often stops a backed-out nut from returning and costs hardly any time.
Replace tired sway bar and shock mounting bushings for instant peace
Swap worn D-bushings and end links, and replace shock-top sleeves when needed. New rubber or polyurethane parts from a known brand restore performance without a big outlay.
- Re-torque upper and lower fasteners to factory spec after a short test drive.
- Plan one corner per weekend—one endlink or sway bushing and one shock mount in about 90 minutes.
- Road test the same route before and after to confirm the improvement.
| Action | Cost | Time |
|---|---|---|
| Tighten strut nut & thread locker | Free | 15–30 min |
| Replace sway bushings/end links | Low (parts) | 45–90 min |
| Swap shock top bushings | Low–moderate | 60–120 min |
“Start small and test often — a quick win both saves time and narrows the source if the sound persists.”
Prevent the Return of Noise: Maintenance habits that preserve performance and safety

Good habits save time, money, and preserve ride quality as miles add up. We teach the checks that keep your vehicle quieter longer and protect its value.
Routine after tough drives: recheck torque on mounts and links after long trips or rough-road runs. Small loosening grows fast under load. A short check takes minutes and avoids a repeat problem.
Periodic torque checks after rough-road trips and long miles
After heavy miles or a punishing road, inspect fasteners at ride levels. Tighten to spec and mark the bolt so you spot any movement later.
Recheck fasteners after alignments or brake work. Service disturbs mounting points. A quick post-service look protects warranty and systems that matter.
Protect rubber: avoid petroleum products; inspect after winter/salted roads
Keep bushings clean and free of petroleum solvents — they shorten rubber life. Use mild soap and water or approved cleaners instead.
Wash the undercarriage after winter. Salt speeds rust at pickup points on unibody cars. Treat light surface rust, but call a pro for structural corrosion.
- Seasonal rhythm: inspect in spring and fall for cracks, shrinkage, and flaking rust.
- Quick tire check: tread and pressure — uneven wear can hide or mimic faults.
- Log time, miles, and road conditions to spot trends and protect resale value.
- Store off-street, dry, and clean when possible to extend bushing life over the year.
“Keep a short maintenance card in the glovebox — torque checks, wash after winter, and a quick tire/pressure reminder.”
Know When to See a Pro for your car’s suspension system
We help you decide when a home check is enough and when to hand the job to a shop. A short, clear line keeps you safe and protects value at resale.
Leverage TSB-backed redesigns and possible no-cost fixes
Ask the dealer about TSBs by VIN. Some models qualify for redesigned parts or no-cost repairs under a brand bulletin.
Bring notes: list the model year, symptoms, and any short video or audio clips. That helps a tech confirm the fault quickly.
Frame corrosion, cracked mounts, and severe free play require a shop
Rusted unibody pickup points, cracked mounts, or large steering play are safety items. These need professional welding or part replacement.
- Keep service records and torque checks — they help if a warranty claim applies.
- A good shop will inspect at loaded height, measure play, and road test the same route you used.
- Compare estimates and ask for parts brands and torque specs on reassembly.
A correct professional repair often saves money over repeated part swaps and protects the vehicle’s long-term market value.
| Issue | Why a pro | Expected shop action |
|---|---|---|
| TSB-covered clatter | Dealer records & parts | Redesign/low-cost repair |
| Structural rust or cracked mount | Safety risk | Weld, replace, or frame shop work |
| Severe free play | Steering/safety concern | Loaded inspection, part replacement, alignment |
Conclusion
Conclusion
A targeted plan ends mystery knocks fast—start small, test each corner, then confirm the result on the road. First check TSBs by VIN. Then use the bounce test, dry-park steering check, and ride-height inspection to find the exact spot.
Snug a backed‑out strut gland nut and add anaerobic thread locker. Replace aged sway bar or shock bushings for a quick, low-cost win. Recheck torque after a short loop so parts settle and stay tight.
If you find rusted pickup points or severe free play, take notes and see a trusted shop. Do one corner at a time, log your test drive, and keep a small checklist in the glovebox. We feel better driving quieter miles and owning the fix we made right.
FAQ
Why does my car start making clunks and rattles after lots of miles?
Worn components — like shocks, strut mounts, bushings, and sway bar links — commonly fail first after high mileage. Road salt and rough surfaces speed rubber and metal wear. We recommend a visual check and simple tests (bounce test, pry-bar check) to isolate the part before replacing it.
How can I tell if the sound is from suspension or something else, like the exhaust or motor mounts?
Use a quick method: drive over a rough patch slowly, then hold steady speed and listen. Suspension noises change when you load or unload a corner; exhaust or loose shields tend to vibrate continuously. Use a broom handle as a stethoscope — press it against suspect parts to pinpoint the source.
What is the bounce test and what does it reveal?
Press down on a corner of the vehicle and release. If it bounces more than once or two times, shocks or struts may be worn. Isolating upper strut mounts and control arm joints during the test helps reveal specific failed parts.
Can I tighten a loose strut gland nut myself?
Yes — if you have the right tools and can safely support the vehicle on jack stands. Tightening a backing-out gland nut and applying thread locker often cures clunks. Always follow torque specs for your make and model.
What tools do we need for basic suspension troubleshooting at home?
Keep a flashlight, torque wrench, breaker bar, pry bar, penetrating oil, and quality jack stands. These let us inspect mounts, check free play, and safely support the vehicle when working on control arms or sway links.
When is a repair beyond a DIY and needs a shop visit?
Visit a pro if there’s severe free play in steering, frame corrosion, cracked mounts, or a TSB indicates redesign parts. If you’re unsure about bearing removal, spring compression, or welding, a shop is the safer choice.
How do motor mounts mimic suspension clunks and how do we check them?
Worn or oil-soaked motor mounts let the engine shift and thump under throttle or on bumps. We check by observing engine movement while revving slightly in park and by inspecting mounts for delamination or oil saturation.
What maintenance stops noise from coming back after repairs?
Periodic torque checks after rough-road trips, inspecting rubber parts after winter, and avoiding petroleum-based cleaners on bushings help. Regular visual checks at service intervals catch wear before it becomes loud or unsafe.
Are sway bar links and bushings worth replacing if they look only slightly worn?
Yes — small play in sway bar links or cracked bushings makes a disproportionate racket. Replacing these low-cost parts often yields instant quiet and improved handling.
How do I use VIN or TSBs to avoid repeated work?
Check manufacturer TSBs by VIN or model year before you start. Some makes have known redesigns or no-cost fixes that prevent repeat repairs — saving time and money.
Recent Posts
Durable Jeep Wrangler American Flag License Plate Frame for Patriotic Drivers
Have you ever felt frustrated by a plain, worn-out license plate frame on your Jeep Wrangler? It’s a small detail, but it can really affect your vehicle’s look.Every time you see that dull...
Slim Design Audi Black License Plate Frame for Sleek Car Styling
Have you ever struggled with a bulky, noisy license plate frame that just doesn’t fit right? It can be so frustrating when your car’s style feels off or the frame rattles every time you...