

Car Temperature Gauge Fluctuating? Don’t Panic! It’s Likely a Minor Fix. This guide explains why your car’s temperature gauge might jump around, covers common causes like a faulty thermostat or sensor, and provides simple, step-by-step fixes to get your gauge reading steady and your engine running cool. Read on for easy fixes!
Ever noticed your car’s temperature gauge do a little dance on the dashboard? One minute it’s right in the middle where it should be, and the next it’s creeping up towards the red, or maybe it’s dipping down to cold when the engine is warm. It can be a bit unsettling, especially if you’re not sure what it means. But don’t worry, this is a pretty common issue, and often, it’s not as big or expensive a problem as you might think. Understanding why this happens is the first step to getting it fixed. We’re going to walk through this together, step-by-step, so you can get your temperature gauge behaving normally again and drive with peace of mind.
Why is My Car Temperature Gauge Fluctuating? Common Culprits
That needle on your temperature gauge is like your car’s personal thermostat. It tells you how hot your engine is getting, which is super important for keeping everything running smoothly. When it starts to jump around unexpectedly, it’s a sign that something isn’t quite right. There are a few common reasons for this behavior, and thankfully, many of them are relatively simple to address. Let’s explore what might be causing your gauge to act up.
1. The Thermostat: A Tiny Valve with a Big Job
Think of your thermostat as a gatekeeper for your engine’s coolant. Its job is to open and close at specific temperatures to regulate how much coolant flows through the engine and radiator.
If it sticks closed: The coolant can’t reach the radiator to cool down, and your engine overheats, causing the gauge to shoot up. You might also notice your heater blowing cold air.
If it sticks open: Coolant flows constantly, meaning your engine might not reach its optimal operating temperature, and the gauge could read too low, especially on cooler days or short trips.
If it’s failing to regulate: The thermostat might open and close erratically, leading to those fluctuating readings. It’s like a gate that’s stuck, then suddenly opens, then closes again, all while it’s supposed to be steady.
A faulty thermostat is one of the most common reasons for a fluctuating temperature gauge. Thankfully, it’s usually a straightforward and relatively inexpensive part to replace.
2. Coolant Level and Quality: The Lifeblood of Your Engine
Coolant (or antifreeze) is what keeps your engine from overheating in hot weather and freezing in cold weather. It also helps keep the engine clean and lubricated.
Low Coolant Level: If there isn’t enough coolant in the system, the temperature sensor won’t get an accurate reading, and the system can’t effectively transfer heat. This can cause the gauge to fluctuate wildly. Always check your coolant level when the engine is COLD. You can usually find the reservoir tank under the hood; it’s a translucent plastic tank with “MIN” and “MAX” or “LOW” and “FULL” lines.
Old or Contaminated Coolant: Over time, coolant loses its effectiveness. It can become contaminated with rust, debris, or even oil. This degraded coolant doesn’t transfer heat as well, leading to temperature regulation issues and fluctuating readings. If your coolant looks murky, discolored, or has particles floating in it, it’s time for a flush and refill.
The U.S. Environmental Protection Agency (EPA) recommends following manufacturer guidelines for coolant maintenance to ensure optimal engine performance and longevity.
3. Cooling Fan Issues: Keeping Things Breezy
Your car’s cooling fan is crucial, especially when you’re driving at slow speeds or stuck in traffic, as it pulls air through the radiator to help dissipate heat.
Fan Not Engaging: If the fan doesn’t turn on when needed (which is often controlled by a temperature sensor or a relay), the engine can start to overheat, causing the gauge to climb. You might notice this more when you’re stopped for a while.
Fan Clutch Failure (for belt-driven fans): Some older vehicles have a fan attached to the engine via a belt. A faulty fan clutch can cause the fan to spin too slowly or not at all, leading to overheating and gauge fluctuations.
A problem with your cooling fan can directly impact how effectively your engine is cooled, directly affecting what your temperature gauge is trying to tell you.
4. Air Pockets in the Cooling System: Trapped Heat
Even a small amount of air trapped inside your cooling system can cause big problems. Air doesn’t transfer heat as well as coolant, so it can create hot spots and prevent proper circulation.
How Air Gets In: Air can enter the system during coolant changes, if there’s a leak, or if a gasket is failing.
Symptoms: Air pockets can cause your temperature gauge to fluctuate erratically, leading to overheating and cold spots in your heater. You might also hear gurgling sounds from under the dashboard.
Bleeding the cooling system (removing air) is often necessary after certain repairs or if you suspect air is the culprit.
5. A Failing Engine Coolant Temperature (ECT) Sensor
The ECT sensor is the component that actually reads the coolant’s temperature and sends that information to your car’s computer and your dashboard gauge.
Faulty Sensor: If the sensor itself is malfunctioning, it can send incorrect (and fluctuating) signals, making your gauge read wrong. This is a common culprit for unpredictable gauge behavior.
Wiring Issues: The wiring leading to the ECT sensor can also become damaged or corroded over time, interrupting the signal and causing erratic readings.
This sensor is relatively small and, like the thermostat, is often an affordable part to replace.
6. Radiator Cap Problems: The Unsung Hero
The radiator cap might seem simple, but it plays a critical role in maintaining the pressure within your cooling system. This pressure raises the boiling point of the coolant, allowing it to operate at higher temperatures safely.
Worn Seal: If the rubber seal on the cap is damaged or worn, it can’t hold the required pressure. This allows coolant to escape as steam, leading to a loss of coolant and potential overheating or fluctuating temperatures.
Incorrect Cap: Using the wrong pressure-rated cap for your vehicle can also lead to system inefficiencies.
A bad radiator cap can cause a cascade of cooling system problems, and it’s an inexpensive part to replace.
7. Leaks in the Cooling System: Slow and Steady Losses
Even a small, slow leak can lead to a gradual loss of coolant over time. This will eventually result in low coolant levels, air pockets, and consequently, an erratic temperature gauge.
Common Leak Points: Radiator hoses, heater hoses, the radiator itself, water pump seals, and gaskets are common areas for leaks.
Symptoms: Aside from fluctuating temperatures, you might notice puddles of coolant under your car (often green, pink, or orange), a sweet burning smell, or a constantly low coolant level.
Addressing leaks promptly is key to preventing more serious engine damage.
DIY Troubleshooting: How to Pinpoint the Problem
Before you rush to a mechanic, there are several checks you can perform yourself to get a better idea of what’s going on. These steps are designed for beginners and focus on safety first.
Safety First! Always.
Engine Cold: Never open the radiator cap or touch engine components when the engine is hot. Hot coolant is under pressure and can cause severe burns. Wait at least an hour after parking your car, or until all components are cool to the touch.
Parking Brake: Ensure your car is parked on a level surface with the parking brake engaged.
Gloves and Eye Protection: Wear gloves and safety glasses to protect yourself from dirt, grease, and potential spills.
Step-by-Step Checks For Your Car Temperature Gauge Fluctuating
Here’s how to investigate the common causes:
Step 1: Check the Coolant Level
1. Locate the Coolant Reservoir: Open the hood and find the translucent plastic tank connected to the radiator. It usually has “MIN” and “MAX” or “LOW” and “FULL” markings on its side.
2. Inspect the Level: With the engine completely COLD, view the coolant level against the markings.
3. Observe the Coolant: Note the color and clarity of the coolant. It should be bright and clear (usually green, orange, pink, or yellow, depending on the type). If it’s murky, rusty, or oily, it needs attention.
4. Add Coolant if Needed: If the level is below “MIN,” add the correct type of coolant (check your owner’s manual) or a 50/50 mix of distilled water and antifreeze. Never use plain tap water. Slowly add coolant to the reservoir until it reaches the “MAX” or “FULL” line.
Step 2: Inspect Hoses and Radiator for Leaks
1. Visual Inspection: With the engine cold, carefully examine all visible coolant hoses (thick rubber tubes connected to the radiator and engine). Look for cracks, bulges, soft spots, or leaks at the connection points.
2. Check Radiator: Inspect the radiator for any signs of corrosion or damage. Check the area around the radiator cap for signs of leaks or dried coolant residue.
3. Radiator Cap: Gently remove the radiator cap (again, only when COLD). Examine the rubber seal for cracks or stiffness. Ensure the spring mechanism is intact.
Step 3: Observe the Cooling Fan(s)
1. Start the Engine: Start your car and let it idle. (Ensure you have good ventilation if working in a garage).
2. Warm Up: Allow the engine to warm up. You can do this by letting it idle or by taking a short, slow drive.
3. Monitor the Fan: As the engine temperature gauge starts to rise (or if the AC is on), watch for the cooling fan to kick on. It might be one electric fan or multiple fans located behind the radiator.
4. Fan Operation: If the fan doesn’t turn on as the engine temperature nears the normal operating range, or if it runs constantly even when the engine is cold, there might be an issue with the fan motor, relay, fuse, or temperature sensor controlling it.
Step 4: Check Heater Performance
1. Turn on Heater: Turn your car’s heater to the highest setting (fan speed on high, temperature set to hot).
2. Feel the Air: Does the heater blow hot air consistently?
Cold Air: If you get only cold air even when the engine is warm and the gauge is high, it often points to low coolant or an air pocket in the system, or a faulty thermostat.
Intermittent Heat: If the heat comes and goes with the temperature gauge, it further suggests a circulation or coolant level problem.
Step 5: Listen for Unusual Noises
While the engine is running (and after it cools down), listen for any unusual sounds like:
Gurgling: This can indicate air in the cooling system.
Whining or Grinding: This might suggest a failing water pump bearing.
Essential Fixes for a Fluctuating Temperature Gauge
Based on your troubleshooting, you’ll have a better idea of the likely culprit. Here are the most common fixes, explained simply.
Fix 1: Replacing the Thermostat
This is a very common repair. A new thermostat is usually inexpensive.
Tools You Might Need:
New thermostat (ensure it’s the correct one for your car model)
New thermostat gasket or seal
Socket set or wrenches
Container to catch spilled coolant
Funnel
Gloves and safety glasses
Rags
Steps:
1. Drain Some Coolant: Place a drain pan under the thermostat housing and carefully remove the lower radiator hose or a drain plug (if accessible) to drain enough coolant so the level is below the thermostat.
2. Locate Thermostat Housing: Find the housing, usually a metal or plastic piece where a large coolant hose connects to the engine.
3. Remove Old Thermostat: Unbolt the thermostat housing. It might be a bit tricky to get to. Remove the old thermostat and gasket. Note the orientation of the old thermostat before removing it.
4. Install New Thermostat & Gasket: Clean the mating surfaces of the housing and engine. Install the new thermostat with its new gasket, ensuring it’s oriented correctly (usually there’s a jiggle valve or the pellet faces a certain way – check your repair manual or the new part’s instructions).
5. Reassemble: Reattach the thermostat housing and tighten the bolts evenly.
6. Refill & Bleed: Reconnect the radiator hose (if you disconnected it). Refill the cooling system with the correct coolant mixture.
7. Bleed the System: Start the engine, turn the heater on high, and let it run with the radiator cap off (or bleed screw open) until the thermostat opens (you’ll see coolant circulating) and no more air bubbles come out. This is crucial for preventing future issues. Top off coolant if needed.
Fix 2: Flushing and Refilling the Coolant
If your coolant is old, dirty, or the wrong type, a flush and refill is a great maintenance step.
Tools You Might Need:
New coolant (distilled water and antifreeze, or pre-mixed)
Coolant system flush additive (optional, for very dirty systems)
Drain pan
Hose and nozzle (optional, for flushing)
Funnel
Distilled water
Rags, gloves, safety glasses
Steps:
1. Drain Old Coolant: Locate the radiator drain plug or disconnect the lower radiator hose. Drain all the old coolant into your pan.
2. Flush the System (Optional but recommended for discolored coolant): Fill the system with distilled water. If using a flush additive, follow its instructions. Run the engine for 10-15 minutes with the heater on high. Drain the system again. Repeat with just distilled water until the drained water runs clear.
3. Refill with New Coolant: Mix your antifreeze and distilled water according to the manufacturer’s instructions (typically 50/50) or use a pre-mixed solution. Slowly fill the system through the radiator or reservoir.
4. Bleed the System: This is extremely important! Start the engine with the heater on high. Let it run until it reaches operating temperature and the thermostat opens. Keep an eye on the coolant level in the reservoir and top it off as needed. Open any bleed screws (if your vehicle has them) until a steady stream of coolant flows out, then close them. Once all air is out, you’ll have proper circulation.
Fix 3: Replacing the Engine Coolant Temperature (ECT) Sensor
If you suspect the sensor itself is faulty, it’s usually a straightforward replacement.
Tools You Might Need:
New ECT sensor (correct part for your car)
Socket or sensor socket tool
Wrench
Container to catch any minor coolant drip
Rags, gloves, safety glasses
Steps:
1. Locate the Sensor: The ECT sensor is typically screwed into the engine block or thermostat housing, usually with a wire connector attached. Consult your owner’s manual or a repair guide if you’re having trouble finding it.
2. Disconnect Electrical Connector: Carefully unplug the electrical connector from the sensor. There’s usually a small tab you need to press.
3. Remove Old Sensor: Use the appropriate socket or tool to unscrew the old sensor. Be prepared for a small amount of coolant to drip out.
4. Install New Sensor: Screw the new sensor into place. Make sure it’s snug but don’t overtighten. Some sensors come with thread sealant already applied; others might require a bit of “Teflon tape” or thread sealant appropriate for automotive use.
5. Reconnect Electrical Connector: Plug the electrical connector back onto the new sensor.
6. Test Drive: Start the car and monitor the temperature gauge.
Fix 4: Replacing Radiator Cap and Hoses
These are wear-and-tear items that are relatively easy to replace. A weak radiator cap or cracked hoses can allow coolant to leak or air to enter, both of which can cause the temperature gauge to fluctuate.
Tools You Might Need:
New radiator cap (ensure it’s the correct pressure rating for your vehicle)
New radiator hoses (upper and lower)
Hose clamps (if yours are worn or rusted)
Pliers or hose clamp pliers
Bucket for coolant
Funnel
Rags, gloves, safety glasses
Steps for Radiator Cap:
Ensure Engine is COLD: Never remove a radiator cap from a hot engine—it can spray boiling coolant and cause serious burns.
Remove Old Cap: Simply twist it counterclockwise and lift it off.
Install New Cap: Place the new cap on, pressing down firmly and twisting until it locks into place.
Steps for Radiator Hoses:
Drain Coolant: Place a drain pan underneath the radiator and drain the coolant.
Remove Old Hoses: Use pliers to loosen and slide the clamps away from the hose ends. Gently twist and pull the hoses off.
Install New Hoses: Slide the new hoses onto the fittings and secure them with clamps. Ensure they’re snug and leak-free.
Refill and Bleed: Refill the system with the correct coolant mixture and bleed out any air pockets as described in earlier fixes.
Final Thoughts
A fluctuating temperature gauge usually points to an issue in your car’s cooling system. In most cases, the fix is straightforward: replacing the thermostat, flushing the coolant, swapping a faulty sensor, or addressing worn caps and hoses. By tackling these repairs step by step, you’ll restore stable engine temperatures and protect your engine from overheating or long-term damage.
If the gauge still fluctuates after these fixes, it’s best to consult a professional mechanic—issues like a failing water pump, clogged radiator, or blown head gasket can cause similar symptoms and need expert attention.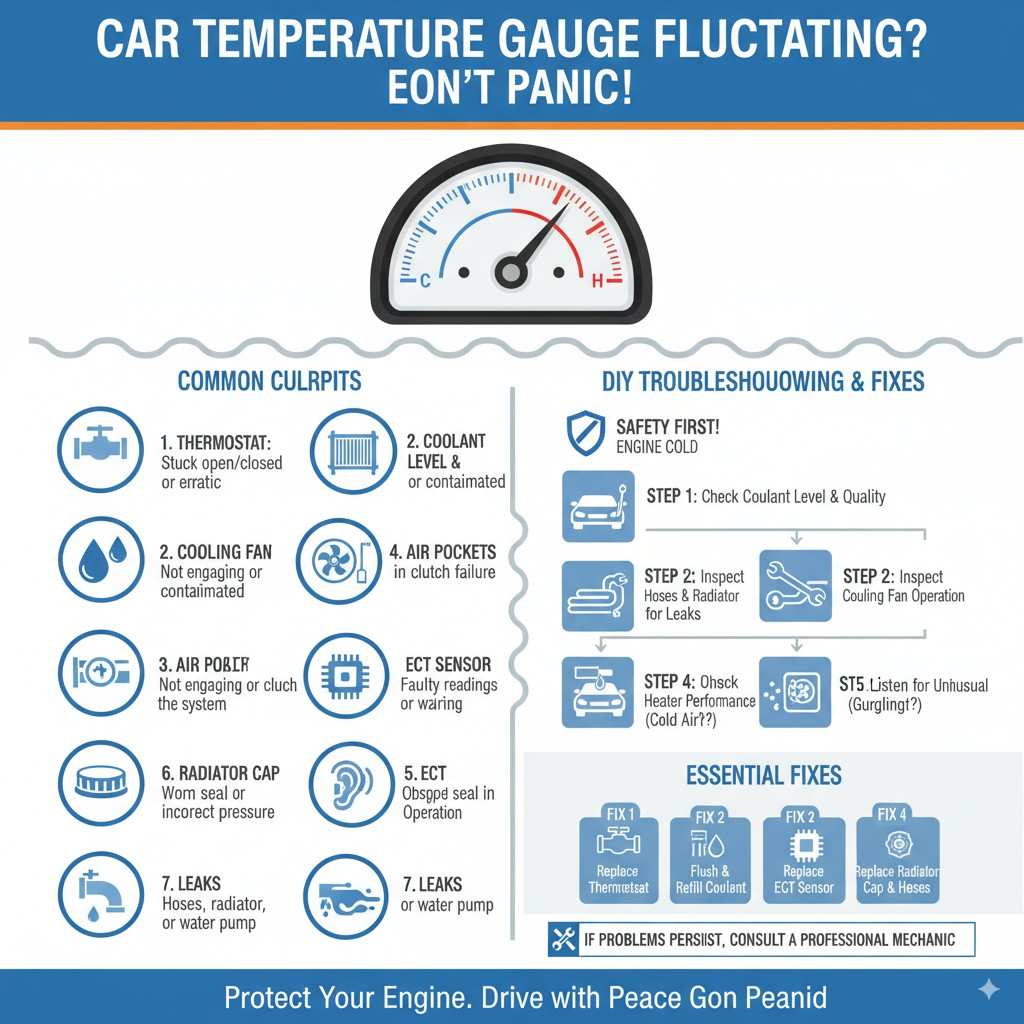
FAQ: Essential Fixes for a Fluctuating Temperature Gauge
1. Why does my car’s temperature gauge keep going up and down?
A fluctuating temperature gauge usually means there’s an issue in the cooling system—such as a faulty thermostat, low coolant, air pockets, a bad sensor, or worn hoses.
2. Can a bad thermostat cause temperature fluctuations?
Yes. A thermostat that sticks open or closed can cause the gauge to swing between hot and cold. Replacing the thermostat often solves this issue.
3. How do I know if my coolant needs to be flushed?
Signs include rusty or dirty coolant, overheating, or a sweet smell under the hood. If your coolant hasn’t been changed in 2–5 years (depending on your vehicle), a flush is recommended.
4. What happens if the engine coolant temperature sensor is bad?
A faulty ECT sensor can send incorrect readings to the ECU and dashboard gauge, making the temperature gauge fluctuate and possibly causing poor engine performance.
5. Can a bad radiator cap cause temperature gauge problems?
Yes. A weak radiator cap can let coolant escape or allow air into the system, both of which cause erratic temperature readings.
6. Is it safe to drive with a fluctuating temperature gauge?
It’s risky. Driving with unstable engine temps can lead to overheating, engine damage, or even a blown head gasket. It’s best to diagnose and fix the problem promptly.
7. How much does it cost to fix a fluctuating temperature gauge?
Costs vary: a new thermostat or sensor is often $20–$80 in parts, while hoses or a radiator cap are usually under $50. Labor may add $100–$300 depending on the repair.
8. What if these fixes don’t solve the problem?
If the gauge still fluctuates, the issue may be more serious, like a failing water pump, clogged radiator, or head gasket leak. In this case, consult a professional mechanic.
Recent Posts
Durable Jeep Wrangler American Flag License Plate Frame for Patriotic Drivers
Have you ever felt frustrated by a plain, worn-out license plate frame on your Jeep Wrangler? It’s a small detail, but it can really affect your vehicle’s look.Every time you see that dull...
Slim Design Audi Black License Plate Frame for Sleek Car Styling
Have you ever struggled with a bulky, noisy license plate frame that just doesn’t fit right? It can be so frustrating when your car’s style feels off or the frame rattles every time you...