
Quick Summary: Yes, you can absolutely adjust coilovers while they are installed on your car! This handy guide will walk you through how to do it safely and effectively, so you can fine-tune your ride height and get the perfect stance for your vehicle without needing to remove the suspension components.
Ever look at your car and wish it sat just a little lower? Or maybe you’ve installed coilovers and now want to make small tweaks to the height? It’s a common thought for many car owners, and the good news is, you don’t always need to be a master mechanic to do it. Adjusting your coilovers can give your car a sportier look, improve handling, and even make parking easier. It might sound complicated, but with the right knowledge and a few tools, adjusting coilovers on your car is totally achievable for most DIY enthusiasts. This guide will break down exactly how to adjust your coilovers step-by-step, making the process clear and stress-free.
Understanding Coilovers: What They Are and Why Adjust Them
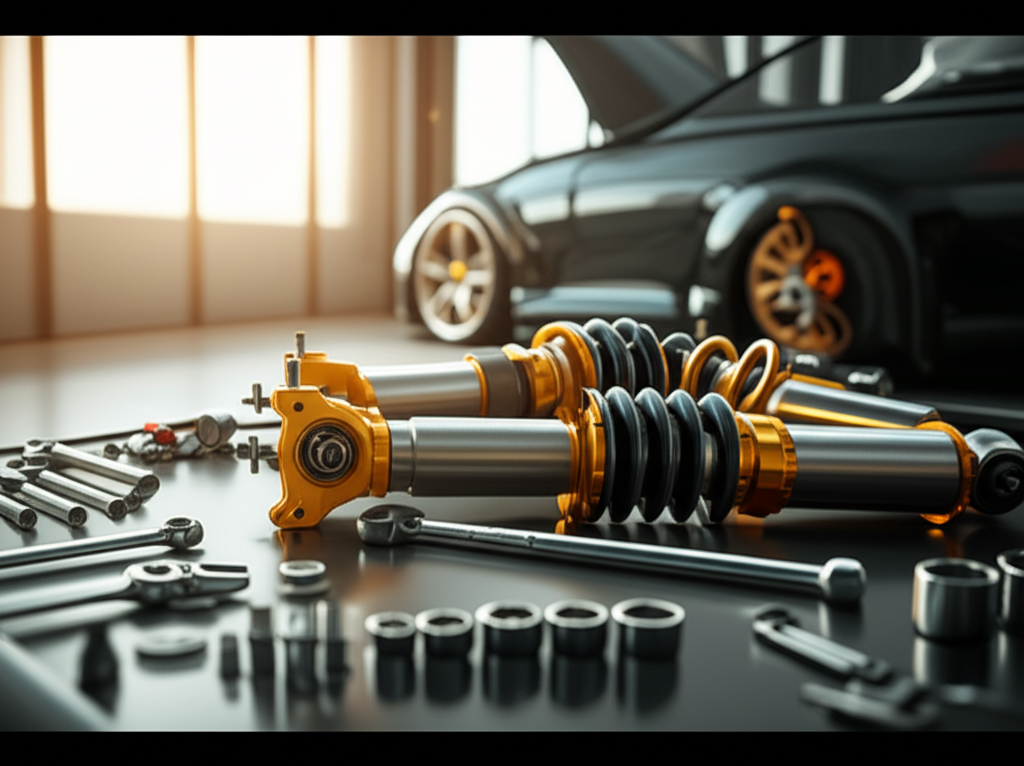
Before we dive into the “how-to,” let’s quickly cover what coilovers are. The word “coilover” is a combination of “coil” (for the spring) and “over” (meaning it goes over the shock absorber). Essentially, a coilover is a complete suspension unit that bundles the shock absorber and the coil spring together. This integrated design is often upgradeable and allows for height and stiffness adjustments, which is why people love them.
Why would you want to adjust them? There are a few common reasons:
- Aesthetic Appeal: Many enthusiasts lower their cars for a more aggressive, sportier look. Coilovers offer precise control over this stance.
- Performance Handling: Lowering your car can reduce its center of gravity. This often leads to less body roll during cornering and improved responsiveness.
- Clearing Obstacles: Sometimes, a slightly raised setting can help prevent scraping on driveways or speed bumps.
- Corner Balancing: For serious performance driving, adjusting each corner’s height can help distribute weight evenly across the tires, optimizing balance and handling.
Can You Adjust Coilovers While They Are On The Car? Yes, You Can!
This is the big question, and the answer is a resounding yes! The primary advantage of most aftermarket coilovers is their adjustability without needing to remove the entire suspension assembly. This makes the process much more convenient and less labor-intensive compared to older or simpler suspension setups.
The adjustment mechanisms usually involve threaded collars that move up or down the shock body. By turning these collars, you change the pre-load on the spring and thus the ride height of the vehicle. It’s important to understand how these collars work to make safe and effective adjustments.
Essential Tools You’ll Need
Gathering the right tools before you start will make the job much smoother. Don’t worry, most of these are common automotive tools:
- Coilover Adjustment Wrenches: These are specialized wrenches designed to grip and turn the collars on your coilovers. They usually come with your coilovers, or you can purchase them from an auto parts store. You’ll typically need two.
- Torque Wrench: Essential for tightening fasteners to the manufacturer’s specifications, ensuring safety and preventing parts from coming loose. You can find these at most auto parts stores.
- Jack and Jack Stands: Crucial for safely lifting your car and supporting it while you work. Never work under a car supported only by a jack. Learning to use these safely is a fundamental skill for DIY car maintenance. For more on safe jacking practices, consult resources from organizations like the National Highway Traffic Safety Administration (NHTSA).
- Wheel Chocks: To prevent the car from rolling when you’re lifting it.
- Gloves: To protect your hands.
- Safety Glasses: Always protect your eyes when working on your car.
- Measuring Tape or Ruler: To ensure consistent height adjustments on all sides.
- Pen and Paper (or Phone): To record your starting measurements and adjustments.
Step-by-Step Guide to Adjusting Coilovers
Let’s get your coilovers adjusted! Follow these steps carefully for a safe and successful outcome.
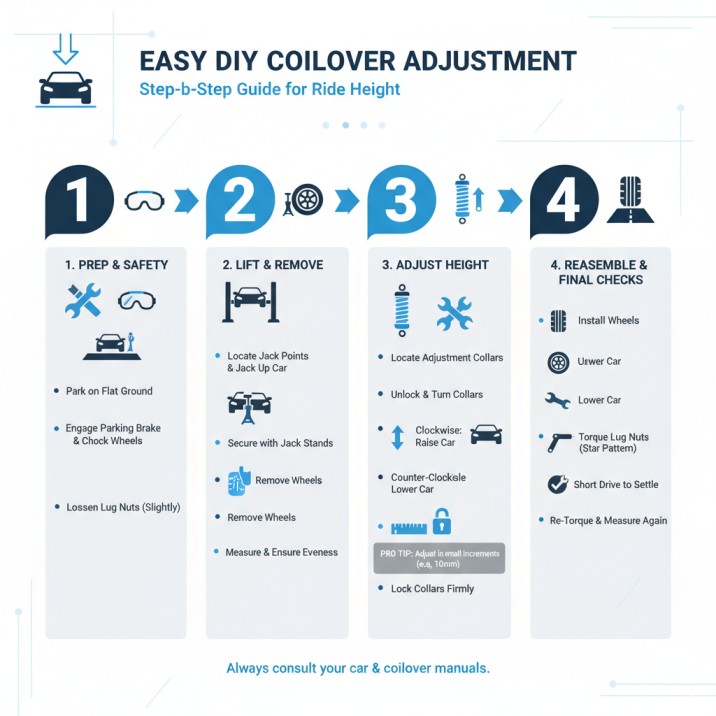
Step 1: Preparation and Safety First
Safety is always the top priority. This is the most critical step.
- Park on a Flat, Level Surface: Ensure your car is on a solid, even surface.
- Engage Parking Brake: Firmly apply the parking brake.
- Chock the Wheels: Place wheel chocks behind the rear wheels if you plan to lift the front, and in front of the front wheels if you plan to lift the rear. This adds an extra layer of safety against rolling.
- Loosen Lug Nuts (Slightly): Before lifting, use your lug wrench to slightly loosen the lug nuts on the wheels you’ll be removing. Just a quarter to half a turn is enough. Don’t remove them yet.
Step 2: Lift and Support Your Vehicle
You need to lift the car enough so the wheels are off the ground, allowing them to hang freely. This relieves pressure on the suspension.
- Locate Jack Points: Consult your car’s owner’s manual for the proper jack points. Using the wrong points can damage your vehicle.
- Jack Up the Car: Place your jack under the designated jack point and lift the car until the wheels you intend to work on are completely clear of the ground.
- Place Jack Stands: Position jack stands securely under the appropriate support points (again, check your manual or a reliable automotive repair guide). Slowly lower the car onto the jack stands. Ensure the car is stable and secure on the stands before proceeding.
Step 3: Remove the Wheels
This gives you direct access to the coilovers.
- Remove Lug Nuts: Fully unscrew the lug nuts you loosened earlier.
- Remove the Wheel: Grip the tire and pull the wheel straight towards you. It might require a bit of wiggling. Set the wheel aside safely.
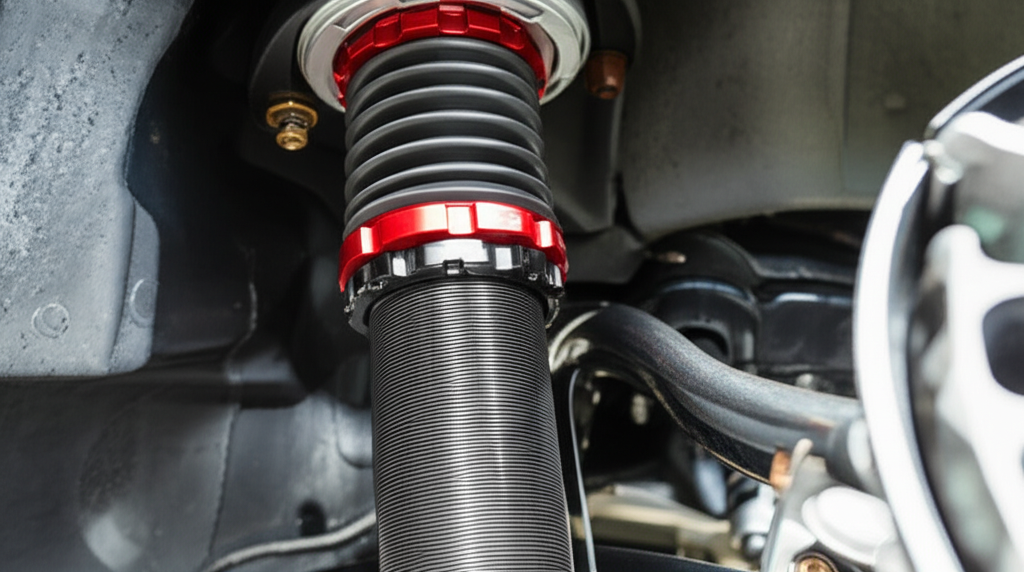
Step 4: Locate the Coilover Adjustment Collars
On your coilovers, you’ll see a spring sitting on a threaded shock body. There are usually two main locking collars that hold the spring perch in place. The lower the collar is screwed onto the body, the lower your car will sit. Conversely, raising the collar will lift the car.
Step 5: Adjusting the Ride Height
This is where the special adjustment wrenches come into play.
- Identify the Lowering Collar: This is the collar closest to the bottom of the shock body.
- Unlock the Collars: There’s usually a locking collar above the main adjustment collar that needs to be loosened first. Use one adjustment wrench to hold the lower collar and the other to turn the locking collar counter-clockwise.
- Adjust the Lowering Collar: Once unlocked, use one or two wrenches to turn the main lowering collar.
- To Lower the Car: Turn the collar counter-clockwise (down the shock body).
- To Raise the Car: Turn the collar clockwise (up the shock body).
- Adjust in Small Increments: Make small adjustments (e.g., one full turn) at a time. You can always adjust more later, but you can’t easily undo lowering too much.
- Achieve Evenness: Measure from the center of the wheel hub to the top of the fender or the center of the wheel bolt hole to the bottom of the fender. You want to make the same adjustments on both sides of the same axle to keep the car level. For example, if you lower the driver’s side by 10mm, you should lower the passenger’s side by 10mm.
- Lock the Collars: Once you’ve made your adjustment, screw the upper locking collar back down firmly against the adjustment collar. This prevents vibrations from loosening the adjustment over time.
Important Note on Preload: Some coilovers have an adjustable spring perch that allows you to set spring preload. Many modern coilovers are designed to be adjusted by simply moving the perches up or down, without altering spring preload. Always consult your specific coilover manufacturer’s instructions. Incorrect preload can negatively affect ride quality and shock life. Resources like local air quality management districts often have information that indirectly touches on vehicle modifications affecting emissions, but for specific mechanical advice, contact your coilover manufacturer directly.
Step 6: Reinstall Wheels and Lower Car
It’s time to put things back together.
- Reinstall Wheels: Mount the wheels back onto the hubs.
- Hand-Tighten Lug Nuts: Screw on the lug nuts and tighten them by hand as much as you can.
- Lower the Car: Carefully jack up the car just enough to remove the jack stands. Then, slowly lower the car back to the ground.
- Torque Lug Nuts: With the car back on the ground, use your torque wrench to tighten the lug nuts in a star pattern. Tighten them to the manufacturer’s recommended torque specification for your car. This is crucial for safety.
Step 7: Check and Repeat for Other Axle
After adjusting one axle (e.g., the front), repeat steps 2 through 6 for the other axle (e.g., the rear) to achieve your desired overall stance. It’s often best to do one axle at a time and then check your progress.
Step 8: Settle the Suspension and Final Checks
New adjustments need to settle.
- Go for a Short Drive: Drive the car gently for a few miles. This allows the suspension to settle into its new positions.
- Re-Torque Lug Nuts: After the short drive and once the wheels are cool, re-torque the lug nuts to ensure they haven’t loosened.
- Measure Again: Park on a level surface and measure your ride height at all four corners.
- Make Fine Adjustments: If needed, repeat the adjustment process for minor fine-tuning.
Understanding Ride Height and Its Effects
Adjusting your coilovers isn’t just about looks; it impacts how your car drives.
| Adjustment | Effect on Ride Height | Potential Impact on Handling/Ride |
|---|---|---|
| Lowering | Decreases ground clearance | Lower center of gravity, reduced body roll, potentially harsher ride, increased risk of scraping. |
| Raising | Increases ground clearance | Higher center of gravity, more body roll, potentially softer ride, improved clearance for obstacles. |
A significant drop in ride height can affect your car’s geometry, potentially leading to:
- Alignment Issues: The angle of your wheels (camber, caster, toe) can change. It’s highly recommended to get a wheel alignment after significant ride height changes to ensure proper tire wear and safe handling. If you’re unsure about alignment, a professional shop can help.
- Suspension Binding: Lowering too much can cause suspension components to bind or hit other parts of the car, leading to damage.
- Reduced Suspension Travel: The shocks and springs have less room to move, which can result in a rougher ride and potentially bottoming out.
For more detailed advice on vehicle suspension and alignment, the Society of Automotive Engineers (SAE) provides technical papers and standards that can be very informative, although often technical.
Common Mistakes to Avoid
Even with a clear guide, some common pitfalls can trip people up. Being aware of them can save you time and hassle.
- Not Securing the Vehicle Properly: This is the most dangerous mistake. Always use jack stands and wheel chocks.
- Adjusting Only One Side of an Axle: Always make symmetrical adjustments on the left and right sides of an axle to prevent uneven handling and potential tire wear.
- Lowering Too Much: Trying to get the car “slammed” without considering suspension travel, exhaust clearance, or driveshaft angles can lead to costly damage and poor drivability.
- Forgetting to Lock the Collars: If the collars aren’t locked, vibrations can cause your ride height to change over time.
- Skipping a Wheel Alignment: Significant lowering or raising can throw off your alignment. A professional alignment ensures safety and optimal tire wear.
- Not Consulting Manufacturer Instructions: Different coilover brands have specific adjustment procedures or recommendations. Always check their manual.
When to Seek Professional Help
While adjusting coilovers on the car is a common DIY task, there are times when it’s best to let a professional handle it:
- Unsure about Safety: If you’re not comfortable with the lifting and supporting procedures, a shop can do it safely.
- Persistent Issues: If you’ve adjusted them and are experiencing strange noises, vibrations, or handling problems, a mechanic can diagnose the issue.
- Complex Suspension Setups: Some high-performance or custom suspension systems might require specialized knowledge.
- Wheel Alignment: After significant changes, getting a professional wheel alignment is strongly recommended for safety and tire longevity.
FAQ Section
Here are some common questions beginners have about adjusting coilovers.
Q1: How much can I lower my car with coilovers?
A1: Most aftermarket coilovers offer a drop of 1 to 3 inches (2.5 to 7.5 cm) from the stock ride height. However, “how much” depends on the specific coilover kit designed for your vehicle and your personal preference. Dropping too low can cause drivability issues and damage.
Q2: Do I need to remove the wheels to adjust coilovers?
A2: No, you don’t have to remove the wheels, but it makes the process much easier and safer. You need to lift the car so the wheels hang free, and it’s often difficult to access and turn the collars with the wheel in place.
Q3: How often should I check my coilover adjustments?
A3: After making initial adjustments and after the suspension settles, it’s good practice to check your lug nut torque and ride height periodically, especially during the first few weeks. Subsequent checks can be part of your regular maintenance schedule, perhaps every few months or before and after long trips.
Q4: Will adjusting my coilovers affect my alignment?
A4: Yes, changing the ride height significantly will almost always affect your wheel alignment (camber, caster, toe). It’s highly recommended to get a wheel alignment done by a professional shop after any noticeable ride height adjustments to ensure safe handling and prevent uneven tire wear.
Q5: Can my coilovers adjust rebound or compression?
A5: Some higher-end coilovers have separate adjustments for damping (rebound and compression). Ride height is adjusted by the collars on the shock body, while damping is typically adjusted via knobs or screws on the shock absorber itself. Always refer to your coilover manufacturer’s manual for specific features and adjustment procedures.
Q6: What is spring preload, and do I need to adjust it?
A6: Spring preload is the initial tension on the spring when the suspension is at full droop. On many modern coilovers, ride height is adjusted by moving the spring perch, and preload is set by the manufacturer to a specific value that ensures proper suspension function. Adjusting preload incorrectly can negatively impact ride quality, handling, and component lifespan. Unless your manufacturer’s guide explicitly states to adjust preload for ride height, it’s best left untouched.
Understanding your specific coilover system is key. For instance, even general automotive guides can have regional differences in recommendations. For example, in areas with strict emissions regulations, modifications are sometimes scrutinized. While not directly related to coilover adjustment, it’s a reminder to be aware of local regulations or recommendations that might pertain to vehicle modifications.
Conclusion
Adjusting your coilovers while they’re on the car is a perfectly viable and common modification that many car owners can accomplish with a bit of patience and the right approach. By following these careful steps, prioritizing safety, and understanding the impact of your adjustments, you can achieve that desired stance and potentially enhance your car’s handling characteristics. Remember to always work safely, double-check your work, and consider a professional wheel alignment afterward. Enjoy your newly refined ride!
Recent Posts
10 Best License Plate Frames for Popular Cars: Stylish & Durable Picks
Have you ever struggled with a loose or rusty license plate frame that just won’t stay put? It’s frustrating when your car’s look feels unfinished or when a noisy frame distracts you on every...
Best Tesla Model 3 & Model Y License Plate Frames No Drill Options
Have you ever struggled with installing a front license plate on your Tesla Model 3 or Model Y? Drilling into your sleek car’s bumper can feel wrong and risky.It’s frustrating to think about...